Threading of Lawnmower Blade Bolts: We understand the intricacies involved and have the expertise to assist you. Rest assured, we’ve got you covered.
Does threading of lawn mower blade bolts matter:
Yes, understanding the threading of lawn mower blade bolts is crucial for every gardener. It’s key to know if your mower uses forward or reverse threading. This knowledge prevents damage during maintenance. Always adhere to torque specifications when reattaching blades for optimal mower performance and safety.

Stay ahead in your gardening journey. Find out why threading of lawnmower blade bolts is a must-know for every gardener.
Contents
- 1 Threading of Lawnmower Blade Bolts
- 1.1 • Lawnmower Blades Maintenance Tips
- 1.2 • Importance of Regular Maintenance
- 1.3 • Understanding Reverse Threading and Standard Threading
- 1.4 • Lawn Mower Blade Threading: Is It Standard or Reverse?
- 1.5 • Identify Threading Direction from the Mower’s Discharge Chute
- 1.6 • Threading Systems of Various Lawn Mower Brands
- 1.7 • Safety Measures During Blade Removal
- 1.8 • Step-By-Step Guide to Remove a Lawn Mower Blade
- 2 Understanding Lawn Mower Blade Nuts
- 3 Torque: A Key Factor in Bolt Maintenance
- 3.1 • The Magic of Penetrating Oil
- 3.2 • Working with Mower Blades: Safety is Paramount
- 3.3 • Understanding Bolt Directions for Mower Blades
- 3.4 • Regular Blade Check: A Must-Do
- 3.5 • Utilize a Socket Wrench
- 3.6 • Blocking the Blade
- 3.7 • Clean the Underside of the Mower Deck
- 3.8 • User Manual: Your Best Resource
- 3.9 • Remember: Wear Protective Gear
- 3.10 • Blade Replacement Tips
- 3.11 • Summary
- 3.12 • Determining Bolt Threading in Lawn Mowers
- 3.13 • Importance of Proper Tool Usage
- 3.14 • Deciphering Mower Blade Threading Type
- 3.15 • Threading Type Variables
- 3.16 • Understanding the Function of Reverse Threading
- 3.17 • Advantages of Forward-Type Mowers
- 3.18 • Timeliness in Replacing Mower Blades
- 3.19 • Different Threading Directions Among Different Lawnmower Brands
- 3.20 • Lawnmower Blade Removal Safety Guidelines
- 3.21 • Disconnect Power and Spark Plug
- 3.22 • Blade Removal Process
Threading of Lawnmower Blade Bolts
One minor detail many people might not consider when it comes to lawn mower maintenance is understanding the threading of lawn mower blade bolts. These components may seem small, but they play a crucial role in the safety and compatibility of your lawn mower blade.
– Forward Threading on Blade Bolts
Let’s explore the dynamics of forward threading. Forward threading, the most common type, requires a clockwise turn to tighten the bolt. Therefore, a counterclockwise turn will work to loosen it.
This threading type adheres to the universal rule of “righty tighty, lefty loosey,” which most people are familiar with from basic handiwork.
– Understanding Reverse Threading
On the other hand, reverse threading bucks the usual trend. To tighten a bolt with reverse threading, a counterclockwise turn is needed. To loosen, the bolt requires a clockwise turn. This can be counterintuitive and, therefore, may require extra attention during maintenance procedures.
– How to Determine Threading Type
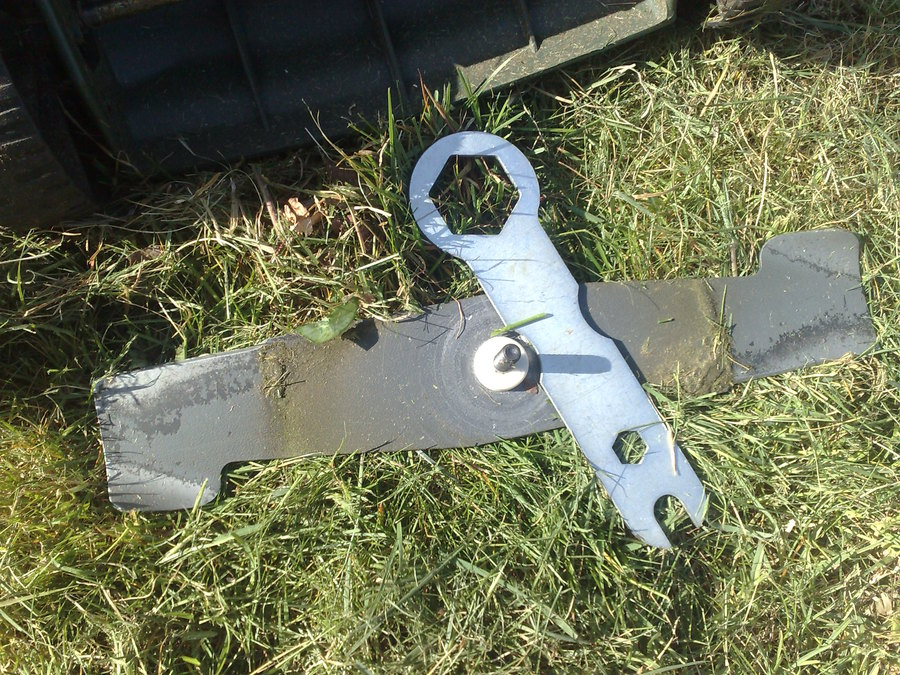
There are a couple of ways to determine the threading type on your lawnmower blade bolts. The first method involves using a socket wrench. By carefully observing the direction that tightens the bolt, you can figure out whether it’s forward or reverse-threaded.
Alternatively, you may refer to the user manual that came with your lawnmower. Manufacturers generally specify details about the threading type of the blade bolts in these manuals.
– Misconceptions about Threading
A common misconception is that all lawnmower blade bolts are reverse threaded. This is not true. Both forward and reverse-threaded bolts are utilized in various models of lawnmowers.
– Pros and Cons of Forward and Reverse Threaded Bolts
There are advantages to both forward and reverse-threaded blade bolts. Forward threading is generally more intuitive to use, making maintenance easier. Meanwhile, reverse threading can help in reducing the risk of bolt loosening due to the spinning of the blades, thereby enhancing safety.
However, it’s essential to understand the specifics of your lawnmower and adapt to its needs accordingly.
• Lawnmower Blades Maintenance Tips
A lawnmower blade is due for replacement after a certain number of operating hours. This number can vary depending on the model of your lawnmower and the intensity of usage. Make sure to refer to your user manual for details.
Now, you might wonder why blade replacement is necessary. Well, a dull blade can strain your lawnmower engine and does not provide a clean cut, thereby affecting the health of your lawn.
Oregon State University’s guide provides valuable insights on maintaining your lawnmower for optimal performance.
• Importance of Regular Maintenance
Regular lawnmower maintenance and timely blade replacement are paramount for optimal performance. It ensures efficiency and helps prevent the premature deterioration of your lawnmower.
Remember, each detail matters, right down to the threading on your lawnmower blade bolts. It’s these smallest components that often contribute significantly to the overall functioning and performance of your lawnmower.
It’s through diligent maintenance and a thorough understanding of each part’s function that we can get the best out of our lawnmowers and ensure they serve us well for an extended period.
• Understanding Reverse Threading and Standard Threading
First, let’s clarify the primary difference between reverse threading and standard threading. Standard threading, or right-hand threading, is the most frequent type found in screws and bolts. In this system, you tighten the screw by turning it to the right and loosen it by turning it to the left.
On the other hand, reverse threading, also known as left-hand threading, works in the exact opposite way. Instead, you tighten the screw or bolt by turning it to the left and loosen it by turning it to the right.
• Lawn Mower Blade Threading: Is It Standard or Reverse?
Now, when it comes to lawn mower blades, there’s a misconception that all of them are reverse threaded. The truth is the threading can vary depending on the manufacturer. Some lawnmowers may indeed have reverse-threaded blades, but others do not.
To ascertain the threading of your lawn mower blade, you can either check the operator’s manual, where the information should be listed, or observe the blade’s direction of rotation.
• Identify Threading Direction from the Mower’s Discharge Chute
Another helpful tip to determine the threading direction of your lawn mower blade is to look at the position of the mower’s discharge chute.
If your system is right-hand threaded, the discharge chute will typically be on the right side of your mower. This can be a useful indicator if you have lost your operator’s manual or are unsure of the blade’s rotation direction.
• Threading Systems of Various Lawn Mower Brands
To give you an idea about the threading systems of different lawn mower brands, let us explore some popular ones. Brands like John Deere, Toro, Cub Cadet, Craftsman, Troy Bilt, Gravely, and Bush Hog are favorites among gardening enthusiasts.
While some of these brands use standard threading in their lawnmowers, others equip their models with reverse threading.
It’s also important to note that some brands may use different threading systems in various models, so always double-check with the operator’s manual or contact the manufacturer directly if you are unsure about your specific model.
Oregon State University offers a great guide on mower maintenance where you might find additional helpful information.
• Safety Measures During Blade Removal
Before we dive into the steps involved in removing a lawn mower blade, let’s emphasize some crucial safety measures.
First, always wear safety glasses and gloves to protect yourself from flying debris and sharp edges. Also, use a block of wood to secure the blade when removing it, preventing the blade from rotating and causing harm.
• Step-By-Step Guide to Remove a Lawn Mower Blade
Here’s a step-by-step guide to safely and effectively remove a lawn mower blade.
- Disconnect the Spark Plug: Always start by disconnecting the spark plug to avoid accidentally triggering the mower.
- Protect the Gas Tank: With the spark plug disconnected, cover the gas tank opening with a plastic bag to prevent any fuel from spilling out while you’re working.
- Tip the Mower On Its Side: Carefully tip the mower on its side to gain access to the blade.
- Note Blade Orientation: Before you begin removing the blade, take note of its orientation to ensure the new one is installed correctly.
- Loosen the Blade Nut: Using a wrench, gradually loosen the blade nut. Remember, the nut may be reverse threaded, so inspect the thread direction beforehand.
- Clean the Mower Deck: Once the blade is removed, take the opportunity to clean the underside of the mower deck by removing grass clippings and other debris.
- Install the Replacement Blade: Finally, install the new blade in the correct orientation then carefully tighten the blade nut.
This entire process will be smoother if you know whether your mower blade uses standard or reverse threading ahead of time. So, understand your equipment, stay safe, and maintain your lawn like a pro.
Understanding Lawn Mower Blade Nuts
• Right and Reverse Threading
Predominantly, lawn mower blade nuts adopt the right-hand or clockwise threading, with the standard practice of loosening them in a counterclockwise direction. However, some models instead use what is known as reverse threading.
To explain further, reverse threading refers to when the threads of the nut are designed in the opposite direction, thus, the nut tightens or loosens in the opposite, or counterclockwise direction.
• Brands With Non-Reverse Threaded Nuts
Though many models work with the common right-hand thread nuts, there are also brands that do not have reverse threaded nuts. Examples include renowned brands like John Deere and Toro.
This isn’t an exhaustive list, but it is helpful to be aware and double-check your specific lawn mower brand’s specifications.
• User Manual Guidance
Many users might wonder how to confirm if their lawn mower uses reverse thread blades. The key lies in the user manual that comes with your lawn mower. The manual will typically document the specific details about the blade nuts, including their threading direction.
To locate this information, look under the sections describing mower maintenance or blade replacement. However, some manuals may use technical language. Terms like ‘right-hand thread’ or ‘counterclockwise threaded’ are clues to guide you.
In case of any difficulty understanding the terminology, it’s always a good idea to consult with a lawn equipment expert or the manufacturer’s customer service.
• Importance of Wearing Gloves
Working on lawn mower blades isn’t a task to be taken lightly, hence the emphasis on wearing gloves. The rationale behind this safety measure lies in the sharpness and rusty nature of the blades. They can easily cut or scrape unprotected hands.
Furthermore, in the case of old or rusty blades, direct contact could pose a risk of tetanus infection. Therefore, it’s not just advised but necessary to wear sturdy gloves while handling lawn mower blades.
• Disposing of Old or Damaged Lawn Mower Blades
Another aspect often overlooked during lawn mower maintenance is the correct disposal of old or damaged blades. Most communities have strict guidelines for disposing of hazardous waste, which can include sharp objects like lawn mower blades.
Some local recycling centers or scrap yards may accept these blades but always call ahead to confirm. For further guidance, consult your local waste management facility or visit the Environmental Protection Agency’s website EPA.
• Cleaning the Mowing Deck
When you remove the lawn mower blade, it also presents the perfect opportunity to clean the underside of the mowing deck. This step, while optional, is highly beneficial in maintaining the performance and longevity of your mower.
Over time, the underside of the mowing deck can accumulate hardened grass clippings, dirt, or rust, which can adversely affect the mower’s cutting efficiency. Cleaning this off with a scraper or stiff brush can help keep your mower in peak condition. Just remember to wear those gloves!
In conclusion, a proper understanding of the type of blade nuts, adherence to safety measures, and meticulous cleaning can extend the functional life of your lawn mower.
While this article primarily pertains to lawn mowers, it’s broadly applicable as a good practice for various types of outdoor power equipment maintenance. Always remember that being informed and cautious reaps the best results.
Torque: A Key Factor in Bolt Maintenance
When it comes to the maintenance of your mower, adhering to the recommended amount of torque for bolt tightening is imperative.
The mower’s owner’s manual provides these specifications, and it’s crucial not to overlook this step. Torquing the bolts to their designated levels ensures the mower’s optimal functioning and elongates its lifespan.
From my experience, it’s worth investing in a torque wrench if you don’t already own one. These handy tools provide the precise tightening force you need to comply with the manufacturer’s specifications.
• The Magic of Penetrating Oil
Let’s face it, stubborn bolts can be incredibly frustrating to deal with. Penetrating oil is your best ally during these moments. Apply a fair quantity of this lubricant to the bolt, then patiently let it soak before attempting bolt removal.
In my experience, giving the penetrating oil sufficient time to seep into the bolt’s threads genuinely does wonders.
Not only does it facilitate the removal process, but it also preserves the bolt’s integrity by reducing the chance of stripping its threads, some of the best penetrating oils can be found on the .edu site.
• Working with Mower Blades: Safety is Paramount
While you may feel invincible with your gloves on, you must remember that safety is your top priority. Always wear work gloves when removing mower blades.
The blades are sharp, potentially harmful objects that can leave nasty cuts if mishandled. Work gloves, preferably ones with a thick lining and a snug fit offer your hands the protection they need throughout blade removal.
• Understanding Bolt Directions for Mower Blades
In the world of mowers, bolt directions aren’t always straightforward as one might assume. Generally speaking, the bolt on a mower blade is threaded in the standard ‘righty tighty, lefty loosey’ direction.
When it’s not mentioned in the owner’s manual, it’s safe to make this assumption. However, it’s essential not to force a stubborn bolt in an adverse direction, which can lead to complications.
In my experience, if a bolt resists easy removal, it’s better to double-check its threading direction before applying additional force. Take a careful look at your mower’s design and check its model on the manufacturer’s website for more specific information.
In conclusion, following the owner’s guide’s instructions in terms of torque can impact significantly in preserving your mower’s blades and bolts. Couple that with the correct use of penetrating oil and the right bolt handling knowledge, and you’ll experience an easier and smoother maintenance process.
Remember, the standard threading is usually to the right. However, exceptions are not unheard of. Thus, create a rule of thumb – when uncertain, check with the manufacturer’s specifications. It will save you potential hassles down the line.
• Regular Blade Check: A Must-Do
Regular maintenance of your lawnmower includes checking the blade for any signs of damage or wear. This not only assures the effectiveness of the machine but also ensures your personal safety.
A dull or damaged blade can result in uneven cutting of your grass and put additional strain on your mower’s engine. Throughout the mowing season, make this a routine practice. Even the smallest crack can escalate into a major problem.
A damaged blade can rupture when spinning at a high speed, causing serious harm not just to your mower but potentially posing a risk to you as well. As the University of Illinois advises, always respect and maintain your lawnmower’s safety measures.
• Utilize a Socket Wrench
Loosening the blade retaining bolt on a mower is no easy task. It is simplified by using a socket wrench or socket set. This set of tools provides the necessary torque to easily unbolt the securing blade fixture. Make sure to select a wrench that matches the size of the bolt to avoid stripping its edges.
• Blocking the Blade
While loosening the bolt, however, the blade may try to turn along. It’s crucial to block this from happening. You can use a piece of solid wood or a dedicated blade-lock tool to hold the blade in place. This not only eases the loosening procedure but also prevents any inadvertent injuries.
• Clean the Underside of the Mower Deck
Once you have successfully removed the blade, a good practice is to clean the underside of the mower deck. Over the course of mowing, it tends to accumulate layers of grass cuttings and debris. This buildup hampers the overall efficiency of your machine and its cutting ability.
A simple scrub brush and water can effectively clean the deck. However, before performing this operation, ensure the machine has cooled down completely to avoid burns.
• User Manual: Your Best Resource
Lastly, your lawnmower’s user manual is your best guide for blade removal and replacement specifics. Each model varies with its structure and the method to handle it differs accordingly.
Consulting it prior to commencing work can save a lot of time and prevent errors. Safety precautions, in particular, should never be overlooked in order to assure a risk-free blade change.
• Remember: Wear Protective Gear
While undertaking any maintenance work on the lawnmower, it is advisable to wear appropriate protective gear.
This includes safety gloves to protect your hands, especially while handling the blade, and protective eyewear to prevent any accidental injuries that might occur during the blade removal or installation process.
• Blade Replacement Tips
Keep a spare blade handy: It’s always a good idea to keep a spare blade on hand. This allows you to replace a dull or damaged blade immediately, ensuring your mower is always ready to use.
Regular sharpening: Ensure your blades are regularly sharpened. Depending on how often and how large an area you mow, blades can be sharpened once or twice a year.
• Summary
To ensure the optimal performance of your lawnmower and secure operation, taking meticulous care of the blade is paramount. Incorporate regular blade checks, utilize the right tools, refer to the user manual, and always give the underside of the mower deck a good clean.
Remember, a well-maintained lawnmower blade not only helps create a clean, healthy lawn but also extends the life of your machine. Maintaining lawn tools is not just about being responsible but also about safety, efficiency, and reliability.
• Determining Bolt Threading in Lawn Mowers
In the world of lawn mowers, understanding the thread pattern your mower blade features is crucial. For a forward thread bolt, you require a counterclockwise motion to loosen it, and a clockwise motion for tightening.
But why is this relevant? Well, before you start working on your mower blade, knowing the direction to turn the wrench will save you from damaging the bolt or blade, ensuring the longevity of your device.
• Importance of Proper Tool Usage
Not unlike other pieces of machinery, using the correct tools for inserting and removing bolts in your lawnmower is instrumental in maintaining safety. Each bolt requires a specific tool for both insertion and removal.
When you use the appropriate tool, you reduce the chances of slipping, which could lead to potential harm or damage to your lawnmower. Always remember to prioritize safety first.
The Occupational Safety and Health Administration regularly publishes information on correct tool usage that is useful for everyone.
• Deciphering Mower Blade Threading Type
At times, it becomes essential to observe the motion of the wrench handle to ascertain the threading type. Some manufacturers may label their products with this information, but this is not always the case.
When the label is missing or unclear, this is an effective method for identifying thread type. Also, checking the angle of the blade to the discharge chute can provide you with clues regarding the threading type.
• Threading Type Variables
One thing to remember is that threading type can widely vary depending on the manufacturer and model of the lawnmower. This variability presents another reason why understanding threading is pivotal.
To quickly identify, you can always look through the manufacturer’s guide or directly contact the manufacturer for accurate information.
• Understanding the Function of Reverse Threading
Blade bolts with reverse threading are notably designed for easy removal and to prevent blade loosening. This feature enhances the safety and efficiency of your lawnmower, making maintenance tasks less daunting.
However, make sure to verify whether your mower uses reverse threading or not to avoid confusion during the removal or attachment of the blade.
• Advantages of Forward-Type Mowers
Forward-type mowers offer more efficiency and provide cleaner cuts compared to other mower types. They expel grass clippings and debris from the deck, making them a safe choice, especially for larger, more intensive mowing tasks.
Due to their safety and efficiency, it is generally recommended to choose a forward-type mower when purchasing a new lawnmower.
• Timeliness in Replacing Mower Blades
Just like any other part of your lawnmower, its blade needs replacement after a certain operating time. Typically, this is after 100 to 200 operating hours.
Consistently monitoring the sharpness of your blade will ensure that your mower can carry out its job properly. It’ll also prevent potential accidents that could occur because of dull blades.
– Choosing a Durable Blade
A durable blade made of metal and alloy can easily last up to 400 hours, depending on your usage and maintenance. Always go for blades from reputable manufacturers and avoid cheap knock-offs.
These blades may be pricier, but their durability and performance make them well worth the investment in the long run. Always remember, a premium blade is a recipe for a splendidly looking lawn.
In conclusion, understanding the basics of lawnmower threading can save you time, ensure your safety, and increase your efficiency when you’re maintaining your yard.
Always make sure to refer to the manufacturer’s guidelines, use appropriate tools, and understand the type of threading on your lawnmower to avoid damaging your mower or, worse, causing an injury.
• Different Threading Directions Among Different Lawnmower Brands
Each brand of lawnmower has a distinctive feature that sets it apart from the others. One of these features is the threading direction of the mower blades. This is an important aspect to note as it affects how one may install or remove the blades.
For instance, John Deere is a popular lawnmower brand renowned for its quality equipment. For these mowers, the blades have typical threading, which means they tighten to the right and loosen to the left.
This is how most traditional screws and bolts work. Similar to John Deere, other lawnmower brands with normal threading include Cub Cadet, Toro, and Troy Bilt.
Contrarily, Craftsman blades are designed with reverse threading. In simple terms, this blade follows the lefty tighty, righty loosey rule when it comes to installation or removal.
This might be unconventional to some users but Craftsman opts for it to reduce the likelihood of the blade loosening while the mower is in motion.
Another interesting threading direction is exhibited by Gravely blades. These blades utilize right-hand threading, which is similar to normal threading but requires careful handling due to the distinct blade design.
Finally, Bush Hog stands out with its blade bolts that are decidedly reverse threaded. Ensure this is at the back of your mind when handling blades from this brand.
• Lawnmower Blade Removal Safety Guidelines
Before we dive into the step-by-step process of blade removal, there are safety precautions that need to be emphasized.
Foremost, always wear safety goggles and thick, protective gloves. These will protect your eyes from any dust or debris and your hands from any sharp edges of the blades respectively.
• Disconnect Power and Spark Plug
Next, disconnect the spark plug or power supply to prevent the machine from accidentally starting up. This minor precaution can prevent major accidents. This can also be a great practice for maintaining your lawnmower.
More about lawnmower maintenance can be found on this University of Arkansas webpage that highlights the importance of regular lawnmower care.
• Blade Removal Process
Once you have adhered to the safety guidelines and disconnected your power source, the actual process of blade removal can start.
To begin, tip the mower on its side. By doing so, you are creating a safe and convenient workspace for yourself.
Next, wedge the blade with a block of wood to keep it stable. This allows for a firm grip of the bolt and blade when you take out the blade or put a new one in.
To remove the blade, start by loosening the blade nut. Remember that the threading direction will differ from brand to brand, as mentioned in the first section of this article.
After removing the blade, the underside of the mower should then be cleaned. This is because the piled-up grass cuttings and debris can interfere with the blade’s performance and the overall operation of your mower.
The final step involves installing the replacement blade. Do this carefully and make sure to tighten it to the manufacturer’s specifications. If the blade is not properly positioned and torqued, it can result in uneven grass cutting or even damaging your mower.
Therefore, understanding your particular brand’s specifications is crucial for successful blade installation. You can usually find these details in the user manual that came with your lawnmower.
Overall, lawnmower blade maintenance involves not only the correct understanding of your blade’s threading direction but also observing recommended safety precautions. It is key to always disconnect the power source before starting and to wear suitable protective gear.
A simple, consistent monitor and care of your blade will ensure the longevity of your mower and a neatly trimmed lawn.
Can not knowing the threading of my lawnmower blade bolts cause damage to my mower?
Ensuring the correct threading of your lawnmower blade bolts is vital for your mower’s safety and performance. Feel free to reach out if you need assistance with any maintenance queries.
Is there a way to easily identify the threading of my lawnmower blade bolts?
Dear Ronnie Dean, please refer to your lawnmower’s manual or observe the direction that tightens the bolt with a socket wrench to identify the threading easily. Stay safe and enjoy gardening!
Is it safe to remove and replace lawnmower blade bolts by myself?
Yes, understanding the threading of lawnmower blade bolts is crucial for safety and longevity. With the right tools and knowledge, you can safely remove and replace them yourself. Happy gardening!
This article was very informative and helpful to understand the importance of knowing the threading of lawnmower blade bolts.
Thank you, Ben! We’re glad you found the article helpful in understanding the importance of lawn mower blade bolt threading. Remember, we’re here to assist with any questions you may have. Happy mowing!
Do different lawnmower brands use different threading for their blade bolts?
Yes, different lawnmower brands may use different threading for their blade bolts. Always refer to the user manual or contact the manufacturer for specific details. Stay informed for optimal performance.
I didn’t realize the threading of the blade bolts on my lawnmower could impact its performance. Thanks for sharing this information.
Thank you, Emily! We’re thrilled to have been able to provide you with valuable information on lawnmower blade bolts threading. Happy to help you optimize your lawnmower performance.
I appreciate the detailed explanation about forward and reverse threading of lawnmower blade bolts. It’s something I never thought about before.
Thank you for your kind words, Charlene! We’re glad you found the information on threading of lawnmower blade bolts helpful. Stay safe and keep gardening!
Are there specific tools I need to have to properly maintain the blade bolts on my lawnmower?
Gabriella, understanding the threading of lawnmower blade bolts is crucial. Use a socket wrench to determine if your mower uses forward or reverse threading. Torque specs are essential for optimal performance. Stay safe!
Is it common for lawnmower blade bolts to have reverse threading?
Yes, lawnmower blade bolts can have reverse threading. Knowing this is key for proper maintenance. Refer to your manual or observe the bolt’s motion for confirmation. We’re here to help.
Should I be worried if I don’t know the threading of my lawnmower blade bolts?
Ricky, knowing the threading of your lawnmower blade bolts is crucial for maintenance. Check your user manual or observe the tightening direction. Safety first!
How often should I replace my lawnmower blade bolts?
Understanding the threading of your lawnmower blade bolts is key. It’s crucial to know if your mower uses forward or reverse threading for maintenance. Adhere to torque specifications for optimal performance.
Should I always follow the torque specifications when reattaching the blade bolts on my lawnmower?
Yes, always follow torque specs for blade bolts on your lawnmower for optimal performance and safety. It’s a crucial step in maintenance to prevent damage and ensure longevity.
As a novice gardener, I found this article very enlightening. It’s great to know that something as small as the threading of bolts can make a big difference.
Thank you for your kind words, Austin! I’m glad you found the article enlightening. Remember, understanding the threading of lawn mower blade bolts is crucial in maintaining your mower. Happy gardening!
What are some signs that indicate it’s time to replace the blade bolts on my lawnmower?
We recommend checking the threading direction and adhering to torque specifications to ensure optimal performance and safety. Regular maintenance is key to a healthy lawn and a well-functioning mower.