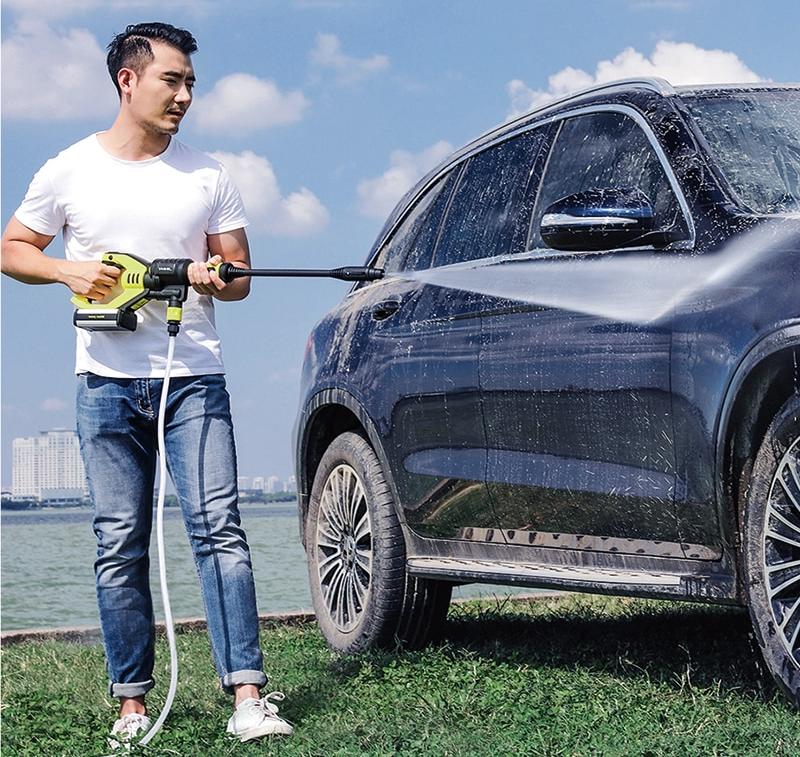
In this blog post, I will discuss a simple method to remove the hose from your pressure washer without any professional assistance. With the passage of time, the hose that supplies the water to your pressure washer may crack, get damaged, wear out or leak. You will have to purchase a new hose and replace it to prevent the wastage of water.
Disconnecting the hose from your pressure washer is as simple as tightening or loosening the thread from either side of the assembly. If you find any signs of corrosion on the hose of your pressure washer, you must slide the plastic sheaths away from the coupler using an adjustable plier to rotate it carefully. You must then unthread and remove the hose from the trigger and pump of your pressure washer.

Scroll on to read the details of the step by step guide to remove the hose from your pressure washer.
Always remember to remove the excessive pressure inside the wand before planning to disassemble the hose. After you have finished pressure washing, turn the machine off. Never try to change the hose, nozzle, or the spray gun while the pressure washer is still on.
Make sure all the pressure inside is fully released before trying to replace any of its attachments. If you try to replace any attachment while there is some pressure inside the washer it will directly be released on your hand, especially your fingers. Make sure that your pressure washer has fully cooled down and is safe to disconnect the hose.
Contents
- 1 Step by step guide to removing the hose from your pressure washer
- 2 Safety precautions to be observed while pressure washing:
- 3 Final remarks
- 4 The Challenges of Removing Plastic Cover from a Pressure Washer Hose
- 4.1 • The Risk in Winter
- 4.2 • Winterizing Your Pressure Washer
- 4.3 • Strategies for Removing the Plastic Cover
- 4.4 • Encouraging the Community
- 4.5 • Recommended Tools for the Task
- 4.6 • Humorous Solutions to the Dilemma
- 4.7 • Importance of Considering Material Type in Hose Connectors When Purchasing
- 4.8 • Dangers of Overtightening Connectors
- 4.9 • Selecting Appropriate Lengths and Avoiding Twisted Connections
- 4.10 • Steps for Removing a Garden Hose from a Pressure Washer
- 4.11 • Removing a Pressure Washer Nozzle
- 4.12 • Preventive Measures to Prolong Hose Life
- 4.13 • Essentiality of Regular Hose Maintenance
- 5 Safety Precautions in Removing Stuck Hose Connectors
- 5.1 • Always Wear Protective Gear
- 5.2 • Choose the right tools
- 5.3 • Applying Heat to Stuck Metal Connectors
- 5.4 • Use Cold water for Plastic Connectors
- 5.5 • Lubricate before Attempting Again
- 5.6 • Apply Correct Force
- 5.7 • Replace if Necessary
- 5.7.1 – Throbbin Rods’ Coupler Problem with Snapper Model 020397 Pressure Washer
- 5.7.2 – Initial Attempts at Removing The Stuck Coupler
- 5.7.3 – Suggestions from the Forum: Big Washer Enthusiast’s Proposal
- 5.7.4 – HandyMan84’s Advice: Use of Heat
- 5.7.5 – KnownRepairman’s Suggestion: Leverage The Wrench
- 5.7.6 – PressureWasherExpert’s Tip: Tap It Out
- 5.7.7 – FixItAll’s Recommendation: Use of Pipe Wrench
- 5.7.8 – DoughnutKing’s Advice: Protect The Coupler Surface
- 5.7.9 – To Conclude: Various Ways to Deal with a Stuck Coupler
- 5.8 • The Challenge of a Stuck Hose
- 5.9 • My Pressure Washer Woes
- 5.10 • Safe Removal Process: Keeping Damage At Bay
- 5.11 • Addressing the Pulsating Problem
- 5.12 • Last Resort: Using An Angle Grinder
- 5.13 • Learning from Other Experiences
- 5.14 • Understanding the Problem
- 5.15 • Removing the Stuck Hose Resourcefully
- 5.16 • Recommendations from Experience
- 5.16.1 • Material Choices for Pressure Washer Hose Connections
- 5.16.2 • Avoid Overtightening the Hose
- 5.16.3 • The Importance of Appropriate Hose Length
- 5.16.4 • Required Materials for Hose Removal
- 5.16.5 • Step-by-Step Instructions to Remove the Hose
- 5.16.6 • How to Remove the Pressure Washer Nozzle
- 5.16.7 • Preventing Garden Hose from Getting Stuck
Step by step guide to removing the hose from your pressure washer
Never try to move the pressure washer while it is still hot to prevent any burns. I have given a comprehensive step by step guide to removing the hose from your pressure washer below:
Step no. 1:
Put on a pair of rubber gloves. Turn off your electric pressure washer and unplug it from your wall outlet.
Step no. 2:
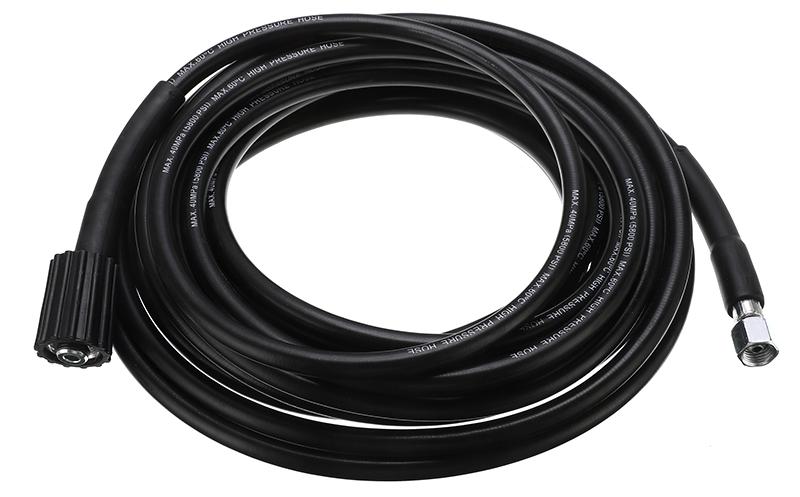
Squeeze the trigger of your pressure washer to release all the pressure inside it. Now grab the brass, plastic or the stainless steel quick connect fitting at the end of the knurled section of your hose. Then push it towards the pump of your pressure washer.
Step no. 3:
Loosen all male and female plugs and sockets to make it easier for you to disconnect the hose. Use a wrench to rotate them and then take them off with your hands and place the smaller parts in your pocket to prevent them from falling out of sight.
Step no. 4:
Now you can install a new hose on your pressure washer.
Step no. 5:
You can now insert the male repair coupling into one end of your new hose. You can then crimp the ends of the coupling so they are flat against your new hose. Then you can tighten any compression rings on the crimped ends if they are present.
Step no. 6:
Now you can insert the female repair coupling into the other side of your new hose. Then you can crimp the ends so they are flat, as you just did with the male end. You must now secure with any compression rings.
Step no. 7:
Finally, you must connect the male and female repair couplings together. Then you must tighten them all using your wrench.
Safety precautions to be observed while pressure washing:
Broken pressure washer hose: A cracked or a broken pressure washer hose can seriously injure you, sending you to the emergency room of a hospital. A new pressure washer hose will cost only $25 which is much lesser than the cost of your treatment in the emergency room of a hospital.
Through even a pin-sized hole, the pressure of the water will be so high that it will punch a hole into your flesh or tear apart the concrete of your property. If you try to cover the puncture with the palm of your hand the water will cut through your flesh and if it accidentally points towards your eye it can cause a serious injury and even blindness. To prevent a serious threat to your life and any damage to your property, it is necessary to remove the damaged hose as soon as you detect the problem.
Skin: “The extreme danger with a pressure washer is that even with what seems a very minimal skin break, the fluid can get very deep into your tissue and spread out which causes a bacterial infection,” said Howard Mell, M.D., a spokesman for the American College of Emergency Physicians.
Hose repair can be dangerous: If you try to cover or clog the hole in the hose with strong duct tape or the strongest glue, the patch will hold for a few seconds only and then the pressure will build up and it will burst the patch. Be extra careful if the hose has a crack or a cut near its end where you attach the nozzle because that area is very close to your arm and it can fracture your muscle. Never try to repair a broken pressure washer hose as it has multiple layers of wire mesh to help it distribute the pressure of the water evenly throughout the length of the hose.
If you put a patch on the outermost layer it will never be safe for pressure washing. You will have to repair each and every layer to help the hose hold its proper shape. This can be too time-consuming. It is recommended you get rid of the damaged one and simply order for a new one.
Injury: Always call the ambulance at once in case of the injury of a child or a pet. First aid and urgent medical attention are really important to control the bleeding of the victim.
Detrimental: “Pressure washing can be detrimental to your landscaping, as well as the surrounding area of what you are washing,” said Dan Wright, owner of a highly rated, roof cleaning and pressure washing company. “Pretty much anything that is dirty that can be cleaned off with water,” Wright said.
Use the correct nozzle: “It is really a matter of the technique as there are certain things that require more attention and care, like an older property that has very fragile parts or anything that is painted.” He also said, “a pro will use different tips to determine how soft the water will come out and how big the stream will be to ensure that nothing is getting damaged during the pressure washing process. There is a technique involved to do it properly, so it is a situation where you should hire a professional.”
Asphalt roof: “If you are pressure washing your asphalt roof, you cannot use high pressure because it will take the granules off and completely destroy the integrity of your roof. If you don’t have enough experience, the odds are you may damage something, especially when you are dealing with soft surfaces or structures like wood or areas with dry rot,” Wright said. “Every situation is quite different,” he said.
Environment: “The region of the country you live in will always impact how often things like your home or your driveway needs to be pressure washed, as is the environment around you. If you live in an area that does not have a lot of trees or if you are not near a source of water, the odds are that you may need to clean a little less frequently,” he advised.
Use the correct technique: “Every surface and structure is different and needs a different technique,” Wright said. “Pressure washing your wood is very different from pressure washing your concrete driveway. It is imperative that the person doing the pressure washing knows what they are doing and understands what goes into it.”
Don’t stop in the middle: “There is one main technique to pressure washing things like your wooden deck or your fence,” Wright said. “If you stop in the middle of your plank even for a single moment, it will leave a very deep line and that line is not going to vanish ever. You may also damage the integrity of what you are pressure washing or tear that thing apart completely.”

Professional: He added, “We can tell when something was done professionally or by somebody who has never used a pressure washer ever before. It is a completely different result if you get it done professionally and the people can easily differentiate between that. When they do it themselves, there are often very deep lines everywhere and the results are uneven and unpleasant, but when we are doing it, the thing looks fresh and brand new.”
Final remarks
In order to conclude this blog post, I would say that it is a very simple task to remove the hose from your pressure washer, which you can do easily on your own with minimum effort, time, and tools, instead of seeking the expensive assistance of a professional mechanic.
If you always read the user manual before trying to remove the hose, your task will become even much easier.
The Challenges of Removing Plastic Cover from a Pressure Washer Hose
Removing the plastic cover from a pressure washer hose presents a unique set of frustrations and challenges. Users often share experiences where attempting this task results in minor injuries such as scrapped knuckles. Sound familiar? Let’s dive in.
• The Risk in Winter
Pressure washer hoses are not winter’s best friend. One such challenge, often overlooked by many, is leaving a hose attached to a pressure washer during winter. The potential consequences of this are not minor. The water in the pump can freeze and potentially break the pump.
It’s a risk not many are ready to take, given the cost of replacing a pump or the entire unit. To learn more about the effects of freezing temperatures on mechanical devices, see Detailed Effects of Winter on Mechanical Devices.
• Winterizing Your Pressure Washer
The question then arises: How do you prevent your pump from freezing over the colder months? One inventive user has suggested using compressed air to blow out the pump and hoses during the fall season.
This method allows any residual water of coolant to be fully expelled from the system, effectively ‘winterizing’ the pressure washer. This is an interesting thought and one that might save you from a big frustration come spring.
• Strategies for Removing the Plastic Cover
Creating a safe yet effective way to remove the cover has led to a myriad of strategies. Discussion threads are rife with different methods, ranging from the use of a strap wrench to pushing the inner hose towards the pump, moving the collar, and even squeezing the trigger on the gun to release pressure.
These varied strategies highlight the struggle that many experience with this challenging task.
• Encouraging the Community
The pressure washer community thrives on collective problem-solving. Struggles such as the aforementioned plastic cover issue often lead to influxes of offerings, encouragement, and support to those struggling with the issue. After all, we’re all here to help each other out.
• Recommended Tools for the Task
Ever considered using a pipe wrench or water pump pliers to remove the plastic cover? Some users recommend wrapping the former in a rag for protection, showing an innovative approach to this problem. And it may just work for you, too.
• Humorous Solutions to the Dilemma
In the midst of these challenges, a sense of humor can go a long way. One user suggests using a torch to melt the plastic cover off. While this may raise consistency issues, it is definitely an amusing solution.
This jest exemplifies the camaraderie among users, showing how humor can lighten up the struggles of pressure washer maintenance.
Keeping your pressure washer in perfect condition, despite these challenges, allows for longevity and performance efficiency. Despite minor challenges like removing a plastic cover, users are resourceful and innovative.
Through the sharing of experiences, struggles, and solutions, the pressure-wash community has shown the power and potential of collective problem-solving.
• Importance of Considering Material Type in Hose Connectors When Purchasing
For a seamless gardening experience, it’s crucial to consider the materials used for hose connectors when purchasing a new hose. Metallic connectors such as steel or brass are renowned for their toughness and resilience.
They greatly reduce the chances of future removal difficulties. This choice will ensure better longevity, resulting in cost-effectiveness in the long run.
• Dangers of Overtightening Connectors
Overtightening connectors on your hose can lead to problems. It may seem like a tighter hose equals a better one, but it can actually do more harm than good.
Not only does overtightening make it harder to remove the hose, but it also can cause wear and tear on both your hands and the connectors. Hence, I highly recommend investing in a higher-quality hose that allows for a medium grip.
• Selecting Appropriate Lengths and Avoiding Twisted Connections
Misjudging your hose length needs can lead to unnecessary pulling, tugging, and eventual damage to the hose and connectors. Always ensure you select the appropriate length for your specific gardening needs.
Moreover, twisted connections can cause similar issues, so avoiding this is crucial in preventing potential damage.
• Steps for Removing a Garden Hose from a Pressure Washer
Removing a garden hose from a pressure washer can be a delicate task. The first step involves discharging the pressure from the hose. This can be done by turning off the water supply and squeezing the spray gun until the water completely drains out.
The next step is loosening the connectors. Start by using your hands to loosen the connector. If its too tight, you can use a wrench instead. Make sure to turn the wrench slowly and gently to avoid damaging the hose or washer.
• Removing a Pressure Washer Nozzle
Just as with the hose itself, proper removal is key when dealing with a pressure washer nozzle. Start by stopping the water supply. Second, consider wearing safety gloves as they give you a better grip and protect your hands.
If the nozzle is seized, you could consider lightly pounding the base with a rubber mallet to loosen it. Another practical technique involves heating the sprayer.
The goal here is not to melt but to expand the metal, making it easier to unscrew. You can also use lubricants or lime to loosen the fittings, applying them generously around the area before attempting to remove the nozzle again.
• Preventive Measures to Prolong Hose Life
Implementing preventive measures can greatly improve the lifespan of your hose. Aluminum-hose combinations can fuse if left attached for long periods of time, so consider removing them regularly to prevent this.
Hoses with brass fittings offer optimal longevity and ease of use. They are less likely to corrode, providing a long-lasting and durable option. Likewise, applying silicone grease to the threads of your hose fittings can prevent them from seizing over time.
An additional resource on best practices for home garden irrigation can be found on Cornell Universitys Home Gardening pages.
• Essentiality of Regular Hose Maintenance
Regular and proper maintenance of a garden hose is crucial to prevent accidents and damage.
Cleaning, proper storage, and regular inspection for damage are steps that can greatly increase your hose’s life span. In addition, ensuring you follow the steps and advice above will ensure you take good care of your equipment.
By following these recommendations and steps, your hose and its fittings will serve you well for a long and fruitful period. Take the time to ensure your hose and its connectors are well looked after, and your future gardening self will thank you.
Safety Precautions in Removing Stuck Hose Connectors
• Always Wear Protective Gear
The first rule of working with stuck hose connectors is ensuring you’re protected. Always wear heavy-duty gloves. The protective layer prevents potential injuries caused by the sharp edges of tools or the connectors themselves. You don’t want to end up with scars on your hands.
Also, your eyes need protection, too. A good pair of safety goggles ^1^ will shield them from tiny particles that might fly off while you’re struggling with the connector. Don’t underestimate the importance of this step.
• Choose the right tools
Your toolbox should contain pliers, a strap wrench, and a heating gun. These are the main tools you’ll need for removing a stuck hose connector.
From my personal experience, the pliers come in handy to grip the hose, while the strap wrench takes care of the connector. Sometimes, a heating gun is necessary for metal connectors that have contracted in cold weather.
• Applying Heat to Stuck Metal Connectors
On occasion, the connector may refuse to budge even with the wrench. That’s likely due to the laws of physics^2^, especially if it’s a metal hose connector. Cold weather makes metal contract and effectively tightens the connection. In such cases, a bit of warmth can make a big difference.
First, use your heating gun (or a hairdryer) and aim it towards the connector. Keep the heat level moderate to avoid damaging the hose or connector. Allow the warmth to expand the metal, and then try using the wrench again. You’ll notice the change in how easily it moves.
• Use Cold water for Plastic Connectors
Unlike metal, plastic expands when heated. So, if your connector is made of plastic, then you need cold water to work it loose. However, avoid using ice-cold water as it might crack the connector.
• Lubricate before Attempting Again
Lubricants can also aid in loosening the stuck hose connector. Apply a generous amount of penetrating oil^3^ or even cooking oil on the connector and let it sit for a few minutes. This will help reduce any friction and make it easier for the parts to slide apart.
• Apply Correct Force
Applying just the right amount of force is the key to removing a hose connector without causing any damage. Excessive force might result in breaking the connector or even causing injuries.
Remember, our primary concern is safety. So, rely more on the penetrating power of the oil, the strap wrench, and gentle manipulation.
• Replace if Necessary
Finally, don’t be afraid to give up if a connector won’t come loose. It’s not a failure but a realization that the connector has served its purpose and now needs replacement. Trying too hard to remove a connector can only lead to frustration and injuries, so be wise in your decision.
In conclusion, removing a stuck hose connector needs patience, the right tools, and your safety gear. Don’t rush the process. Take these precautions seriously. They’ll not only help in removing the stuck hose connectors but also keep you from any possible injuries.
– Throbbin Rods’ Coupler Problem with Snapper Model 020397 Pressure Washer
Here at Throbbin Rods, we’ve run into a bit of a snag. It’s all about the Snapper model 020397 pressure washer, to be precise, the coupler. It’s stuck, and we’ve tried everything.
– Initial Attempts at Removing The Stuck Coupler
Our first instinct was to cut away the surrounding plastic to expose the hex fitting. After some careful snipping, we had a clear shot at it. Yet, despite our efforts, the stubborn coupler didn’t loosen.
– Suggestions from the Forum: Big Washer Enthusiast’s Proposal
Turning to the communal knowledge of online forums, we found promising advice from Big Washer Enthusiast. Suggesting the use of penetrating oil to loosen the couplers seemed feasible. Yet, unluckily, this method didn’t culminate in the success we were hoping for.
– HandyMan84’s Advice: Use of Heat
Another member of the forum, HandyMan84, recommended another approach. His idea of applying heat to expand the metal parts and, hence, break the bond certainly provoked thought.
If any of you are planning to try this, be extra cautious. Heat can cause materials to degrade or even fire if not used properly.
– KnownRepairman’s Suggestion: Leverage The Wrench
The forum was far from dry of ideas. KnownRepairman chimed in with a useful suggestion of using a strap wrench or an adjustable wrench for more leverage, and prudent advice for those dealing with stubborn mechanical parts.
The Mechanical Engineering Department at MIT also echoes KnownRepairman’s advice. However, ensure to use the wrench properly to avoid damage.
– PressureWasherExpert’s Tip: Tap It Out
Next in line was PressureWasherExpert, who proposed tapping the coupler in a counterclockwise direction. This technique can sometimes loosen up threads that might have been locked tight over time.
– FixItAll’s Recommendation: Use of Pipe Wrench
When the penetrating oil didn’t work and we lacked adequate tools to follow other offered advice, FixItAll came up with a technique worth trying: applying a firm twist counterclockwise with a pipe wrench. The hardness and torque of such a tool could break through even the most stubborn of fits.
– DoughnutKing’s Advice: Protect The Coupler Surface
While the advice to apply force is in itself beneficial, we need to remember that care must also be given to protect the coupler. DoughnutKing’s advice comes in handy here, recommending the use of a pipe wrench lined with a cloth or a rubber pad to maintain the coupler’s surface.
– To Conclude: Various Ways to Deal with a Stuck Coupler
We’ve thus far discussed multiple methods to deal with a stuck coupler on the Snapper model 020397 pressure washer: from cutting away surrounding elements, using penetrating oil, applying gentle heat, leveraging a wrench, tapping or twisting the coupler.
Some of these methods might work for you or might not, depending on the specific challenge you are facing.
What is essential, however, is to remember that even complicated mechanical problems can have multiple solutions. Persistence and a willingness to learn from the experiences of others go a long way.
Use protective measures when necessary, always keep safety in mind, and don’t be afraid to ask for help when needed.
• The Challenge of a Stuck Hose
If you’re like me, you understand the struggle of dealing with a stuck hose on a pressure washer. It can be a surprisingly challenging issue, leaving you scratching your head and wondering why on earth it’s happened. Fret not; you’re not alone.
• My Pressure Washer Woes
I’ve been in a similar situation myself. Despite all my efforts, I couldn’t unscrew the hose from the pressure washer. Annoying? Absolutely. It doesn’t just happen by bad luck; this can be a common issue many people face.
• Safe Removal Process: Keeping Damage At Bay
During this ordeal, I sought advice on safely removing the stuck hose without incurring any damage. It’s worth noting that excessive force often worsens the situation, so patience and proper technique can make a noticeable difference.
• Addressing the Pulsating Problem
My pressure washer was already having issues with pulsation. To address this, I changed the o-ring. Replacing this component seemed an effective solution, at least theoretically, but it didn’t solve my main issue, the stuck hose.
• Last Resort: Using An Angle Grinder
The stickier the situation, the more drastic measures we consider. In my case, I pondered cutting off the hose with an angle grinder. However, this should only be considered as a last resort due to the potential damage to the pressure washer’s fittings.
• Learning from Other Experiences
I wanted to learn from the experiences of others. Perhaps there are others who’ve had similar trials and triumphed. Sharing knowledge and solutions can be beneficial for everyone involved. If you’ve encountered such a situation, your suggestions could be the key to resolving this issue.
• Understanding the Problem
The lack of understanding can be frustrating. I’m still unsure why the hose got stuck. It’s a mystery that requires unraveling. A competent resolution will likely emerge from identifying the core problem and addressing it directly rather than employing a general, trial-and-error approach.
• Removing the Stuck Hose Resourcefully
My key objective is to find a solution on how to remove the stuck hose without instigating further damage. It’s crucial to figure out the right balance between applying enough force and avoiding damage to the washer or the components.
• Recommendations from Experience
Based on my experiences, I would recommend regularly maintaining your pressure washer, ensuring all attachments are properly cleaned and stored after use. Performing these simple steps can mitigate the chances of encountering a stuck hose.
The University of Florida’s IFAS Extension Best Management Practices (BMPs) for the Maintenance of Commercial and Industrial Pressure Washers emphasizes the importance of correct pressure washer maintenance.
This resource, while intended for larger-scale operations, provides invaluable advice that can be applied to domestic situations, too.
In conclusion, dealing with a stuck hose can be a frustrating problem. However, with patience, the right techniques, and possibly some handy tips from fellow pressure washer users, you’ll be back to pressure washing in no time.
• Material Choices for Pressure Washer Hose Connections
To start, it is crucial to understand the different materials available for pressure washer hose connections. These range from brass, plastic, and aluminum, to stainless steel.
In my experience, you should select a material based on its resistance to corrosion to ensure longevity and efficient performance. You can find more information on material corrosion resistance on www.corrosion.gov, an authoritative site on corrosion and material science.
• Avoid Overtightening the Hose
Overtightening is a common mistake. I have witnessed how this can make the removal of the hose more difficult. Thus, I advise using a higher-quality hose with a medium grip that can be easily managed and removed.
• The Importance of Appropriate Hose Length
Damage to the hose connector can complicate the removal process. This usually occurs when the incorrect hose length is chosen, putting unnecessary stress on the connector. Therefore, it is important to select the appropriate hose length to avoid these complications.
• Required Materials for Hose Removal
When you’re ready to remove the hose, ensure you have the necessary tools and items. From my toolbox, I recommend the following: an extra pair of gloves, a wrench, a bowl, hot water, lubricants, a hacksaw, and a piece of fabric.
• Step-by-Step Instructions to Remove the Hose
When it comes to removing the hose, releasing all the pressure is the first step. You can achieve this by squeezing the trigger. Use a wrench to loosen those stubborn connectors before removing them manually.
• How to Remove the Pressure Washer Nozzle
Just as crucial as removing the hose is the process of removing the pressure washer nozzle. During this process, always ensure to shut down or restrict the water supply. Safety is paramount, hence the necessity of wearing safety gloves. I have found using a hammer or applying heat can often help if the connections are especially tight.
• Preventing Garden Hose from Getting Stuck
Finally, to prevent your garden hose from getting stuck, I suggest frequently removing it in case it has metal fittings. Another tip is to use hoses with brass fittings rather than aluminum ones to prevent getting stuck. For more information on garden hose care, check the www.garden.org website.
In conclusion, the successful management of pressure washers and hoses is dependent on a good knowledge of material selection and maintenance. A mindful approach to tightening, removing, and preventing of stuck hoses will ensure prolonged and efficient usage.
What tools are needed for this task?
Simply a wrench to loosen the male and female plugs and sockets will be needed to disconnect the hose from your pressure washer. Be sure to try hands first to prevent any damage.
I never knew about the dangers of a cracked pressure washer hose, thanks for sharing
Thank you, Cherly! I’m glad you found the information helpful. Feel free to reach out if you have any more questions.
I appreciate the cautionary tales included to highlight potential dangers
Thank you for recognizing the importance of potential dangers. Safety precautions are indeed crucial. Always better to be safe than sorry.
This article really emphasizes the importance of proper maintenance
“Thank you, Billy! Maintenance is key to the longevity of your pressure washer. If you need help removing the hose, check out the step-by-step guide in the blog post. Happy cleaning!”
I appreciate the detailed safety precautions shared in the article
Thank you, Frank Reyes! I’m glad you found the safety precautions helpful in the article. Stay safe and happy pressure washing!
The community aspect of sharing advice and tips is fantastic to see
Thank you, Carmen! The community support and advice-sharing are truly invaluable. Happy pressure-washing!
Interesting method, I will try it out myself
Thank you, Shane! I hope the method works well for you. Remember to follow the safety precautions outlined to prevent any injuries and ensure a smooth process. Happy pressure washing!
How often should pressure washer hoses be replaced?
Hi Carolyn, pressure washer hoses should be replaced when showing signs of wear or damage to prevent injuries or property damage. See the step-by-step guide in the blog post for more details.
Does this method work for both electric and gas pressure washers?
Yes, this method works for both electric and gas pressure washers. Just make sure to follow the steps carefully. Thank you for your question!
I had no idea about the risks of winterizing a pressure washer
Thank you for sharing your experience, Ron. Winterizing your pressure washer is crucial to prevent damage. Make sure to follow safety precautions while handling your pressure washer to avoid injuries.
Do you recommend any specific brands for replacement pressure washer hoses?
I recommend stainless steel or brass connections for replacement pressure washer hoses. Avoid overtightening to make removal easier. Hope this helps!
Is it possible to repair a damaged pressure washer hose?
Yes, it is possible to repair a damaged pressure washer hose by purchasing a new one. Follow the steps in the blog post for a simple guide to remove and replace the hose.
How long does it typically take to replace a pressure washer hose?
Disconnecting the hose is simple, but typically takes about 10-15 minutes. Use caution to prevent any accidents. Remember to read the user manual for guidance.
What are some signs that indicate the hose needs to be replaced?
“Luis, signs like cracks, leaks & wear indicate hose replacement. Safely remove & replace it to prevent further damage. Be cautious with fittings to avoid injury. Hope this helps!”
Great step by step guide, very helpful
Thank you, Allison! I’m glad you found the guide helpful. Let me know if you have any questions or need further assistance.
I enjoy the variety of tips and advice shared in the article
Thank you, Vanessa! I’m glad you found the tips helpful. Let me know if you have any questions.
Can I use this method for all types of pressure washers?
Yes, you can use this method for all types of pressure washers. Thank you for your comment!
The recommended tools section was very informative and useful
Thank you, Gladys! I’m glad you found the recommended tools section informative and useful. Feel free to reach out if you have any questions or need further assistance.
The video demonstration was very helpful in understanding the process
Thank you, Gwendolyn Rose! I’m glad the video was helpful. Removing the hose is a simple DIY task with the right tools and technique. Wishing you all the best in maintaining your pressure washer!
Good reminder to always wear protective gear when working with pressure washers
Thank you Roberto for your insightful comment on the importance of wearing protective gear when working with pressure washers. Safety is always a top priority when dealing with any equipment.