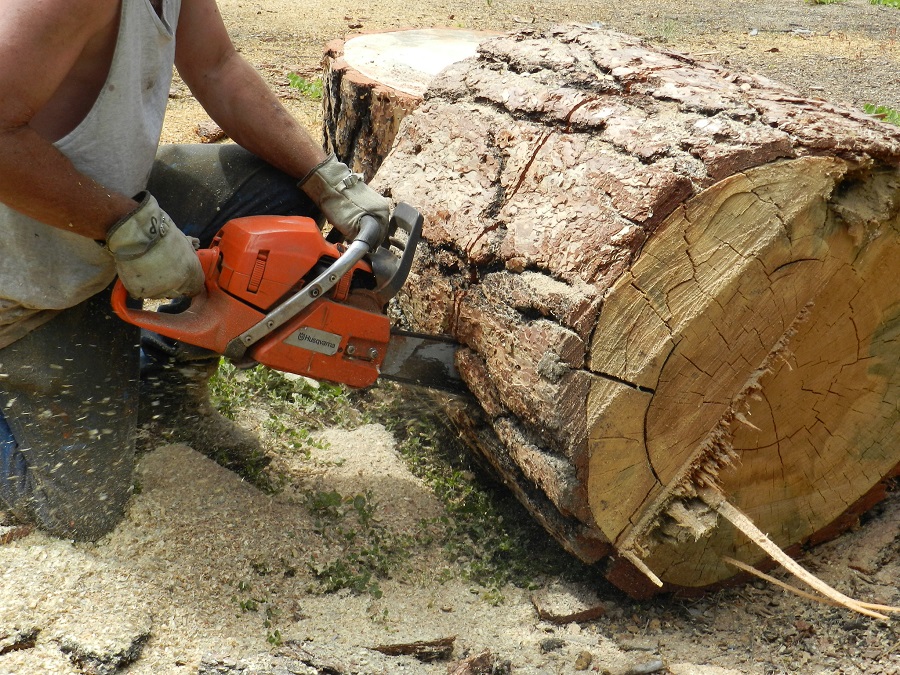
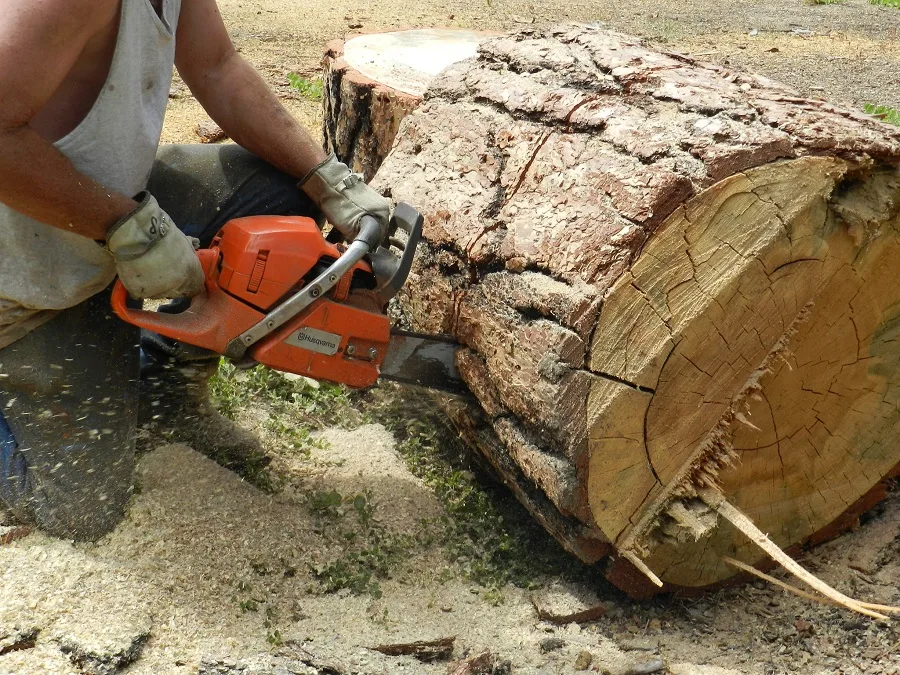
If you are a professional logger or a homeowner interested in obtaining lumber from fallen trees, a log debarker must be one of your go-to tools. Almost every wood type has an outer bark that needs to be peeled off before the wood is made usable. On an industrial scale, this process is carried out by large dedicated debarking machines. What if I told you there’s a much simpler way of doing that on a smaller level. And with the help of a chainsaw?
How to install a chainsaw debarker:
- Step 1: Gather all the necessary tools for the job. Take off your chainsaw bar.
- Step 2: Draw the markings on the bar as per the log debarker attachment.
- Step 3: Drill holes on the bar and mount the log debarker on it.
- Step 4: Use a slightly longer chain and mount it on the bar. Tighten both the chain and the bar.
If you are interested in the details, scroll down to read further. I will provide you in this blog post with further tips and tricks of debarking wood using a chainsaw from a professional’s experience.
Contents
What is a Log Debarker?
A log debarker does the job of peeling off the bark and other layers of mud on the outside of the wood manually or through a rotating chain.
The bark on the wood needs to be peeled before it can be used for any application. On the industrial scale, special debarking machines are set up to deal with large volumes of wood. The log is placed against the machine’s blade with turns and hence removes the entire outer layer of the bark from the wood. On a smaller scale, however, the process is a bit time-consuming.
For homeowners undertaking wooden projects, there are two main types of debarkers used. The first type includes tools that can be attached to a chainsaw and utilize the rotating sprocket to perform their operation. An example includes a log wizard, which is a multipurpose tool that works as a debarker, planer, notcher, and post sharpener.
The second type of debarkers is the manual hand tools that are used as planers to peel off the outer layer of the wood. This includes drawknives, peeling spuds, etc. These tools provide a neat surface finish but can be cumbersome to use on large logs. Hence, people prefer to modify their chainsaws with attachments for faster results. Let’s have a look at how that’s done.
Installing the Log Debarker on Your Chainsaw:
If you are looking to transform your chainsaw into a debarking tool, you need to install a log wizard to help you do that. The steps for installation are listed below:
● Step 1: Gather the needed tools:
Before starting the job, ensure that you have the correct tools at your disposal. Also, you would be making a modification on your chainsaw bar that would facilitate the attachment of the log wizard, so be sure that you are familiar with the basic workshop tools and their operations. For this job, you would need the following equipment:
- 5/16-inch drill bit
- Drill press
- Scriber tool
- Center punch
- Ball pin hammer
- Ruler
- Log wizard
- Additional chain links
● Step 2: Remove the chainsaw bar and chain:
To start, remove the chainsaw bar and chain. The chain comes off easily by turning the lever at the bar’s attachment. To remove the bar, you need to unscrew the fasteners that secure it. Once the bar is removed, we can now make the inscriptions on it.
● Step 3: Draw markings on the bar:
This step is important as the markings will determine how accurately the log wizard is attached to the bar. Ensure you do it carefully.
- Centerline: You need to mark a line that lies at the center of the bar. Use a ruler to determine the distances accurately and mark the centerline using a scriber tool. After you’ve marked the centerline, place the log wizard on the bar and make sure that its sprocket aligns with the bar’s nose.
- Arcs: With the log wizard placed on the bar, line up its mounting holes with the centerline. After that, scribe the mounting holes’ arcs on the bar.
- Cross-line: Next, use a ruler to measure a distance of a quarter of an inch from the edge of the arc along the centerline. Scribe a cross mark at this distance.
- Hole’s center: We shall create holes at the points where the crosses have been marked. But before doing that, let’s mark those holes with a center punch so that the drilling can be done accurately and with ease. Place the center punch just above the cross marks and hold it firmly with your hand. Strike it from the top with a hammer until a dimple is created for the hole’s center.
● Step 4: Drill holes on the bar:
Using a 5/16-inch drill bit for drilling the holes. For drilling operations, a drill press is preferred. Before drilling a hole in the blade, make sure a wooden block is placed underneath the blade. Now, drill two 5/16-inch thru-holes at the center punch locations on the blade.
● Step 5: Mount the log wizard on the bar:
The holes drilled above are where the mounting bolts of the log wizard shall be inserted. Place the log wizard just above the bar so that its mounting holes line up with the drilled holes on the bar. Insert the mounting bolts and tighten the nuts. Also, mount the bar onto the chainsaw, ensuring that the chain tightener is set to the loosest setting. Don’t attach the cover on the bar’s mounting yet.
● Step 6: Fix and tighten the chain:
- Add chain links: Since the log wizard has been attached to the saw, your previous chain length might not be enough to pass over the entire bar’s length and the log wizard’s sprocket. For this reason, you need to break the chain and add one or two links so that it’s longer than its previous length by about 2 inches.
- Tighten the chain: Pass this chain over the bar and the log wizard’s sprocket. It might still appear to be loose. It was for this reason that we left the chain tightener loose in the previous step. Using an Allen key, tighten the chain tightener so that it doesn’t sag. To check this, pull the chain from the bar and release it to see if it returns to its original position. If it does, it is tightened enough and ready to do the job.
- Tighten the bar: Now, using a wrench, tighten the bar’s mounting nuts. Also, make sure that the log wizard’s nuts are tight enough.
With this, our log wizard installation is complete. In the next section, let’s see how to operate a chainsaw with a log wizard installed.
Using a Log Debarker on a Chainsaw: some Pro Tips
Based on my experience of addressing chainsaw-related issues at various forums, I can provide you with some tips to ease your logging experience. Speaking of debarking, it sounds pretty straightforward, but keeping in mind a few points from an expert’s experience will surely be of great value.
Tip 1. Assess the wood type:
It may not seem like it, but using a peeler spud may be easier for some wood types than using a chainsaw modified with a log wizard. I have seen log wizards work well with pine and similar type of wood barks that are hard enough for a peeling spud. But for cedarwood and other types of stringy barks, a peeling spud might be easier for the debarking job. Or, if available, you may also use a pressure washer to knock out mud, bark, and other deposits.
Tip 2. Use a strong chainsaw:
In my opinion, if you choose to use an attachment, make sure your chainsaw is strong enough for it. By that, I mean that the bearings need to be in good condition, and the spindle and the bar should be properly oiled. The catch is that using an attachment adds an extra strain on the rotor. And since it wasn’t originally designed for that purpose, your chainsaw might give issues after having used it for some time.
Tip 3. Don’t underestimate hand tools:
As I have said earlier, hand tools are more effective for certain jobs, but just for the sake of productivity and fast results, people may choose to use a chainsaw attachment. It is better to have peeling spuds and drawknives at your disposal if a clean finish is desired. In most cases, you might need to use a spud for cleaning off an area before using the log wizard attachment on it.
Tip 4. Debark in spring:
They say “strike when the iron is hot” as heat makes it soft enough. The same thought applies to woodworking. That’s where the season plays a vital role. You get the best results when the wood is soft, and in spring, wood is the softest due to its buddings and tends to harden towards the summer. Hence, in my opinion, always make sure that you try to debark your wood in the spring season.
Related Questions:
1. How does a ring debarker work?
Ring debarkers comprise a series of cutters along a ring. A wooden log is fed across these cutters, peeling off the bark layer and exposing the inner layers.
Such debarkers are very efficient for long, straight logs of both softwood and hardwood. They are favored for specimens that have difficult to remove barks. However, they are not suited to bulk operation as they operate only on one log at a time. Also, they are ineffective against crooked or bent logs or logs with small diameters.
2. What is a debarking tool?
A debarking tool can be any mechanical tool (such as a spud, a knife, or a cutter blade) that is used for peeling off logs by removing their barks.
Traditionally, peeling spuds and knives have been used for debarking large wooden logs. Although they provide a neat surface finish, these hand equipment have been quite cumbersome for larger volumes. Nowadays, a special set of planer blades are available for attachment on a chainsaw. These blades can serve multiple purposes alongside debarking and have been favored by many chainsaw operators due to their versatility. An example of such a tool is a log wizard.
3. What is the best way to remove bark from a log?
According to most experts, using a drawknife is the best way to debark a log with a decent surface finish.
Drawknives are a set of sharp single blades fitted with a pair of handles. To debark a log using a drawknife, simply press it downwards against the wood and pull it towards yourself, thereby peeling off the bark. Repeat this process to debark the remaining wooden surface. To get better results, it is advisable to sharpen your drawknife blades before debarking.
In situations where you have a large number of logs to be peeled off, using a drawknife can be very tedious. Hence, it is viable to use a chainsaw fitted with a debarker to peel off these woods.
4. What is a peeling spud?
A peeling spud is a sharp blade used for peeling off bark from wooden logs.
Just like a drawknife, a peeling spud is a manual tool consisting of a sharp blade that removes bark from felled logs. To use a peeling spud, slide the sharpened edge across the surface until a strip of bark is peeled off. If you require a nice surface finish of your logs, then a peeling spud should be preferred for use.
I appreciate the detailed instructions provided in the article
Thank you, Monica! I’m glad you found the instructions helpful. If you have any questions or need further assistance, feel free to reach out. Happy debarking!
Amazing guide, I can’t wait to try this out on my next woodworking project
Thanks, Ted! I’m glad you found the guide helpful. Let me know how it goes with your woodworking project using the log debarker attachment on your chainsaw. Good luck!
This seems like a handy tool for DIY projects involving wood
Thank you, Candice! I’m glad you found the information helpful for your DIY projects involving wood. Let me know if you have any other questions or need further assistance.
Very informative article, thanks for sharing
Thank you, Dawn Young! I’m glad you found the article informative. I hope it helps you with your logging and woodworking projects in the future.
Great step-by-step guide on installing a log debarker on a chainsaw
Thanks for the positive feedback, Logan! I’m glad you found the guide helpful for installing a log debarker on a chainsaw. Happy woodworking!
I never knew there were manual debarking tools, so interesting
Thank you, Tammy! I’m glad you found the information on manual debarking tools interesting. It’s always great to learn something new about tools and techniques used in woodworking.
I wonder if using a log debarker affects the chainsaw’s performance
Using a log debarker attachment can definitely affect the performance of your chainsaw. Make sure to follow the proper installation steps for optimal results. Good luck with your debarking project!
Great video resources accompanying the article, very helpful
Thank you for the positive feedback, Arron! I’m glad you found the video resources helpful. If you have any more questions, feel free to reach out.
Are there different types of log debarkers available for chainsaws?
Yes, there are different types of log debarkers available for chainsaws. One option is to attach a log wizard to your chainsaw for a simpler debarking process. Hope this helps!
Interesting read, I didn’t know chainsaws could be used for debarking logs
Thank you, Wilma! Yes, chainsaws can be quite versatile when it comes to woodworking tasks. I hope you found the blog post informative and helpful in your future projects.
What safety precautions should be taken when using a chainsaw debarker?
Hi Violet, when using a chainsaw debarker, always wear protective gear, maintain a firm grip, and keep a safe distance from the blade. Take frequent breaks to prevent fatigue. Stay safe!
Is it easy to find log debarker attachments for chainsaws in stores?
Yes, log debarker attachments for chainsaws can be found in stores. They are a convenient and efficient way to peel bark off wood before use.
Can you use a chainsaw debarker on all types of wood?
Yes, a chainsaw debarker can be used on most wood types, but it may be easier to use hand tools for certain types like cedar. Make sure your chainsaw is strong enough.
I never thought about using a chainsaw for debarking, good to know
I’m glad you found the information useful! Using a chainsaw for debarking can be a game-changer. Let me know if you have any other questions or need further tips. Happy logging!
Debarking in spring makes so much sense, good tip
Thank you, Edna! I’m glad you found the tip helpful. Spring is indeed the perfect time for debarking. If you have any more questions, feel free to ask.
Drawknives seem like a great alternative for debarking logs, thanks for the suggestion
Thanks for the feedback, Dana! I’m glad you found the suggestion helpful. For more tips on using a chainsaw for debarking, feel free to check out the additional information provided in the blog post.
I love the idea of using a chainsaw for debarking, so innovative
Thank you, Morris! I’m glad you found the idea of using a chainsaw for debarking innovative. Stay tuned for more tips and tricks on woodworking with chainsaws.
This article has inspired me to get a log debarker for my chainsaw
Thank you, Michael! I’m glad to hear that the article inspired you to get a log debarker for your chainsaw. It’s a great tool to have for anyone working with wood. Enjoy debarking your logs!
How long does it typically take to debark a log using a chainsaw debarker?
Hi Mike, typically, it takes a few minutes to debark a log using a chainsaw debarker. The process is quick and efficient, making it a great tool for both professionals and homeowners.
I appreciate the expert tips shared in the article, very useful
Thank you, Kaylee! I’m glad you found the tips useful. Let me know if you have any questions or need further assistance. Happy debarking!