For most chainsaw users, a chainsaw is a garden tool that guarantees efficiency and productivity for sawing operations. However, most users encounter a common problem: the chainsaw is cutting very thin chips of wood per cut. This low material removal rate hampers productivity, and you begin to wonder if there’s a way to fix it. In this blog post, I will address this and help you solve this issue.
How to adjust a chainsaw’s depth gauge:
- Step 1: I recommend using a depth gauge guide tool and a flat file.
- Step 2: Clean the chain so that any deposits of oil or debris are dislodged.
- Step 3: Fix the chain. Using the guide tool, file the top portion of the depth gauge until it is completely leveled with the guide tool.
- Step 4: Repeat the above process for the remaining depth gauges.

Sharpening the depth gauges ensures that the chainsaw cuts enough wood per unit of time and saves you several precious hours of your time. Typically, depth gauge adjustments become more imminent after the chain has been sharpened.
To further elaborate on the original answer, I will provide valuable insight into some chain dynamics.
What Is A Depth Gauge?
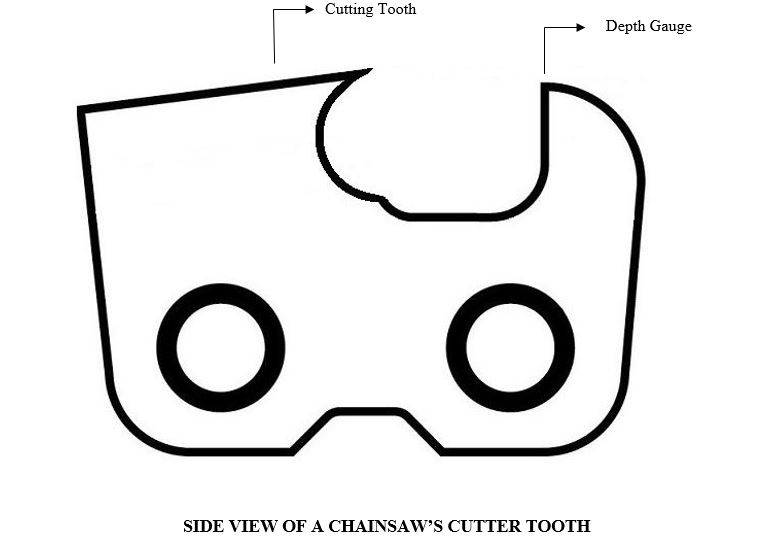
As the name suggests, a depth gauge is a part of the cutter tooth that controls the depth of the cut. It is a pointed tip located along with the cutter tooth after the cutting blade. A small amount of vertical distance is present between the tip of the cutting blade and the depth gauge. This distance is also known as depth or rake and is often stamped on the depth gauge.

How does Depth Gauge Affect the Material Removal Rate?
I will show you first how the depth gauge affects the cutting efficiency of your chainsaw. During the cutting operation, a greater depth of cut results in a more significant amount of wood being severed. During a chainsaw operation, the material removal rate is the mathematical product of the chain speed, the speed with which it is fed, and the depth of cut. Hence, to achieve the maximum material removal rate, you need to maximize the depth of cut of your chainsaw. Mathematically,
Where, V = chain speed, f = feed speed, d = depth of cut, MRR = material removal rate. Since you have gained a basic insight into the cutting process, let us determine why a depth gauge is so important and why it needs maintenance to ensure superior cutting performance.
Graphical Demonstration:

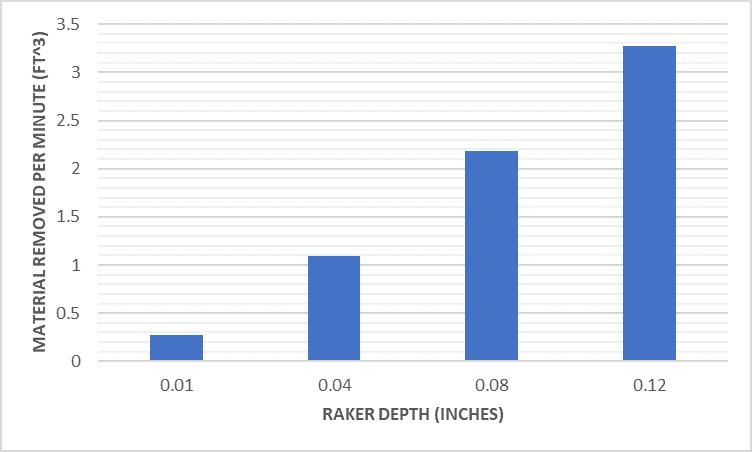
This mathematical relation might seem dull but don’t worry. I will apply this to a real-world scenario. I will consider a Stihl 020 gas chainsaw running at full throttle at 10000 RPMs. It uses a guide bar whose height is 4.5 inches. The amount of wood that is cut in a minute is compared against various raker depths. You can see that at greater depths, the material removed per minute also increases. You can see that by keeping your rakers well adjusted, you can increase the wood removal rate and boost the cutting efficiency of your chainsaw.
Why Does a Depth Gauge Need Maintenance?
As your purchase, a new chainsaw, the cutting teeth, and the depth gauges of its chain are set correctly. Most homeowners tend to sharpen their chainsaw’s cutter teeth to achieve better results. In most cases, the sharp cutting edge of the cutter tooth gets lowered, ultimately reducing the depth gauge’s rake. The downside is that the material removal rate is significantly decreased since the depth of the cut is reduced. Due to this, your chainsaw will cut thinner chips of wood. There might come a time when it doesn’t cut anything due to the cutting edge and the depth gauge being at the same level.
Conversely, you might also see a situation when the depth gauge is way lower than the prescribed value of its rake. In this case, the chainsaw might be dangerous to operate as it dislodges very large wood chunks. It might also produce kickbacks to the user. Hence, it is not recommended for a user to operate such a chainsaw.
In both of these situations, it becomes mandatory to adjust the depth gauge of your chainsaw so that you can resume your regular sawing routine with minimal hitch and maximum productivity.
Adjusting a Chainsaw’s Depth Gauge: Step-by-Step:
Adjusting all the depth gauges on your chainsaw is very important to prevent accidents or kickbacks. For this purpose, all the gauges on the cutter teeth need to be at the same level. The procedure for doing that will be discussed in this section step-by-step.
Step 1: Gather your tools:
During this operation, you need the two most essential tools. One is a depth gauge guide tool, and another file to peel off the excess metal from the depth gauge.
– Depth gauge guide tool:
It is a tool used for providing a flat platform over the cutting teeth. It has a slot from which the depth gauge edge protrudes out. Each chainsaw manufacturer has its particular guide tool, which may not be compatible with a different manufacturer. So, it would help if you prefer buying the one which your chainsaw brand manufactures. A depth gauge guide tool is not very costly, and it falls somewhere around 10-15$. You can find some depth gauge guide tools here:
https://www.amazon.com/chainsaw-depth-gauge-tool/s?k=chainsaw+depth+gauge+tool
– Flat file:
Besides the guide tool, a flat-file is also needed to chop off extra metallic portions to perfectly level the gauges.
You can find flat files along with a depth gauge guide here (click here).
Step 2: Clean the chain:
Now that you have all the tools at your disposal let’s proceed towards accessing the chain. If you’ve come fresh after a sawing session, leave the saw for 10-15 minutes to allow the chain to cool down. Using a rag, clean off the debris or grease so that your hands don’t get spoiled. Please note that you don’t need to take the chain off to adjust the depth gauge. The filing operation requires that the chain be held fixed in a vice or at the chainsaw bar.
Step 3: File the depth gauge:
Place the chainsaw on a flat surface. Set the guide tool on the chain to cover the cutting tooth, and the depth gauge’s edge is exposed through the slot. You might see some of its portion protruding out of the slot. Note that only one tooth shall be visible per slot.
Take the flat file and feed it across the depth gauge above the slot to level the depth gauge. Keep filing the gauge until it has been leveled with the guide tool. While doing so, make sure you maintain the original shape of the depth gauge. Otherwise, the cutters will feed roughly to the wood while cutting. Also, avoid filing the gauge lower than the guide setting.
Step 4: Repeat the process for the entire chain:
Using a similar method, keep filing the rest of the gauges until all the gauges are of the same height. Again, it would be best to level all the gauges equally, preventing the chain from vibrating during the operation.
Related Questions:
1. When to sharpen a chainsaw chain?
The best way to know if your chain needs sharpening is to check the wood shavings produced during sawing. If the shavings comprise fine, dust-like particles, then you should consider sharpening your chain. On the other hand, if you see larger, thicker chips instead, then your cutter teeth are sharp, and there’s no need to sharpening yet.
2. How to sharpen a chainsaw chain?
If you see your saw producing dust-like wood particles while sawing, it probably means that your cutter teeth have become dull. In this case, you need to sharpen them to avoid any future risk of an injury or an accident; since dull chains are prone to produce kickbacks. To sharpen your chain, you should follow a step-by-step procedure as mentioned underneath.
– Step 1: Gather your tools:
To begin the process, make sure all the necessary tools are at your disposal. For sharpening, you need a round file along with a file guide. Make sure the file has a safety handle to avoid the risk of an injury.
– Step 2: Fix the chainsaw bar:
Before you proceed, it is better to fix your chainsaw bar on a bench wise if available. This makes the filing easy and effective as compared to holding the chainsaw manually. Ensure that the bar’s longitudinal side is fixed between the wise fixtures, with the top side of the cutter teeth visible from above. Also, your chain should move while the bar is fixed.
– Step 3: File the cutter teeth:
Using the round file fixed in the file guide, press it firmly on the top surface of a cutter tooth at an angle of 30 degrees. Afterward, move it across the cutter by pressing it firmly. It is essential to know that the filing should only be carried out in one direction. Avoid moving the file back and forth continuously, as this will damage the file.
While filing, make sure you move the file away from the saw and not towards it. Also, keep it pressed firmly until you feel the metal being peeled off from the surface. After a few strokes, repeat the process on the remaining cutter teeth until all of them have been filed completely.
– Step 3: File the depth gauges:
While the cutter teeth have been filed, it is also important to adjust the depth gauges to compromise our cutting depth. For this purpose, use a flat-file and a depth gauge guide tool and ensure that their top surface has been leveled as per the guide tool. Then, repeat this process for the entire chain.
3. Why does my chainsaw chain get dull so fast?
Various factors can contribute to the chain getting dull rapidly. These include chains hitting the ground or hard objects such as iron nails. Dust stuck in the chain, bent bar. Improper maintenance and inadequate lubrication can also cause the rapid wear of the chain. Eventually, you might need to buy a new chain.
4. What is the best angle to sharpen a chainsaw?
The sharpening angle is the angle at which you keep the round file on the top surface of the cutter teeth while sharpening. This angle varies for different chain types and is usually engraved on the cutter teeth. For crosscutting chains (against the grain direction), this angle typically varies from 25-30 degrees. For chains that cut along the grain direction, the sharpening angle is usually 10 degrees.
Types of Firefighting Fans
When tackling fire situations, a variety of fans are available to firefighters to help with ventilation. This arsenal includes battery-powered fans, electric fans, and gas-powered fans. It also includes hydraulic fans, all of which can be used to control the flow of oxygen, reducing the risk of fire growth.
• Firefighting Robots
One revolutionizing addition to firefighting equipment is the large-scale firefighting robot. This groundbreaking technology allows firefighters to handle fires remotely, reducing the risk to human life and increasing their efficiency.
Firefighting robots can reach areas that may be unsafe for humans and offer a more efficient and safe way of fighting fires.
• Smoke Ejectors
Smoke ejectors are critical tools in firefighting. Available types include electric, gas, and hydraulic smoke ejectors. These devices help to clear smoke from structures, enhancing visibility and making it safer for firefighters.
• Ventilation in Confined Spaces
Confined space ventilation is a complex firefighting task. Therefore, specific equipment such as nano blowers, ventilators, and ducts/adapters are required. These tools help increase visibility, decrease heat, and remove dangerous gases from confined spaces.
• Fire Rescue Saws
Firefighters also use rescue saws, with some even having the capability to convert a chainsaw into a fire saw using conversion kits. This multi-purpose tool increases the efficiency and versatility of its equipment by providing a rapid and easy method of cutting through materials during rescue operations.
• Firefighting Related Accessories
Firefighting also involves the use of essential accessories like fan misters, foam generators, and smoke machines. Additionally, apparatus securement ensures that all equipment is safely stored and transported. Each of these supplements the primary firefighting equipment, providing support in unique ways.
• New and Featured Products
Among the innovative products in the firefighting equipment market are the most compatible battery fan and a unique product that can convert a chainsaw into a fire saw. Such advancements continually improve firefighting procedures and the overall safety of operations.
• Industrial Fans: Blowers and Exhausters
The industrial fans section consists of blowers and exhausters, available in single-speed, high-speed, variable-speed, and pneumatic fan models. These help in creating the necessary ventilation to counteract the smoke and heat generated during fires, tripling its role in efficient firefighting.
• Positive Pressure Fans
Positive pressure fans, available in battery-powered, electric, and gas-powered versions, are used to push heated air and smoke out of structures. This technology greatly benefits firefighters by increasing visibility and decreasing heat in a burning structure.
• Specialty Fans
Unique firefighting situations require specialty fans, including large-scale fans, firefighting robots, and custom ventilation fans. These specialized fans contribute significantly to the efficiency of firefighting practices.
• Accessories for Firefighting
Firefighting accessories extend to ducts/adapters, stands/hangers, and miscellaneous accessories, creating a comprehensive equipment list. These accessories facilitate the proper functioning and use of other firefighting equipment.
• Support and Sales by Super Vac
With sales support, dealer finding services, catalogs, technical support, product manuals, operational videos, a parts store, and information about Super Vac, the sales and support section greatly aids the sales experience.
Warranty details and even career opportunities cement the offerings, positioning Super Vac as a comprehensive provider in the firefighting industry.
As per NFPA 1989, it becomes essential for such companies to provide detailed manuals, videos, tech support, and safety information for the firefighting community.
Importance of Using Filing Aids when Sharpening Chainsaw Chains
Having the right tools when sharpening chainsaw chains can significantly improve the accuracy of the sharpening process. Among the top recommendations is the use of filing aids.
• Filing Gadgets by STIHL
Leading chainsaw manufacturer STIHL, recognizes the value of specialized tools for the process. The company recommends using filing gauges, filing templates, file holders, and other tools to simplify the sharpening process.
– Understanding the STIHL Filing Gauge
The STIHL filing gauge is a crucial tool in the sharpening process. It has a cut-out for checking the depth gauge setting, a sighting edge for the filing angle, a bar groove cleaner, and a scale for measuring groove depth, all of which simplifies the sharpening process by making it more precise.
STIHL offers filing gauges that match the chain pitch, ensuring accurate checking of all necessary angles and dimensions during the process.
• STIHL Filing Template for Accurate Sharpening Angles
An easy-to-use tool that you can rely on is the STIHL filing template. It attaches to the guide bar using magnets and features raised sighting lines. These features allow you to achieve the correct angle for an effective sharpening process.
• Keeping a STIHL File Holder Handy
The STIHL file holder is an essential aid that ensures the file remains at the correct height and angle during filing. To ensure accuracy, it is important to use a file holder that matches the pitch of the chain.
– The STIHL File Holder Guide
For those who prefer not to rely solely on optical alignment aids, STIHL offers the file holder guide. This tool helps to maintain the correct filing angle, thus contributing to a proper and effective sharpening process.
• The Innovative 2-in-1 File Holder by STIHL
For an efficient and time-saving sharpening process, the STIHL 2-in-1 file holder is a commendable tool. It allows users to sharpen the cutters and lower the depth gauges in a single operation. This cuts down the time significantly while ensuring the chain is accurately sharpened.
• STIHL FG 4 Roller Filing Guide
The FG 4 roller filing guide is another excellent tool to have. It has a fold-out filing plate that lets you check and lower the depth gauges for an optimal sharpening process.
• Additional Filing Guides: FG 2, FG 1 and FG 3
Other filing aids are also available from STIHL. The FG 2 must be mounted onto a bench for use, but it requires the saw chain to be removed for sharpening. For a more convenient approach, you can consider the FG 1 and FG 3, which can be attached directly to the guide bar.
• Final Thoughts on STIHLs Sharpening Tools
STIHL offers a range of tools designed to simplify the sharpening process, enhancing accuracy and efficiency. By using these aids, you can ensure a well-sharpened chainsaw chain. For more information on maintaining and servicing chainsaws, the Oregon State University’s Extension Service is an excellent resource.
Understanding the Functionality of the Westcoast Saw Depth Plate
The mechanics and intricacies of the Westcoast Saw Depth Plate make it an indispensable utility. As a professional tool, it is meant to streamline the process of setting raker heights on various chains.
By simplifying a relatively complex undertaking, the depth plate becomes a valuable asset for users of all experience levels.
It’s worth exploring how this resourceful tool can be incorporated into your toolkit. Knowledge of its features and compatibility, the benefits it presents, and the material it is made of can enhance your working proficiency.
• Compatibility with Chains and its Multi-option Depth
The Westcoast Saw Depth Plate, in its innovative design, is compatible with an array of chains. These chains include full-comp, semi-skip, and full-skip, which offer the room for versatility. This compatibility makes the tool essential for a wide variety of tasks.
In addition to its compatibility is the array of depth options the tool offers. It begins at 0.025 and decreases in 0.010 increments.
The strategic design of these multiple depths accounts for better precision while working on different chain types. It showcases adaptability and demonstrates its necessity in handling diverse tasks.
• Cleaning Functionality using the Westcoast Logo Edge
Equipped with multiple functionalities, the edges of the depth plate have been designed for more than just aesthetics.
In fact, the edge with the Westcoast Saw (WCS) logo has been specifically designed to clean the rail bar. This results in improving cutting performance and enhancing the overall practicality of the tool.
• Longevity with High Carbon Steel Material
A crucial aspect of any tool is its durability, and the Westcoast Saw Depth Plate does not disappoint. Made of durable high-carbon steel, the tool stands against wear and tear effectively. This gives it the strength to endure the heavy use it might be subjected to, thereby increasing its lifespan.
Notably, this sturdy tool is manufactured solely within the United States, ensuring the delivery of premium quality with each piece.
• Compatibility with Specialized Chain Size
The Westcoast Saw Depth Plate includes an option for the 3/8 Chain Low Pro size – the only plate size designed to fit a safety chain. This feature becomes particularly important when considering the specialized requirements of a safety chain.
The size is specifically meant to ensure accurate setting of raker heights on safety chains. Through this design, the depth plate manages to accommodate unique technical prerequisites professionally.
• Usage Recommendations
From a professional perspective, understanding your tool and knowing the best way to utilize it is crucial. The Westcoast Saw Depth Plate makes this possible with its design. For cleaning the rail bar, using the edge with the WCS logo is typically recommended for the best results.
To learn more about maintaining your chainsaw and using it safely, refer to OSHA’s website. This .gov site provides valuable safety information for chainsaw users.
In summary, the Westcoast Saw Depth Plate is a tool that is durable, versatile, and extremely functional. Designed to make setting raker heights easier, it becomes an important asset for any user. When cared for and used properly, it promises to deliver excellent performance.
Is there a recommended frequency for adjusting the depth gauge?
Adjust the depth gauge using a gauge guide tool and a flat file to optimize cutting efficiency. Follow the steps outlined for improved productivity and safety. Happy sawing!
Is it possible to over-adjust the depth gauge of a chainsaw?
Adjust the depth gauge of your chainsaw to optimize material removal rate for increased productivity. Follow these steps for efficient cutting: clean chain, fix chain, file depth gauge. Happy sawing!
Could improper depth gauge maintenance damage the chainsaw itself?
Yes, improper depth gauge maintenance can damage your chainsaw. Adjusting them properly ensures maximum efficiency and productivity. Follow the steps outlined in the blog post to maintain your chainsaw’s cutting performance.
This post was very informative and provided valuable insights into chainsaw maintenance.
Thank you for your feedback on chainsaw maintenance. I’m glad you found the information valuable! Remember to adjust the depth gauge for optimal cutting efficiency. Happy sawing!
I never realized that something as small as the depth gauge could impact a chainsaw’s productivity so much.
Thank you, Lisa! I’m glad you found the information helpful. Adjusting the depth gauge can significantly improve your chainsaw’s productivity. Let me know if you have any more questions.
What signs should I look for to know that my chainsaw’s depth gauge needs adjustment?
To adjust the depth gauge on your chainsaw, use a depth gauge guide tool and a flat file. Maintain the top level with the guide tool for best results.
Would a chainsaw work perfectly fine without adjusting the depth gauge?
Adjusting the depth gauge is crucial for optimal chainsaw performance. Follow the steps outlined to ensure your chainsaw cuts efficiently and boosts productivity.
How often should depth gauge adjustment be done for optimal performance?
For optimal performance, adjust the depth gauge every time you sharpen your chainsaw chain. Maintaining a proper depth gauge ensures efficient cutting operations and boosts productivity.
What other tools are necessary for regular chainsaw maintenance?
Adjusting depth gauges on your chainsaw is crucial for optimal cutting efficiency. Use a depth gauge guide tool and flat file for leveling the gauges. This ensures increased material removal rate and enhances productivity.
I never knew how much difference adjusting the depth gauge could make in a chainsaw’s performance.
Adjusting your chainsaw’s depth gauge is a game-changer for improved cutting efficiency. Glad you found the blog post helpful!
The step-by-step guide on adjusting the depth gauge was easy to follow and understand.
Thank you, Jill! I’m glad you found the guide easy to follow. Adjusting the depth gauge is key to maximizing your chainsaw’s efficiency. Happy sawing!
The graphical demonstration really helped me understand the concept of depth gauge adjustment.
Thank you for your feedback, Benjamin! I’m glad the graphical demonstration was helpful to you. Adjusting the depth gauge is crucial for optimal chainsaw performance. Happy sawing!
I will definitely be checking my chainsaw’s depth gauge after reading this article.
Thank you for reading the article! Adjusting your chainsaw’s depth gauge is key to improving efficiency. Let me know if you have any more questions. Happy sawing!
Thanks for explaining the connection between depth gauge adjustment and material removal rate.
Thank you for the positive feedback, Craig. I’m glad the explanation was helpful. Let me know if you have any more questions or need further clarification.
I appreciate the detailed step-by-step guide on adjusting a chainsaw’s depth gauge.
Thank you, Vanessa! I’m glad you found the guide helpful. Adjusting depth gauges is key to maximizing productivity when using a chainsaw. Happy sawing!
This article has inspired me to pay more attention to the maintenance of my chainsaw’s depth gauge.
Thank you, Stacy! Maintaining your chainsaw’s depth gauge is crucial for optimal cutting efficiency. Keep up the good work!
Interesting read, I had no idea about the importance of depth gauge maintenance.
“Thank you, Judy! I’m glad you found the information on depth gauge maintenance useful. It’s a crucial aspect of chainsaw maintenance that often gets overlooked. Happy sawing!”
Thanks for clarifying why depth gauge maintenance is crucial for chainsaw efficiency.
Thank you, Juan Gregory! Adjusting depth gauges is key to ensuring optimal chainsaw efficiency. Your appreciation is valued!
Great explanation on the impact of depth gauge adjustment on cutting efficiency.
Thank you for your insightful comment, Terry! I’m glad you found the explanation on depth gauge adjustment helpful. Happy sawing!
Why is the importance of maintaining and adjusting the depth gauge of a chainsaw not commonly emphasized in chainsaw user manuals?
Thank you for your question, Rebecca. Adjusting the depth gauge is crucial for optimal chainsaw performance and productivity. I appreciate your interest in this important aspect of chainsaw maintenance.
Are there any risks associated with not adjusting the depth gauge of a chainsaw?
Adjusting your chainsaw’s depth gauge is crucial for optimal cutting performance and safety. Make sure to keep them well adjusted to maximize productivity and prevent accidents. Thank you for your question, Johnni!