Humans have been gardening for a long time and have developed tools that make planting more effortless and efficient. A planting dibble is an example of such a tool. This straightforward tool makes holes in the ground for planting seedlings and is also known as a dibber or dibble stick.
Planting Dibble:
A planting dibble is a handheld tool for making holes in the soil for planting seeds and young plants. It has two notable parts, a pointed end used for making holes in the ground and a handle for holding the tool and pushing it into the ground. It is a widespread tool among gardeners.

In this article, I will explore the many uses of the planting dibble and explain how to plant different types of seeds. At the end of the blog, I will answer some of the frequently asked questions about Confers, pine tree seedlings, and bare-root white pines.
Contents
- 1 How does a dibble look
- 2 Uses of Planting Dibble
- 3 How to use a dibble
- 4 How do you plant conifer plugs
- 5 How do you plant bare-root white pines
- 6 How to plant pine tree seedlings
- 7 What is the best time to plant conifers
- 8 How deep to plant conifers
- 9 When to plant pine tree seedlings
- 10 How deep should you plant a pine tree
- 11 How far apart should I plant pine trees
- 12 How far apart should I plant white pines
- 13 References
How does a dibble look
As mentioned earlier, a dibble has two parts, a handle, and a pointed end. The pointed end can either be triangular or square, depending on the manufacturer and its purpose. Triangular dibbles help make holes for bulbs, while conical dibbles work better for larger plants.
A dibble’s handle is generally made from wood, but there are also versions made from plastic or metal. It is designed so that it is easy to grip and comfortable to hold.
Uses of Planting Dibble
A planting dibble is a versatile tool with many uses in gardening and farming. Some of the more important uses include:
- Planting bulbs: Dibbles are often used to make holes in the ground for planting bulbs, such as tulips, daffodils, and lilies. The dibble’s pointed end allows easy and precise planting depth.
- Transplanting seedlings: Dibbles are also helpful for transplanting seedlings from seed trays or pots into the ground. The dibble can make a hole the perfect size for the seedling’s roots, ensuring that it is planted at the correct depth and the right angle.
- Making seed rows: Dibbles are commonly used to make rows for planting seeds. The pointed end can make a hole in the soil at a consistent depth, allowing for even seed spacing and easy germination.
- Aeration: Dibbles can also be used to aerate the soil by making small holes that allow air and water to reach the roots of plants.
- Making planting holes in hard soil: Dibbles are also helpful for making holes in hard or rocky soil. It can break through the hard surface, allowing the soil to be dug and prepared for planting.
- Marking out planting areas: Dibbles can also be used to mark out planting areas before planting. This can help plan the garden layout.
A planting dibble is a simple but essential tool that helps make planting more straightforward, precise, and efficient.
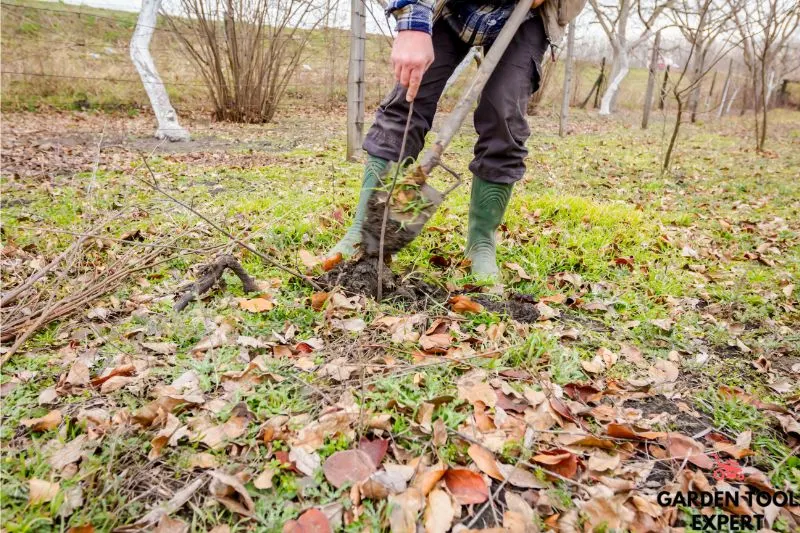
How to use a dibble
The dibble enables the planter to work efficiently fast and plant hundreds of trees in a single day. The following steps describe how to use a dibble properly for planting a seedling:
- Step 1. Start close to the seedling: Insert the dibble bar a few inches from the seedling at an angle into the ground. Unlike a shovel, as a dibble bar does not have a place for your foot, you must use your upper body strength to jab it into the ground in one motion.
- Step 2. Use the same depth: Remove the dibble bar by pushing it forward to make a hole in the ground. Place the seedling in the hole. If the roots are not pointing downward, you may need to adjust them. Plant the seedling at the same depth as in the nursery. To help find this depth, look for a dark line just above the root section.
- Step 3. Plant the seedling firmly: Push the dibble bar a couple of inches into the ground. Pull the dibble bar towards you to move the soil around the seedling root system’s base, then push it over the top of the roots. Now the seedling is firmly planted.
- Step 4. Repeat the steps: Repeat the process to make another hole. Fill the second with soil.
- Step 5. Fill the last hole: Fill the last hole with soil using your toe or heel, then firm it up with your foot. Gently press your foot into the soil around the seedling to keep the seedling upright.
How do you plant conifer plugs
Let’s first look at handling and storage, followed by planting conifer plugs
● Handling and Storage of conifer plugs
Maintain the trees’ coolness and moisture levels. Roots that have dried out are dead, and bare-root seedlings can also dry out. When you remove them from the shipping bundles, I recommend keeping the seedling roots covered and moist, so they are not damaged. I also recommend planting them in the rain.
● Planting conifer plugs
For planting conifer plugs, we will look at the hole, the planting depth, the positioning of the roots, and filling the hole:
- Hole: Create a sound hole. To accommodate the root system, holes should be deep enough. Break hard soil to improve root growth. I recommend digging an additional 3 inches above the root length to have rough soil for the roots. So for ten inches long roots, dig 13 inches.
- Depth: Trees should be planted at the same or slightly deeper depth than in the nursery. Planting too shallow exposes the upper roots, causing them to die. Too deep planting can result in buried needles.
- Positioning of roots: Return the roots to their original position. Ensure the planting hole is large and deep enough to prevent the root system from becoming crowded or j-rooted.
- Filling the hole: Ensure that the soil around each plant is firm. Fill the hole with loose, moist soil, keeping the tree upright and at the proper depth. The roots in these areas may be damaged or killed if dry soil, rocks, or surface litter fall into the hole. Firmly press the moist soil into the hole once it has been filled.
How do you plant bare-root white pines
White pine is usually best planted in the spring. Soil moisture is generally adequate, and cooler temperatures help keep young seedlings from drying out. Planting season in southern Minnesota is typically from early April to early May.
Let’s look at handling and storage, followed by planting bare-root white pines.
● Handling and Storage of bare-root white pines
- Protecting roots: Many white pine trees perish before their roots reach the ground. Young bare-root tree seedlings should be kept cool and moist until they are planted. When you receive your tree seedlings, check the roots for moisture. If they are particularly dry and cracked, return them to the seller. Wet them down and plant them as soon as possible if they’re a little dry.
- How to store: Keep them in the package they came in and place them in a cool, well-shaded location with some air circulation around the package if you need to store them for a few days before planting.
● Planting bare-root white pines
- Ensuring Protection: During the planting process, ensure the tree roots are kept moist and not exposed to periods of sunlight and drying. Even a few minutes in a light breeze on a sunny day can kill the roots and the seedling.
- Hole: White pine seedlings can be planted with a shovel, planting bar, or spade. Check that the hole is deep and wide enough to allow the roots to spread out and extend completely downward. Digging shallow or small holes can cause the roots to twist or ball up.
- Depth: Ensure that the trees are planted at the correct depth. If you look closely at one of the trees, you will notice a natural transition between the root and the stem. Plant the trees to the indicated depth.
- Finishing up: After adequately positioning the tree in the hole, gently pack the soil around it to remove any air pockets. Water the tree to settle it and, if possible, moisten the soil. Gently pull on the tree after it has been planted. If it easily comes out of the hole, the soil needs to be packed more tightly.
How to plant pine tree seedlings
Growing pine trees from seed can be difficult. However, you can be successful with a little patience and determination. Let’s learn how to grow a pine tree from seed.
The seed in pine cones is usually distinguished by a prominent-looking wing attached to the seed to aid dispersal. When the seeds fall from the tree in autumn, usually between September and November, they can be collected.
● Germinating seeds:
- Collecting seeds: To collect seeds, gently shake fallen cones upside down. It may take a few seeds to find any suitable for planting. It is critical to have good, healthy seeds to have success when germinating pine seeds.
- Check seeds: Place your seeds in a container filled with water and separate those that sink from those that float to see if they are viable. The seeds with the lowest chance of germinating remain suspended in the water (floating).
● Planting:
- Storage: If you have enough viable seeds, dry them and store put them in airtight containers. Of course, you can plant them immediately, depending on when you harvest them, as pine tree seeds are typically planted around the first of the year.
- How to plant: Start the seeds in small pots using well-drained potting soil. Make sure each seed is vertical and pointed end is facing downward before pushing it just below the soil’s surface.
- Taking care: Place the pots in a bright window and thoroughly water them. Keep the seeds moist and wait for germination, which can take months but should happen by March or April.
What is the best time to plant conifers
Conifers are best planted in early fall when temperatures are cooler, and rainfall is plentiful. Plant the tree on an overcast day with plenty of soil moisture to reduce transpiration or water loss.
Planting bare-rooted stock is only possible during the dormant season, which limits planting to November to April. Planting in the middle of winter is best avoided because cold, dry winds can desiccate young plants before the roots can make new growth. After April, planting is only possible if the plants have been kept dormant in a cold store.
How deep to plant conifers
To plant conifers, the hole should be dug two to three times the width of the root ball, and its depth should be the same as the root ball’s height.
When to plant pine tree seedlings
Pine seedlings can be planted from December to February, but containerized seedlings can also be planted in the summer. As long as soil moisture is adequate, seedlings for winter plantings should be planted as early as possible (December through January).
How deep should you plant a pine tree
For planting pine seedlings, you will need a hand-planting tool or machine planter. This will help create a planting slit at least 8 inches deep. I recommend a slightly deeper hole of 10 inches and a width of 3 inches to accommodate pine seedling roots and allow proper alignment.
How far apart should I plant pine trees
There is no single best practice for spacing pine trees. It depends more on how the tree is used than on the species. Most evergreen conifers, including pines, grow best when planted 6 to 12 feet apart. Trees less than 6 feet apart will almost certainly need to be thinned, and weed control will be more difficult with trees spaced more than 12 feet apart.
The larger the pine species, the greater the spacing. Pines that can reach great heights should be spaced 12 feet apart. These include White and Austrian pines, which can reach heights of 60 feet. Mugo pines, on the other hand, grow to a maximum height of 10 feet and can be spaced as close as 6 feet apart.
How far apart should I plant white pines
The minimum planting density recommended for white pine is 7 x 8 feet, but a 6 x 6 foot spacing is acceptable.
How often should a planting dibble be cleaned?
Herbert, a planting dibble should be cleaned after each use to prevent the spread of disease among plants. Simply wipe it down with a disinfectant to keep it in good condition.
I can’t wait to start using a dibble in my garden.
Thank you, Noelle! I’m glad you’re excited to start using a dibble in your garden. It’s a great tool that makes planting more manageable and efficient. Enjoy your gardening adventures!
Great explanation of dibbles!
Thanks, Ivan! I’m glad you enjoyed the explanation of dibbles. They’re essential tools for any gardener to have on hand. Happy planting!
Are there any safety precautions to take when using a dibble?
Safety precautions when using a dibble include wearing gardening gloves to prevent blisters and cuts. When not in use, store the dibble in a safe place to prevent accidents. Enjoy your planting!
This was very informative.
Thank you so much, Pauline! I’m glad you found the article informative. If you have any questions, please don’t hesitate to ask!
Will definitely try using a planting dibble now.
Thank you, William! I’m glad you found the information on using a planting dibble helpful. Happy gardening and best of luck with your planting endeavors!
I appreciate the detailed instructions.
Thank you for your kind comment, Oscar. I’m glad you found the instructions helpful! If you have any more questions about planting dibbles or gardening, feel free to ask.
Interesting read!
Thank you so much, Rebecca. I’m glad you found it interesting! Let me know if you have any questions about planting dibbles or other gardening tools.
Are there different sizes of dibbles available?
Yes, there are different sizes of dibbles available depending on the manufacturer. Some have a triangular end for planting bulbs, while others have a conical end for larger plants. Hope this helps!
Can dibbles be used in all types of soil?
Hi Diana, yes, dibbles can be used in all types of soil to plant bulbs, seedlings, and make rows for seeds. It’s a versatile tool that makes gardening efficient.
How can I get my hands on a planting dibble?
You can easily find a planting dibble at any garden supply store or on online retailers such as Amazon or eBay. Have fun gardening!
Can dibbles be used for indoor planting?
Yes, dibbles can be used for indoor planting. They’re versatile tools for making precise holes in the soil for planting seeds and seedlings. Enjoy using them in your indoor gardening endeavors!
What other gardening tools work well with a planting dibble?
Hello, Ross! Some other useful tools for gardening with a planting dibble are a garden trowel, a hand rake, and a watering can. Hope this helps!
I love learning about gardening tools.
I’m glad you enjoy learning about gardening tools, Nellie! Planting dibbles are quite versatile and make gardening much more precise and efficient. Enjoy exploring the world of gardening!
The step-by-step guide was helpful.
Thank you, Maurice! I’m glad you found the guide helpful. Let me know if you have any questions or need further assistance. Happy gardening!
What are the best brands for planting dibbles?
On brands for planting dibbles, some great options are Gardener’s Supply Company, Fiskars, and DeWit. They’re all reliable brands that offer quality dibblers.
I didn’t know dibbles were so versatile.
Thank you, Laurie! Dibbles are indeed versatile tools that make planting easier and more efficient in various gardening and farming tasks. So glad you found the information helpful!
Where can I find a good quality dibble to purchase?
You can find good quality dibbles at garden centers, hardware stores, or online suppliers. Look for a dibble with a comfortable handle and a sturdy, pointed end for efficient planting.
Thank you for sharing this information.
I’m glad you found the information helpful, Gerald. If you have any questions or need further assistance, feel free to ask!
Very clear and easy to understand.
Thank you, Dan! I’m glad you found the explanation of planting dibbles clear and easy to understand. Feel free to reach out with any questions you may have.