Does your chainsaw’s lack of tightness stump you? We’ve got the expertise to assist. Our guide highlights three usual issues that might be causing your chainsaw chain to loosen and offers effective remedies.
3 Issues and Solutions Why Chainsaw Chain Won’t Tighten Anymore:
Three common issues causing chainsaw chain loosening are improper chain setting, temperature changes, and worn sprockets. Solutions involve resetting chain alignment, allowing cooling between uses, and manually adjusting tension. Regular maintenance helps prevent these.

Dealing with a loose chainsaw chain can be frustrating. But we’re here to help. Our guide identifies three common problems and their solutions. Keep going to discover more!
Contents
- 1 Tight the chain before using the chainsaw
- 2 3 Reasons Chainsaw Chains Don’t Tighten
- 3 How To Tighten Chainsaw Chain
- 4 Remarks:
- 5 Main Reasons for Chainsaw Chains Becoming Loose: Improper Chain Setting
- 5.1 • The Impact of Temperature On Chainsaw Chains’ Tightness
- 5.2 • Guide Bar and Chain Condition: Another Major Contributing Factor
- 5.3 • Internal Mechanism Failure: How It Affects Chainsaw Chain Tension
- 5.4 • The Risk of Over-tightening the Chain
- 5.5 • Using a Scwrench: A Handy Tool
- 5.6 • Further Actions: Understanding Basic Chainsaw Mechanics
- 6 How to Check and Adjust Your Chainsaw Chain Tension
- 6.1 • Testing Chainsaw Chain Tension
- 6.2 • Understanding Proper Chainsaw Chain Movement
- 6.3 • Chainsaw Chain Adjustment Process
- 6.4 • Using the Tension Control Screw
- 6.5 • Issues with the Tension Adjustment Screw
- 6.6 • Importance of the Correct Guide Bar Size
- 6.7 • Dealing with a Persistently Loose Chain
- 6.8 • How to Remove Chainsaw Chain Links
- 6.9 • Prioritizing Safety in Chainsaw Operations
- 7 Analyzing the Problem: Stihl Chainsaw Tension Screw Issue
- 7.1 • Proposed Solution: Manually Tightening the Chain
- 7.2 • Another Possibility: Worn Drive Sprocket
- 7.3 • Shedding Light on Chain Issues: Older Chains Might Be Worn, Too Long
- 7.4 • Breaking Down the Solution: Addressing Worn Sprocket
- 7.5 • Understanding Chain Mechanics: Chains Can Stretch with Time
- 7.6 • A Final Note: Expert Recommendations
Tight the chain before using the chainsaw
To properly work with a chainsaw, you must tighten the chain each time before using the machine. But how can you know when to pull the chain and when to loosen it up?
You need some general knowledge of different chain positions and conditions to know that. Mainly, there are three conditions that your chain can be in. Here are three tightening conditions of chainsaw chains!
1. Under Tightened
To know the correct tension of the chain, pull it upwards and see how well it is attached to the base. If the chain seems loose and comes off without you putting any effort, it is undoubtedly under-tightened.
An under-tightened chain will be sluggish during operation. On top of that, the chain can come off at any time during the job, and it can cause severe damage to the operator and surroundings. An under-tightened chain will not function properly, and the performance will decrease in every way possible.
• The Impact of an Under-Tightened Chain on Cutting Performance
When a chainsaw chain becomes under-tightened, it loses the proper grip and, as a result, can’t cut the way it’s supposed to. This causes a decrease in performance and reliability.
Sometimes, if the chain is loose, it can come off while the machine is on. Just imagine something as dangerous as that flying towards you or your house. The result won’t be pretty, and chances are, it will be more devastating than the effects of a wrecking ball.


Signs of a loose chainsaw chain are quite clear – if the chain sags away from the guide bar or pulls away easily, it’s too loose. I’ve seen many cases where a loose chain caused uneven cuts.
2. Over Tightened
If pulling the chain does not show any effect and the chain seems tightly attached to the bar, the chain is over-tightened, which is also not good. Over-tightened chains can’t perform correctly as they are too close to the bar. This can cause adverse effects on the handlebar, and controlling the chainsaw will become more complex.
Over-tightened chains sometimes get stuck. The condition becomes more uncontrollable if the machine runs at high speed. The chainsaw can stop abruptly during the operation and get stuck at a certain point. This can cause severe damage to the mechanical parts of the chainsaw and even cause an explosion out of the blue.
3. Properly Attached
What’s the proper position for the chain? If you give it a pull and find a tiny space between the chain and the base, the chain is correctly attached to the bar. The space between the chain and the bar is vital as it will determine the efficiency of the chainsaw.
An adequately attached chain will make the chainsaw perform better and lag less. A properly attached chain will function as it should, and you won’t have to retighten it every time. There must be a simple gap between the two surfaces to perform correctly. The gap should be less than half an inch.
Chainsaw Issue | Reason Involved | Troubleshooting |
|---|---|---|
Settings | If the parts are damaged slightly, they can be replaced, but if a permanent or manufacturer defect is involved, it’s better to seek professional help. | If the parts are damaged slightly, they can be replaced, but if a permanent or manufacturer defect is involved, it’s better to seek professional help. |
Heating | To get rid of the heating problem, the chainsaw must be stored at a dry place at room temperature, and the device should not be used repeatedly without stopping for it to cool down. | If the parts are damaged slightly, they can be replaced, but if a permanent or manufacturer defect is involved, it’s better to seek professional help. |
Mechanical | The complex structure of the chainsaw can come with defects from the manufacturer or get damaged due to over-usage | If the parts are damaged slightly, they can be replaced, but is a permanent or manufacturer defect is involved, it’s better to seek professional help. |
3 Reasons Chainsaw Chains Don’t Tighten
Now that we’re clear on the chain positions, it’s time to know which conditions lead the chain to become loose over time. These reasons apply to most of the chainsaw types in the market. Here are the reasons behind the loosening of chainsaw chains!
1. Chain Setting
The chain’s setting denotes its initial position when it was manufactured. If your chainsaw chain isn’t correctly attached to the exact position, no matter how much you try to set it to the correct position, it won’t work. The setting denotes the precise position of the chain on the bar.
The required tension of the chain depends on the position. When your chainsaw chain becomes loose, you need to set the chain to this exact setting to get the best results.
Some chainsaws in the market have automatic adjusting levers that adjust the chain to the perfect setting after each use.
– The Importance of Proper Bolt Placement
Two bolts are attached to the sidebar panel to strengthen the attachment further. The bolt defines the strength of the attachment. If the bolt is misplaced or not perfectly tightened, the chain won’t be in its place for too long.
If your chainsaw has a setting error, the chain will abruptly get out of position and loosen up over time. This can happen because of a manufacturer error, rough usage, and other causes.
Whatever the reason, the only way to fix your chainsaw at this stage is to reset the settings and ensure the chain is correctly aligned with the side panel.
– The Role of Chain Settings in Chainsaws
Different types of chainsaws come with varying chain settings. Some are loosely fit on purpose, while others require tight fits. To know if your chainsaw has a problem with its chain setting, look through the manual and find the basic information on the chain material.
Steel alloys are reliable because they don’t get damaged by corrosion. Your chain setting may get hurt because of the material, too. So, check the material type before determining the problem associated with the chain.
2. Temperature Variation
The chainsaw is a potent piece of technology with a high-performing motor attached to the end. The engine runs at a very high speed, and the chain runs with the power it gets from it. With high velocity, a specific rise in temperature is inevitable.
I’ve seen older chainsaw models that would rise to 50 degrees in just a few seconds. The temperature variation creates a challenging situation for the chain. As the length of metallic substances increases and the temperature rises, the same goes for chainsaw chains.
You will quickly notice the change when you use your chainsaw for an extended period. The chain length abruptly increases to a larger size because of temperature variation. As the size increases, the chain becomes loose.
– Impact of Cold Storage on Chainsaw
On the other hand, if the chainsaw is stored in a rather cold place, the chain will gradually tighten more as metallic materials contract when held in a hard place.
For the temperature variation, you must fix the chain’s position after and before every use. Living in a very hot or cold country can be very troublesome.
The surrounding temperature plays a vital role in deciding the quality of the metallic chain. The chain tension will rise or fall abruptly whenever the chainsaw is used.
In my 20 years of experience, I’ve found that a chainsaw chain won’t tighten anymore mainly due to a worn-out guide bar, a damaged tensioning screw, or an overly stretched chain.
3. Mechanical Problem
Besides the setting error and temperature issues, there’s a bigger problem surrounding the chainsaw chain, and it’s related to the mechanical side.
To understand this problem correctly, you need to know the basic outline of the processes in your chainsaw and what happens when you tighten or loosen the chainsaw chain. The chain tension is calculated by the distance available between the bar and the sprocket.
The internal structure of the chainsaw contains a bar attached at one end to the sprocket, with the chain attached to the whole bar. When you rotate the nut clockwise, the bar’s distance and sprocket increase. That means the bar gets further away from the sprocket, so the chain attaches itself tightly to the bar.
– The Role of Proper Settings in Chainsaw Functioning
If your chainsaw chain becomes loose without even using it, there might be an issue with the proper settings. If the internal structure of the chainsaw malfunctions, the chain won’t stay in its place for long.
If the internal structure is somehow damaged or causing defects, repeatedly tightening the chain won’t work. If you face this problem, you should take your chainsaw to a local shop. You can do many types of maintenance by yourself but can’t fix the mechanical issues.
How To Tighten Chainsaw Chain
As you already know the different positions of chains in the chainsaw, troubleshooting it will not be so difficult. But the most important thing to keep in mind is knowing your limits. You can’t tighten the chain too much or too little.
The pressure proportion should be at a certain level that suits the exact type of your chainsaw. To know the proper pressure value, look through the manual provided with your chainsaw. The steps involved are pretty straightforward, but you must follow them cautiously.
• The Risks of Incorrect Chain Tightening
There will be a few screw openings and position-shifting processes, and each of these should be placed in its proper position. Even the slightest mistake can cause a lot of damage to your property and even to yourself. To start with the process, we need some tools first.
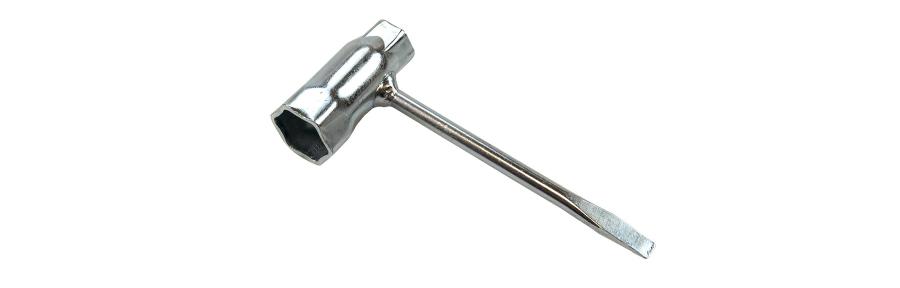
There’s a pretty widespread and popular tool called Scwrench that’s supplied with the chainsaw. It’s a general combination of a screwdriver and a wrench. This tool is pretty easy to find and works like magic in the case of chainsaw troubleshooting. Here are the steps to follow to tighten your chainsaw chain!
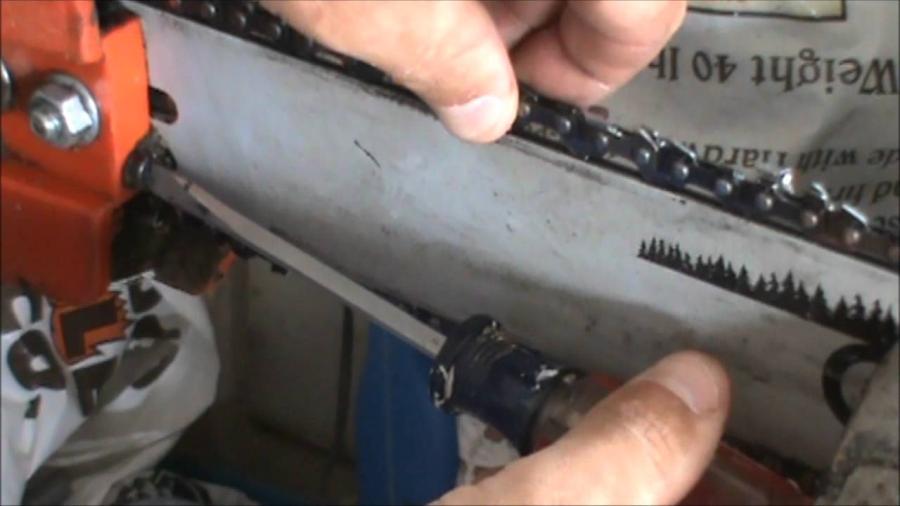
– Step 1: Loosening The Nuts
To begin troubleshooting, loosen up the nuts at the sidebar. The sidebar works as a support for the chain and guide bar. Loosening it up will provide easier access.
Use a Husqvarna wrench to remove the nut from the sidebar easily. Don’t forget to keep the nut in a safe place while you’re working, as these tiny things tend to get lost.
Do this with caution as the nut is loosely connected to the base, and putting too much pressure can damage the base along with the nut. I don’t think there’s anyone who would try to remove the nut while the machine is on, so always take safety precautions before attempting to troubleshoot the chainsaw.
– Step 2: Rotating The Side Bar Nut
This is the primary step of the tightening process. Remember, this step will include manually rotating the sidebar nut to tighten the chain. The pressure you need to pull the chain correctly must be decided by you only.
First, look at the sidebar and locate the nut attached to the panel. Now, take the wrench and rotate the nut in a clockwise direction. Each rotation will end up tightening the chain little by little. Pull the chain upwards and try to feel the tension between the chain and the bar to know if your work is done.
If the chain feels adequately attached, your work here is done. Pull the chain up over and over again if the pressure seems less. Rotate the nut in a counterclockwise direction if the chain feels over-tightened.
Step 3: Final Touch
As you did in the first step, attach the nut you extracted from the sidebar and make sure it’s properly connected. After that, pull the chain again and see if it’s tightened as expected.
Give the chainsaw a go and see if the chain is working perfectly or not. Repeat the steps from the top if there’s any problem with the chain. When the connection between the chain and the base is perfect, it will work like magic.
Due to the reasons I mentioned earlier, the chain can quickly lose tension even after a single use. You can try buying an automated chain-fixing chainsaw to ensure the chain stays in place. These chainsaws are more reliable and need less maintenance than traditional ones.
Remarks:
The chainsaw is a beautiful piece of technology with great power. If properly used, it can cut through almost anything. And, if it’s not handled with care, the damage can be severe. The chain of a chainsaw needs to be in the proper alignment to function perfectly.
If the chain has stretched, it’s a sign that it’s worn down, and you need to replace it ASAP. As I’ve mentioned, all the necessary details to find out the problems with the chain and how you can resolve them. It won’t be so easy if you don’t remember the basics.
• The Importance of Knowing the Basic Structure
Remember, you need to know the essential functions of machinery to troubleshoot it properly. So, get the hang of the basic structure and working principle from the notes above and work properly.
If you hear unusual sounds, it’s probably because the tensioner isn’t working correctly or the chain has been installed with the wrong size.
Always check if the size chain matches the drive link count. If the chain doesn’t stay tight for long, no matter how hard you tighten a chainsaw chain, it indicates that the threads on the tensioner are worn out.
• Chain Tensioner Screw
A pivotal component of the mechanism that tightens chain drives is the chain tensioner screw. When this screw becomes stripped, it dramatically reduces its effectiveness in performing its role, originating severe malfunctions.
The tensioner screw secures the chain in place while it operates. If, in any case, it comes loose or is stripped, the chain will not tighten correctly. This is a common problem that often arises due to over-tightening or cross-threading.
From my experience, maintaining the chain tensioner screw in the proper condition can avert many chain-tightening issues. A periodic check of the screw to ensure that it is not stripped is highly advisable.
Details about stripping processes can be accessed from the University of Cambridge Materials Science Department website.
• Heat-Induced Chain Stretch
Industrially, chains are subjected to high heat conditions, which can lead to excessive stretching over time. The heat causes the metal to expand, increasing the length of the chain.
The stretching of a chain can undermine the functionality of the chain tensioner, ultimately leading to a failure in its operations. The tensioner works on specific dimensions, and any slight alteration to the chain length can disrupt the equilibrium.
From my professional standpoint, avoiding exposing chain drives to high heat or installing heat-resistant chains can help mitigate this problem.
• Chain Size Mismatch
In assembling chain drives, using the wrong chain size can result in improper tightening. The chain tensioner screw dimensions are designed to accommodate a specific chain size, and mismatched combinations can lead to unfavorable outcomes.
The importance of using the required chain size cannot thereby be underemphasized. Always consult the equipment manual or an experienced technician to confirm the correct chain dimensions.
• Worn-out Chain Sprockets
Chain sprockets, over time, tend to wear out due to the continuous rotation and friction from the chain. This causes irregularities in the sprocket tooth profile, making it difficult for the chain to sit correctly and tighten.
Through my professional journey, I have found that routine maintenance and periodic replacement of worn-out sprockets alleviate the malfunctions attributed to this issue.
The National Institute for Occupational Safety and Health (NIOSH) has valuable resources for maintaining the integrity of mechanical components.
• Chain Brake Engagement
The chain brake may sometimes be engaged, preventing the chain from tightening. The chain brake is a safety feature that stops the chain when a sudden movement or kickback occurs.
However, if the chain brake is inadvertently left engaged, the chain will not tighten as it should. It is paramount always to ensure the chain brake is disengaged before attempting to pull it.
Through experience, I can affirm that double-checking the chain brake status averts unnecessary chain-tightening glitches.
The Alliance for Green Heats chain-drive safety protocol is an excellent additional resource.
Main Reasons for Chainsaw Chains Becoming Loose: Improper Chain Setting
The foremost issue leading to chainsaw chains becoming loose is incorrect chain settings. Based on my experience, a proper adjustment is essential to maintain the stability of your tool. An open chain can make your chainsaw less effective and hazardous at the same time.
• The Impact of Temperature On Chainsaw Chains’ Tightness
If you notice, you may find your chainsaw chain often getting loose during high temperatures. The reason for this is straightforward – chainsaw chains are made of metal. These metals tend to expand as the temperature goes up.
When the saw heats up during use, the metal expands, causing the chain to loosen. Therefore, allowing the chainsaw to rest regularly during use is ideal. And remember, always handle it with care and caution when heated up.
• Guide Bar and Chain Condition: Another Major Contributing Factor
The overall condition of the guide bar and chain plays a crucial role in maintaining the chains’ tightness. Ensuring that the chain and guide bar are clean and debris-free is essential.
Moreover, the guide bar should not be worn out. Combining a dirty chain, debris-caked guide bar, and worn-down bars can significantly contribute to chain looseness.
• Internal Mechanism Failure: How It Affects Chainsaw Chain Tension
Sometimes, the chainsaw’s interior mechanism’s failure or damage can influence the tensioning system. Issues such as malfunctioned bearings, gear problems, or obstructed oiling systems can cause the chainsaw chain to lose. Regular service and maintenance can help in minimizing these issues.
• The Risk of Over-tightening the Chain
Everyone wants their chainsaw to be on point and function without any glitches. However, many people tend to over-tighten the chainsaw chain in this process.
This common mistake leads to numerous problems, including premature chain and bar wear. The appropriate chain tension can be determined using a pull test. Remember, an overly tightened chain is not a solution; it can cause more harm.
Overlooked aspects of chainsaw maintenance include regularly cleaning the air filter, checking the spark plug, and ensuring the oiler is working properly. These can greatly extend the life of your chainsaw, as I’ve seen in my two decades in the field.
• Using a Scwrench: A Handy Tool
A unique tool known as a wrench, a combination of a screwdriver and wrench, can be a game-changer for tightening a chainsaw chain. It’s easy to use and can simplify your chainsaw maintenance task.
• Further Actions: Understanding Basic Chainsaw Mechanics
Like any other tool, a chainsaw requires an understanding its basic mechanics for efficient troubleshooting and maintenance. Gaining knowledge about chainsaw parts and their operations can go a long way in managing your tool better.
I recommend the SAF Chainsaw & Crosscut Saw Training Course from Southern Appalachian Wilderness Stewards to learn about chainsaw mechanics.
In conclusion, chainsaw chain maintenance combines appropriate chain settings, adapting to temperature changes, proper cleaning, dealing with internal mechanism issues, avoiding over-tightening, and having a wrench handy. Once you grasp these, your chainsaw will serve you better for longer.
How to Check and Adjust Your Chainsaw Chain Tension
Tending to your chainsaw’s chain is crucial for peak performance and safety. Ignoring this can lead to premature wear and tear or dangerous recoil during operation. The first step is checking the tension.
• Testing Chainsaw Chain Tension
Checking the tension of the chainsaw chain is simple. Hold the chain in the middle of the top of the guide bar. Please give it a sharp, quick snap. If the chain is well-adjusted, it will spring back into place smoothly.
A properly adjusted chain can quickly move around the guide bar but offers minor resistance. The chain’s resistance should signify an ideal level of tension, not so tight as to restrict movement but not loose enough to let the chain dismount the bar.
• Understanding Proper Chainsaw Chain Movement
It’s essential to note the correct functioning when the chainsaw is idle. There should be no movement of the chain when the engine idles.
Links of a well-adjusted chain will always stick to the guide bar, even when lifted away from it. This lack of movement during the idle state ensures an optimum level of tension that keeps the chainsaw operation safe and effective.
• Chainsaw Chain Adjustment Process
If the chain pressure isn’t ideal, you must adjust the chain. The initial step is to loosen the nuts holding the guide bar in place. These would typically be located on the chainsaw’s side panel. Before starting this adjustment process, ensure your chainsaw is turned off and cooled down.
• Using the Tension Control Screw
The tension control screw plays a crucial role in adjusting your chainsaw tension. Turning this screw to the right will tighten the chain; conversely, turning it to the left will loosen it. This makes for an easy and quick way to adjust the chain tension according to the task.
• Issues with the Tension Adjustment Screw
Remember, the tension adjustment screw and the chainsaw case threads holding the screw should be in good condition. If either is stripped, the chain will not tighten adequately.
Regular inspection of these parts will ensure your chainsaw retains an efficient operational mode. For stripped screws, consider seeking professional advice or referring to a reliable source for part replacement, like Oregon Products.
• Importance of the Correct Guide Bar Size
If you’ve recently replaced your guide bar, ensure it is the correct size. The wrong-sized guide bar can cause tension issues with your chainsaw chain, affecting safety and performance.
• Dealing with a Persistently Loose Chain
Occasionally, even after maximum tightening, the chain may still feel loose. If so, removing one or more links from the chain might be necessary. But remember, this should be the last resort after trying all other tension adjustment steps.
• How to Remove Chainsaw Chain Links
Most chainsaw chains have a master link that allows for easy removal of chain links. The process usually needs a flat-head screwdriver to open the master link and remove unnecessary links. Always remember to refer back to your manufacturer’s guide for precise instructions.
• Prioritizing Safety in Chainsaw Operations
Safety cannot be overemphasized when dealing with a chainsaw. Always adhere to safety precautions right from the start of the chainsaw setup to its usage.
Always wear appropriate protective gear, ensure your chainsaw is in good working condition, and maintain a clean, clutter-free environment when operating a chainsaw.
So, by understanding the essentials of chainsaw chain tension, regular check-ups, and adjustments, you can ensure your chainsaw performs optimally and safely. Always remember that regular maintenance is vital, not just for chainsaw longevity but also for your safety.
Analyzing the Problem: Stihl Chainsaw Tension Screw Issue
From the scenario, it’s clear this individual is facing a problem with their Stihl chainsaw’s tension screw. If prolonged, this problem may affect the chainsaw’s overall efficiency.
• Proposed Solution: Manually Tightening the Chain
The issue can potentially be addressed by manually tightening the chain. One of our posters has suggested this as a solution.
It’s relatively straightforward: Pull on the bar and use the adjusting screw to tighten the chain further until it is snug. This method has proven effective for many and might be the immediate fix required.
• Another Possibility: Worn Drive Sprocket
Nonetheless, the drive sprocket might be worn if the above intervention doesn’t work. This situation could render the chain appearing longer than it is. This link provides detailed insight into chainsaw maintenance and an understanding of the role of different components.
I recommend trying a different chain or replacing the drive sprocket as a potential resolution. Sometimes, the best solution might be the simplest one, and changing a worn-out part can restore standard functionality.
• Shedding Light on Chain Issues: Older Chains Might Be Worn, Too Long
According to another poster, the problem might not be the drive sprocket. It’s possible the chain itself is worn and has become too long. Chainsaws are machines that face a lot of wear and tear. Over time, the chains could start showing signs of this strain.
• Breaking Down the Solution: Addressing Worn Sprocket
One of the posters has confirmed that the sprocket was slightly worn in their chainsaw, and replacing the chain with a new one resolved the tightening issue. No further steps were required to address the problem. This might reinforce our hypothesis about chains extending over time due to wear and tear.
• Understanding Chain Mechanics: Chains Can Stretch with Time
We must understand chains can stretch or wear over time. This can potentially make the initial chain longer. One of our regular posters underlines this point. They mention a possible method – removing a link from the chain, but they discourage this.
Removing a link could potentially solve the issue in the short term, but it might cause other complications later on down the line. It would be beneficial to rule out this option unless it’s the last resort.
• A Final Note: Expert Recommendations
From our discussions, it’s clear that chainsaw issues – be they due to the tension screw or the chain itself – can be resolved effectively. Remember, the immediate solution might be manually tightening the chain or dealing with problematic components such as worn-out sprockets or stretched chains.
Remember to approach the problem systematically and consider all possibilities before zeroing in on a solution. Safety is paramount when dealing with mechanical issues, so ensure you’re well-protected before performing any troubleshooting exercises on your chainsaw.
The troubleshooting steps are easy to follow, I appreciate the clear instructions provided.
Thank you for your positive feedback, Louise! I’m glad you found the troubleshooting steps easy to follow. If you have any more questions or need further assistance, feel free to reach out. Happy chainsawing!
How often should I check the tension control screw on my chainsaw?
Hi Rhonda, we recommend checking the tension control screw on your chainsaw before each use. This will ensure proper alignment and prevent any potential issues. Happy sawing!
I never realized the importance of chain tension in a chainsaw until reading this article, thank you for the insight.
Thank you for your feedback, Claude! I’m glad the article helped you understand the importance of chain tension in a chainsaw. Feel free to reach out if you have any more questions.
How often should I be tightening my chainsaw chain?
Hey Owen, thanks for your question! You should tighten your chainsaw chain each time before using it to ensure proper functionality and safety. The guide on our blog post provides details on how to do this effectively. Hope this helps!
What are the risks of not maintaining proper chain tension in a chainsaw?
Hi Christine, dealing with loose chainsaw chains can be frustrating. Check out our guide for troubleshooting tips and solutions to maintain proper chain tension. Hope this helps!
I never knew temperature could affect the chain tension, this was an eye-opener for me.
Glad to hear it was informative for you, Dustin! If you have any more questions or need further assistance, feel free to reach out. Happy to help anytime.
Can using the wrong guide bar size have long-term effects on a chainsaw chain?
Hi Kristin, using the wrong guide bar size can definitely have long-term effects on a chainsaw chain. It’s important to ensure the correct size for optimal performance and safety. Let me know if you need more information.
What are some common mistakes people make when trying to tighten their chainsaw chain?
Thank you for your question, Nellie! Common mistakes include improper chain setting, temperature changes, and worn sprockets. Keep your chainsaw well-maintained!
Learning about the role of the tension control screw was crucial, it’s something I’ll pay more attention to now.
Thank you for sharing your experience with the tension control screw, Salvador. It’s great to hear that you found the information helpful. Always ensure your chainsaw is properly maintained for efficient performance!
The section about the chain brake engagement was enlightening, I’ll always double-check that from now on.
Thank you, Sarah! I’m glad you found the information enlightening. Always double-check your chain brake engagement for safety. Stay safe and happy sawing!
I appreciate the practical advice given in this article, it has definitely improved my understanding of chainsaw maintenance.
Thank you, Gilbert! I’m glad the article was helpful in improving your chainsaw maintenance understanding. Keep up the good work and happy sawing!
Are there any specific signs to look for that indicate a worn-out chain sprocket?
Thanks for reaching out! Signs of a worn-out chain sprocket include difficulty in tightening the chain and excessive chain slack. Consider checking the sprocket for wear and tear as a potential solution. Good luck!
Great video resources shared, very helpful for visual learners like me.
Glad to hear the video resources were helpful, Juan! If you’re a visual learner, practical demonstrations might resonate with you. Keep up the great work!
I appreciate the emphasis on safety throughout the article, it’s a crucial aspect of using chainsaws.
Thank you, Joan! Safety is always a top priority when working with chainsaws. If you have any more questions or need assistance, feel free to reach out. Stay safe!
The explanation about mechanical problems was really informative, I’ll keep an eye out for those issues in my chainsaw.
Thank you for your feedback, Neil! We’re glad you found the information informative. Regular checks are key to maintaining your chainsaw’s performance. Happy to help with any further questions or issues you encounter!
How important is it to regularly check the tension control screw?
Hi Willie, regularly checking the tension control screw on your chainsaw is crucial for optimal performance and safety. Make sure to adjust it as needed to prevent any issues. Keep up the good maintenance work!
I always struggle with tightening my chainsaw chain, but this guide made it much clearer for me.
Thank you for sharing your experience with tightening chainsaw chains. I’m glad the guide was helpful for you. Don’t hesitate to reach out if you have any further questions or need assistance. Happy sawing!
Is it possible to over-tighten a chainsaw chain? How do you avoid this?
Hi Lily, to avoid over-tightening a chainsaw chain, make sure to rotate the nut in a clockwise direction until the chain is properly tense. Avoid excessive tightness to prevent damage from occurring. Hope this helps!
Is it necessary to consult a professional when adjusting chain settings, or can it be done at home?
Hi Erin, considering the complexity of chainsaw adjustments, it’s best to consult a professional when dealing with chain settings. They have the expertise to ensure proper alignment and prevent potential hazards.
What are the best practices for storing a chainsaw to prevent temperature-related chain issues?
Don, storing your chainsaw in a cool, dry place can help prevent temperature-related chain issues. Regular maintenance and cooling breaks between uses are also key. Stay safe!
Thanks for the detailed explanation, it really helped me understand the issues with my chainsaw chain.
Thank you for your kind words, Lillian. I’m glad the explanation helped you with your chainsaw chain issues. Feel free to reach out if you have any more questions.