Kawasaki is a renowned company with a large variety of engines it produces. It claims to be one of the market leaders for the manufacturing of reliable and credible machines. Kawaski makes engines large enough for boats, motorcycles, and heavy industrial companies and engines small enough to support a lawnmower. Although the company is confident about its engine longevity and performance, one needs to perform certain regular repairs, overhauls, and maintenance other the components will start to malfunction and underperform.
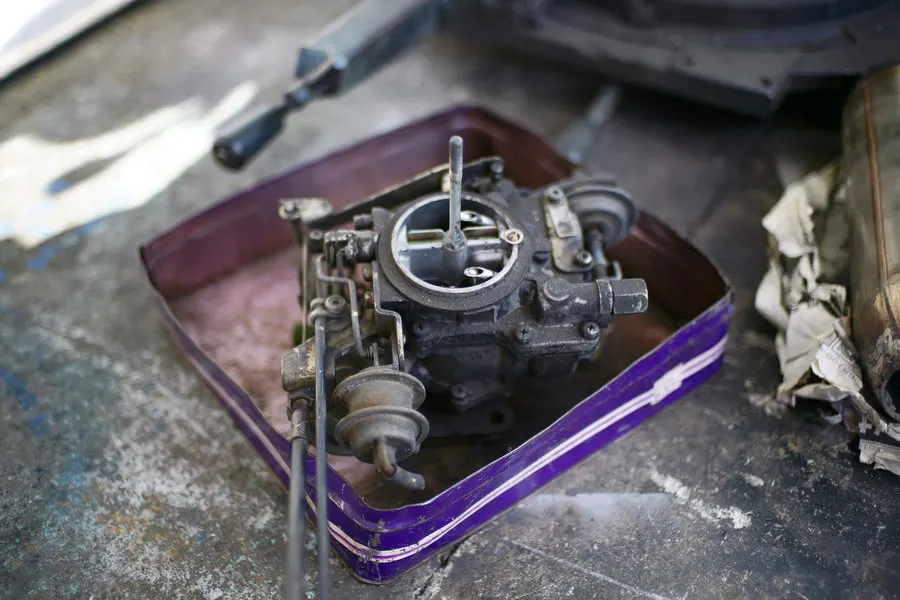
An essential component in a Kawasaki’s lawnmower is the carburetor. The carburetor is the place where the fuel mixes with the air to be burnt. If you use older gas and the carburetor is not cleaned regularly, its valves become clogged with a gummy substance. This means that the flow within the carburetor will be hindered. This can result in the engine working less efficiently and can even stop working. It is possible to clean a carburetor without removing it. But the best and most thorough way is still removing it first.
How to clean a Kawasaki Lawnmower Carburetor, step by step:
- Step 1: Gather necessary tools and supplies
- Step 2: Remove the carburetor
- Step 3: Remove the float
- Step 4: Remove the jets.
- Step 5: Remove the outer parts
- Step 6: Clean the parts
- Step 7: Install the jets.
- Step 8: Install the outer part and the floats.
- Step 9: Install the Carburetor
Checking the carburetor of your Kawasaki lawnmower should be part of regular maintenance. This article will discuss a step-by-step approach to remove and clean the carburetor of your Kawasaki lawnmower.
Contents
- 1 Clean your Kawasaki’s Lawnmower’s carburetor in 9 easy steps
- 1.1 ● Step 1: Gather necessary tools and supplies
- 1.2 ● Step 2: Remove the Kawasaki lawnmower carburetor
- 1.3 ● Step 3: Remove the float
- 1.4 ● Step 4: Remove the Jets
- 1.5 ● Step 5: Remove the outer parts
- 1.6 ● Step 6: Clean the parts
- 1.7 ● Step 7: Install the jets.
- 1.8 ● Step 8: Install outer parts and the float
- 1.9 ● Step 9: Install the Carburetor
- 2 Final Remarks:
Clean your Kawasaki’s Lawnmower’s carburetor in 9 easy steps
● Step 1: Gather necessary tools and supplies
Before you start to clean your Kawasaki lawnmower carburetor, you should gather all the necessary tools and supplies required for the job. It would be best if you had the following tools: a Philips screwdriver, a flat screwdriver, needle nose pliers, a wire brush, and a set of socket wrenches. In addition to these tools, having a carb and choke cleaner, Carburetor cleaner, a Gasket set, or a carburetor rebuild kit is highly recommended.
Once you have all the necessary tools and supplies, you are ready to clean your Kawasaki’s lawn mower carburetor.
● Step 2: Remove the Kawasaki lawnmower carburetor
The next step is to remove your Kawasaki’s lawn mower carburetor. Firstly turn the fuel valve off. The fuel valve is present on the fuel tank. Track this fuel line straight to the carburetor and remove the hose. To ensure there is no leakage, it is recommended to replace the hose once it starts to look deteriorated. In addition to that, also remove the overflow hose. Locate the clamps present at the front and the rear of the carburetor and then loosen them. This will free the carburetor, and you can remove it by wiggling and twisting it. Once it’s free from the assembly, the carburetor will still be held by the throttle cable, which would easily come off by twisting its top cap. Now the carburetor is removed.
After the carburetor has been removed and the throttle cable has been unhooked, set the carburetor aside on a piece of cloth or in a container. The instructions are for a Kawasaki lawn mower carburetor. However, the locations of parts may vary depending upon the model of your mower.
● Step 3: Remove the float
Once the carburetor has been removed, the next step is to disassemble it. The first step is to remove the float. The float is the bottom part of your Kawasaki carburetor. To remove it, remove the four screws (number may vary depending upon the model) carefully. Now you can easily pull off the float bowl. Handle the gasket with care if you are not willing to replace it.
Remove the float pin by pulling it with a pair of needle-nose pliers. Once the pins are removed, the float will now come off easily. Take some pictures or some video throughout the whole process. This makes assembling the parts later much more effortless.
● Step 4: Remove the Jets
This step varies a little bit between Kawasaki lawnmower models. Before the jets can be removed, the splash plates must be taken off first (not all carburetors have these splash plates). The jets’ main job is to allow the fuel to flow through the small hole they have to mix with air. Splash plates need to be removed to get to the jets. The man jets are usually shot and fat and will have either a hex or a flat screwdriver head. On the other hand, pilot jets are long and skinny, requiring a flat screwdriver to remove.
● Step 5: Remove the outer parts
The last part that needs to be removed is the outer parts. The air and the idle screw can be removed with the help of a flat head screwdriver. These screws are located on the sides of the carburetor in a Kawasaki carburetor. The idle screw is comparatively larger and is adjusted to make the engine idling correctly. Simultaneously, the air screw is relatively smaller and is meant to change the airflow through the carburetor.
Remove the choke with the help of a wrench. Twist the top with the use of a wrench, and slide the choke out.
● Step 6: Clean the parts
Once the lawnmower’s carburetor has been removed and unassembled, the next step is to clean every part individually thoroughly. The easiest way to clean the carburetor and other parts is to soak then in carburetor cleaner. Alternatively, you can choose to use a spray can instead of soaking. By following the can’s instructions, spray it over all the parts and use the choke cleaner for the choke.
It is recommended to wear glasses and rubber gloves as a precaution to save your eyes and skin from the harmful fumes of the cleaner. Initially, one should scrub all the parts with a wire brush and then apply the spray cleaner. The jets should be initially cleaned by flowing compressed air through them and then use the spray cleaner. They should be cleaned to such an extent that one could see through them.
Make certain that all the debris has been removed from the carburetor. After cleaning and applying the spray cleaner, one needs to make sure that the carburetor is dry. Use some compressed air through the holes and blow the fluid from all the parts of your Kawasaki carburetor. After drying, the next step is to install the o rings and gasket back on. If the older o rings and gasket are not in good condition, replace them.
● Step 7: Install the jets.
Once you have cleaned and dried all the parts, the next step is to reassemble the carburetors. It follows step 4 but in the opposite order to install the jets. Initially, the float needle and then the fuel splash plates are installed. After that, jets are installed, and finally comes the turn of the splash plates.
● Step 8: Install outer parts and the float
Once the jets are in place, it’s time to install the outer parts of the carburetor. Begin with the choke and then proceed onto the air and idle screws. During the installation of the airscrews, screw it in all the way, then back the screw out a turn and a half. This is done so that the Kawasaki engine idles properly. One should readjust them once the engine is running. The idle screws should be screwed just enough to hold them.
The next step is the installation of the float. For float installation, line the holes up with the carburetor’s holes and slide the float pin in. The hook will slide around freely. Make certain that it is centered and secured. For validation, move the float up and down to make certain that the needles move freely. After that, install the flowing bowl onto the carburetor. The Kawasaki carburetor is now fully assembled.
● Step 9: Install the Carburetor
After the carburetor is all set and ready, install the throttle slide back onto the throttle cable. Place the throttle cable through the top cap of your carburetor, and then pull the string tight. After that, place the needle in the slide, compress the spring, and hook the cable’s end onto the slide. Always make sure that the slot in the fall is lined up with the idle screw before you are about to slide. Once lined up, slide the throttle slide in and then finally screw the top cap back on. To set the baseline, look down either hole of the carburetor and screw the idle screw in accordingly. Once the slide starts to rise, screw the slide in half a turn.
Now settle the carburetor back into the rubber boot inside your Kawasaki lawnmower. Tighten the clamps so that the carburetor is held in place. Reattach the overflow line and the fuel line to the carburetor.
The air and idle screws are adjusted once your Kawasaki engine is running. Screw the air screw out to richen and in to lean out. If one needs to increase the idle, one should screw the idle in.
Final Remarks:
In this article, we discussed in detail how to clean the carburetor of your Kawasaki Lawnmower. We followed the approach to initially remove the carburetor and then unassemble it. Once all the parts are separated, they could be cleaned accordingly. Finally, we explained the reassembly and the adjustment of the carburetor.
These steps may look a little intimidating, but if followed correctly, it should not be difficult. If you have problems with one of the steps, ask a professional for help. Cleaning your carburetor should be part of regular maintenance to use your machine for many years to come.
Will cleaning the carburetor improve engine performance?
Yes, cleaning the carburetor of your Kawasaki lawnmower can significantly improve engine performance. It is an essential part of regular maintenance for optimal functioning.
Do you recommend any specific brand for carburetor cleaner?
I recommend using the Gunk Carburetor Parts Cleaner for cleaning your Kawasaki lawnmower carburetor. It is effective and easy to use.
Does this process apply to other types of lawnmowers?
Yes, this process can apply to other types of lawnmowers as well. Regular maintenance is key for optimal performance. Hope this helps!
Great step-by-step guide on cleaning the carburetor!
Thank you, Stella! I’m glad you found the guide helpful. Keeping the carburetor clean is essential for optimal performance. Happy mowing!
Practical advice for maintaining a Kawasaki lawnmower.
Thank you for reading! Regular maintenance on your Kawasaki lawnmower’s carburetor is essential for optimal performance. Keep up the good work!
Can you provide tips for maintaining other parts of the lawnmower?
Thank you for your question, Mabel! Check out the steps in the blog post for tips on maintaining the carburetor of your Kawasaki lawnmower. Hope it helps!
What tools are absolutely necessary for this process?
Hi Floyd, essential tools for cleaning a Kawasaki lawnmower carburetor include screwdrivers, pliers, wire brush, socket wrenches, and carb cleaner. Make sure to have these on hand for the process.
What are the risks of not cleaning the carburetor regularly?
Regularly cleaning the carburetor of your Kawasaki lawnmower is crucial to prevent clogs and ensure optimal engine performance. Ignoring this maintenance task can lead to decreased efficiency and potential engine failure.
Are there any signs that indicate a clogged carburetor?
Regularly cleaning your carburetor is key to maintaining a properly functioning Kawasaki engine. Signs of a clogged carburetor can include poor performance or engine stalling. It’s best to clean it periodically to avoid issues.
Excellent detailed instructions, very helpful!
Thank you for your kind words, Alicia! I’m glad you found the instructions helpful. Feel free to reach out if you have any questions or need further assistance with your Kawasaki lawnmower.
How do you know when it’s time to clean the carburetor?
Thank you for your question, Lesa. It’s time to clean the carburetor of your Kawasaki lawnmower when the engine is underperforming or not starting easily. Regular maintenance is key for optimal performance.
I appreciate the clear explanations in each step.
Thank you, Connie Price! I’m glad you found the explanations helpful. Let me know if you have any more questions.
Thank you for including the links to the videos!
Thank you for watching the videos! I’m glad they were helpful. Regular carburetor maintenance is key to keeping your Kawasaki lawnmower running smoothly.
I didn’t realize how important carburetor maintenance was.
Regular carburetor maintenance is crucial for optimal engine performance. Thank you for sharing your realization, Carrie! Remember to include this step in your maintenance routine to keep your Kawasaki running smoothly.
Can using old gas really damage the carburetor?
Yes, using old gas can damage the carburetor in a Kawasaki lawnmower. Regular maintenance and cleaning are crucial to avoid this issue. Follow the steps provided to ensure proper care.
I will definitely follow these steps to clean my carburetor, thank you!
Glad to hear that you found the steps helpful, Landon! Remember, regular maintenance is key to keeping your Kawasaki lawnmower running smoothly. Happy cleaning!
Is it necessary to clean the carburetor often?
Regularly cleaning your Kawasaki lawnmower carburetor is crucial for optimal performance and longevity. Follow the steps outlined in the article to maintain your machine efficiently.
Very important maintenance tips, thanks for sharing!
Thanks, Logan! Regular maintenance is key to keeping your Kawasaki engine running smoothly. Remember to clean your carburetor to ensure optimal performance. Happy mowing!
This article makes me feel confident to clean my carburetor.
Thank you, Sharlene! Regular carburetor maintenance is crucial for optimal engine performance. Keep up the good work!
What are some common mistakes to avoid during this process?
Regularly clean and maintain your Kawasaki lawnmower carburetor to avoid clogs and inefficiency in engine performance. Follow these 9 simple steps for optimal results.