Drying of wood is a very essential task especially if you need to use wood for either woodwork or firewood. It is important to know that wood, being hygroscopic, is naturally filled with a lot of moisture. However, to be able to use wood for greater purposes and to improve its efficiency, durability, and resilience to pests and molds, the moisture must first be removed completely. Lumber used as firewood should be properly seasoned for it to burn well, and prevent ashes as well as creosote.
Placing lumber in a dry area where it can lose moisture naturally and dry out (air drying) is simple and easy. However, this process tends to be quite slow and time-consuming. Generally speaking, there are two basic ways by which you can dry wood: the air drying and kiln drying methods. Air drying involves leaving wood outdoors in a dry space and letting it dry out on its own. Here, the major drying factors are natural air and sunlight. Kiln drying, on the other hand, involves the use of a special controlled oven to “bake” wood until it is dry enough for use. This method is faster and is more controlled.
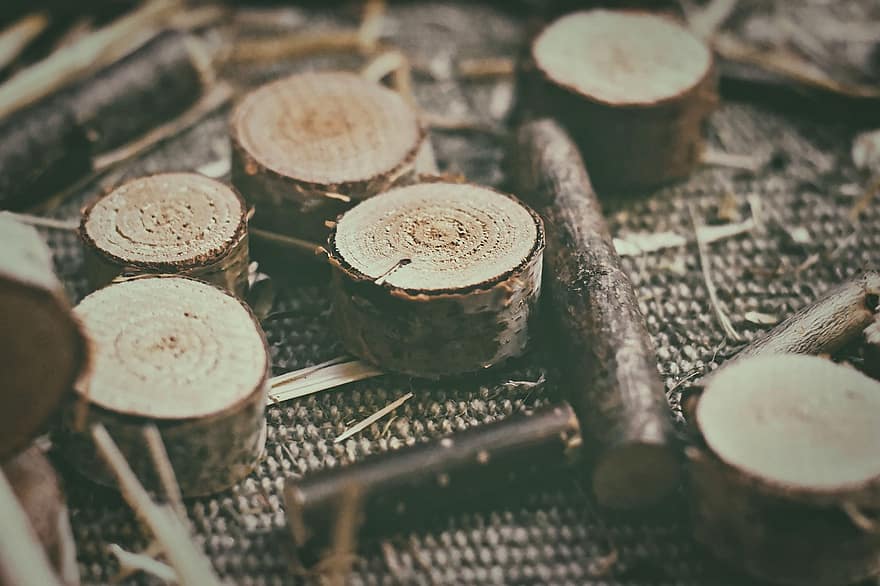
How to Dry Wood Discs or Slices:
There are several methods to dry wood discs or wood slices, depending on your requirements. If you want a quick-drying method for large quantities of wood you can use Kiln drying. Cheaper, but taking much longer is airdrying. If you have a small quantity of smaller wood you can use a microwave or an oven as a super-fast way to dry.

Depending on several factors such as relative humidity and weather condition of the area, wood may take weeks, months or even years to dry up naturally. So if you’re in a hurry and you want your wood to dry faster, this process may not work very well for you. This is where your simple kitchen oven can make a great difference. Wood slices, which are also referred to as wood cookies, are often used for a variety of projects and jobs to add that rustic look and feel. When you dry them, the moisture in the wood gradually evaporates causing the wood to shrink, and this eventually causes the slices to crack. Home ovens, however, can play an important role in drying wood slices faster and more effectively. Do you want to know how to dry wood slices? Don’t look too far; this article will show you the different drying methods specifically for wood slices.
Contents
- 1 Different Drying Techniques
- 2 Steps on How to Dry Wood Slices in an Oven
- 3 Using Denatured Alcohol for Drying Wood Slices
- 4 Techniques for Drying Wood Slices
- 4.1 • Drying Freshly Cut Wood Slices
- 4.2 • Drying Partially Dry Wood Slices
- 4.3 • Using Salt Paste Method
- 4.4 • Choosing the Right Storage for Drying
- 4.5 • Maintaining Appearance and Durability
- 4.5.1 – Use a Moisture Meter for Measuring Wood Moisture Content
- 4.5.2 – Sealing End Grain with Varnish or Oil-Based Enamel Paint
- 4.5.3 – Dedicating an Oven for Drying Wood Slices
- 4.5.4 – Slow Drying of Wood Slices in the Oven
- 4.5.5 – Regulation of Heat During Drying
- 4.5.6 – Precautions Before Drying Wood Slices
- 4.5.7 – Stacking Wood Properly to Promote Air Flow
- 4.5.8 – Using a Fan for Indoor Drying
- 4.6 • Using Denatured Alcohol to Accelerate Drying of Wood Slices
- 4.7 • Using a Moisture Meter for Determining Dryness of Wood Slices
- 4.8 • Conducting the Spritz Test for Wood Slice Dryness
- 4.9 • Drying Wood Slices in an Oven
- 4.10 • Using a Microwave to Dry Wood Slices Quickly
- 4.11 • Preventing Cracking During the Drying Process
- 4.12 • Relevance of 20% or Less Moisture Content in Wood Slices
Different Drying Techniques
As stated earlier, the simplest and least expensive technique for drying wood slices or discs is by air drying- allowing the wood to sit at a particular humidity level and dry naturally on its own. However, there are several factors that you must keep in mind such as the amount of time it would take for the wood discs or slices to dry depends greatly on the species of wood you’re using, the moisture level of the wood, its thickness, and the seasoning technique you plan to use.
However, there’s also the most important thing to keep in mind when drying wood with this method- just know that you cannot rush the process. By taking your time and doing it slowly, you will ultimately reduce the chances of cracking or splitting. Due to this, the standard technique often employed when drying wood is by sealing the end grain and then leaving the piece of wood to dry on its own.
● End Grain Preparation
It may seem confusing, but sealing up the end grain of your wood slows down the drying process, and this technique is quite important when drying wood. Wood should not be dried too rapidly or else drying defects and other issues may occur.
You can make use of a commercial product such as Anchor seal to cover the end grain. You can also decide to use a melted wax instead; either will do just fine. Any type of wax can do this job just fine, so you don’t need to worry about the quality of wax to use. Some people usually make the mistake of using latex paint to seal the end grain, however, latex paint can be quite porous and is very unlikely to work effectively as a sealing agent. Just note that in most cases, the thicker the coat, the better the result. It is even recommended to seal the end grain heavily to get better results. You may also consider using a good wood filler, in case the wood needs a little bit of help.
● Using a Microwave Oven
If you’re dealing with a really small amount of wood slices, you could easily speed dry it in a microwave oven. If you’ll also be doing this regularly, you may want to consider investing in a second-hand microwave oven. Also, remember that you must use the microwave solely for this purpose. Also, speed drying using this method will only work on smaller pieces of wood.
● Using a Conventional Oven
When using a conventional oven to dry wood slices, you should do it slowly. To get better and effective results, you may want to bake the wood for 24 hours or more. This will also depend on the type of wood you’re working with as well as the moisture content of this wood. That being said, you should ideally aim for at least 24 hours of drying time.
Also for smaller pieces of wood, a toaster oven or a conventional oven can be used to achieve effective drying. The only downside to using a conventional oven is that you have to be carefull using it also to cook if you have also used it for drying wood. This is because, when you heat the wood, there is usually a permanent change in the physical property, and as well as a release of certain chemicals or toxins that can be harmful to the body system. These extractives can gradually change into harmful compounds when you use the same oven for cooking, causing your food to develop a certain flavor. This may in turn be harmful to your body. So it usually recommended investing in a second-hand oven which you can use effectively for drying wood discs without worrying about the effect it has on your health.
● Stacking Wood
If you don’t want to use an oven to dry your wood discs or slices, then you’re left with the option of relying on time and natural forces of nature like the wind and sunlight, to slowly dry your wood. In the air-drying method, you can control the drying time as well as the results by speeding up the drying process. This can be done by simply stacking your wood properly. The major trick here is to allow air to flow in all sides and direction of every piece of wood. The more air you allow to flow, the faster it will take for the wood to dry.
This can be accomplished by creating spaces between layers of wood, as well as between each piece of wood. Make sure your wood slices are not in contact with the ground as moisture may collect below, causing it to rot. You can use any material that won’t absorb water to create the spaces. You can also use wooden materials like lumber or pellets that you longer have a use for. If you’re using a wooden bed, line the top of the bed with tarps, plastic sheeting, or any material that can block the transfer of moisture from the wood underneath to the wood slices on top. This will make the wood slices or discs to dry faster.
Steps on How to Dry Wood Slices in an Oven
Step 1: Prepare your Oven
Take out your racks and reposition them so that one is at the bottom and the other one is in the center. Since you want all sides of the wood to dry evenly, you’ll be making use of the center rack. Place a large sheet pan on top of the bottom rack, as this would serve as a precaution to catch any smaller pieces that may slip through the wire. Although your oven has a built-in thermometer, a second one can help ensure more accurate readings and prevent over-drying.
Step 2: Set the Oven Temperature
Set the temperature of your oven to be as close to 218 degrees Fahrenheit as possible. If you’re using an analog oven, then you should first heat the oven between 200 degrees Fahrenheit and 225 degrees Fahrenheit. Turn on the convection fan if your oven has one, to ensure adequate circulation. Then check the thermometer after 15 minutes, and continue adjusting the settings until the internal temperature of the oven is between 210 and 225 degrees Fahrenheit.
Step 3: Place the Wood Slices in The Oven
Place the wood discs or slices on the center rack, making sure no piece is touching each other. This will ensure that the heat reaches all parts of the wood. Place the smaller wood slices perpendicular to the rungs of the rack to prevent them from falling through the rack. Dry the wood for an hour.
Step 4: Measure Wood’s Temperature
Take out two wood slices of different sizes, then press the two metal pins of the moisture meter into the surface of the wood. If the desired moisture has not been reached, return the wood to the oven. Then when you’ve got the desired moisture content, place the wood on a wire cooling rack to cool.
Using Denatured Alcohol for Drying Wood Slices
One of the most effective methods of drying wood slices is the use of denatured alcohol. As an experienced woodworker, I recommend that wood slices should be completely submerged in denatured alcohol during the drying process.
There are multiple benefits of using denatured alcohol, including its ability to quickly draw moisture out of the wood, which significantly reduces the drying time.
• The Soaking Process
The soaking process is crucial when using denatured alcohol. Importantly, the slices should be fully submerged in the denatured alcohol for the soaking process to be effective. To ensure this, you can use rocks to weigh down the slices during the soaking phase.
Rocks are beneficial because they have enough weight to keep the wood slices under the alcohol, ensuring that every part of the wood pieces is treated.
• Protecting the Denatured Alcohol
Interestingly, covering the soaking pan with plastic wrap helps to safeguard the denatured alcohol from evaporation. When denatured alcohol evaporates, it loses its potent properties.
By covering the pan, you ensure that the denatured alcohol remains in liquid form, which allows it to adequately penetrate the wood slices.
• The Drying Phase
Post soaking, it is vital to make sure that the wood slices dry properly. Based on my years of experience, the best way to achieve this is by placing the wood slices at an angle on a towel against a wall. Doing so increases air circulation around the wood, leading to faster and even drying.
• Drying Time
Drying time is an important factor to consider. It is recommended to allow at least 24 hours for the wood slices to dry fully before moving them to a dry slice pile. This time frame may vary depending on the size of the slice, but it’s a good benchmark.
Alternate Drying Methods
For those who prefer, there are alternatives to using denatured alcohol, such as drying wood slices in an oven. This method can hasten the drying process. However, caution should be exercised as drying wood in an oven may increase the likelihood of cracking.
• Natural Drying: A Longer Route
Natural drying is another option, but this method requires a lengthy timeframe. The benefit of natural drying is that it is a gentle process, reducing the chances of cracking or warping, but the downside is the time commitment.
• Prevention of Mold and Bug Attraction
Regardless of the drying method used, it’s important to understand why drying wood slices before usage in projects is vital. This process helps prevent the growth of mold and the attraction of bugs, both of which can compromise the quality and longevity of the wood.
• Video Tutorial for Reference
To help readers understand this process better, I have included a video tutorial. This link offers a visual reference that could be of great assistance to those who are more visual learners.
To recap, the process involves soaking, protecting, drying, and curing the wood slices either by using denatured alcohol or naturally over time. Proper drying of wood slices ensures high-quality results for your woodworking projects.
Techniques for Drying Wood Slices
So, you’ve got your newly cut wood slices and you’re looking to dry them safely and efficiently. Here, I will give you a rundown of the various methods you can use. Stick to these guidelines and you won’t go wrong.
• Drying Freshly Cut Wood Slices
For wood that’s newly cut, you can use a stabilizing solution such as Pentacryl to prevent it from cracking as it dries. If, like me, you’ve dealt with a good deal of timber, you’ll know that cracking is a sure sign of rapid and uneven drying.
The rule of thumb is to soak it for 24 hours per one inch of thickness. By doing this, you allow the penetrant to seep deep into the innermost fibers of the wood, preserving its integrity for years to come.
• Drying Partially Dry Wood Slices
If your wood slice is already partially dry, you can still use other methods to prevent cracks or splits. Wood sealer or denatured alcohol are excellent choices for this.
I usually recommend using these two because they slow down the overall drying process, giving your wood slices a more uniform dry and far less tendency to distort or crack as a result. By ensuring that your wood dries at a controlled and moderate speed, you can maintain its aesthetic value longer.
• Using Salt Paste Method
Another option at your disposal is the traditional salt paste technique. Creating this paste is pretty simple. Mix 3 pounds of table salt with 1 gallon of water. Afterward, thicken your concoction with cornstarch and stir in 3 egg whites.
The paste, which you should apply to your wood slice, should have a creamy consistency. Once you’ve got the paste on, let it air dry for about a week. This salt paste technique is an old-time favorite of many wood enthusiasts like myself.
• Choosing the Right Storage for Drying
Now, where you keep your wood slice as it dries matters as well. Store it on its side in a well-ventilated area. You want it to get as much air as possible from all angles. This ensures an even drying process.
• Maintaining Appearance and Durability
All these methods serve to remove moisture from the wood and restrict shrinkage. From my experience, following these techniques guarantees that the wood slice maintains its appearance and durability.
If you’re new to drying wood, feel free to visit this link from the U.S. Department of Agriculture to learn more about the properties of wood and how to treat it.
Remember, drying wood slices can be a fun and rewarding process if done correctly. By taking the time to treat your wood slices properly, you’ll ensure they last long and continue to look attractive, adding that special touch to your space.
– Use a Moisture Meter for Measuring Wood Moisture Content
Based on my personal experience, I recommend investing in a moisture meter. This instrument can precisely measure the moisture level in the wood before you start the drying process. By using a moisture meter, we ensure that the drying process is effective and efficient.
– Sealing End Grain with Varnish or Oil-Based Enamel Paint
Preventing the wood from cracking or splitting is crucial during the drying process. For this purpose, the use of varnish or oil-based enamel paint is highly recommended. These substances act as water barriers, sealing the end grain of the wood. A well-sealed end grain will retain its integrity and prevent unsightly cracks or splits.
– Dedicating an Oven for Drying Wood Slices
Retain an oven solely for drying wood slices. This mitigates the release of harmful chemicals into the oven which could affect the flavor of food items baked in the same oven. It’s not worth risking our health or compromising the taste of our food by using the same oven for this process.
– Slow Drying of Wood Slices in the Oven
A slow and steady approach is best for drying wood slices in the oven. Aim to bake them for at least 24 hours. This time window may vary depending on the species of the wood and its moisture content. A gradual drying process can minimize wood distortion and other potential damage.
– Regulation of Heat During Drying
A common challenge in drying wood slices is the maintenance of a consistent temperature. Often, oven thermostats can be inaccurate. To counteract this issue, you could utilize a heat sink or microwave the wood in short intervals. This will help to keep exterior and interior wood temperatures in sync.
– Precautions Before Drying Wood Slices
Before drying, it’s beneficial to bring the wood slices to room temperature. This can help in minimizing the risk of splitting. Using a wood stabilizer is also an important consideration. Straight from the Pennsylvania State University extension website, stabilizer usage combined with an even drying approach can further reduce the risk of wood damage.
– Stacking Wood Properly to Promote Air Flow
To expedite the drying process, stack your wood in a way that promotes airflow. Properly stacked wood lets air pass between the slices, which speeds up drying, both indoors and outdoors.
Incorrect stacking could lead to moisture being trapped, which can prolong drying and potentially cause damage to the wood.
– Using a Fan for Indoor Drying
Air flow is an important aspect of the drying process. When drying wood indoors, using a fan can significantly decrease the drying time by increasing the airflow. Place a fan close to the wood stack, ensuring it’s blowing air over and through the entire stack for optimized drying.
• Using Denatured Alcohol to Accelerate Drying of Wood Slices
Denatured alcohol has been known to aid in the rapid drying of wood slices. To use this method, you’ll need to ensure that your wood slices are fully submerged in the denatured alcohol. Place them in a container and pour the alcohol over them until they are completely covered.
Allow the slices to soak overnight before removing them and letting them air dry. As the alcohol evaporates, it helps remove the moisture from the wood. Be sure to handle denatured alcohol with proper safety measures as it is a highly volatile substance.
Information about its safe handling can be obtained from The National Institute for Occupational Safety and Health.
• Using a Moisture Meter for Determining Dryness of Wood Slices
Moisture meters are integral to the wood drying process. They can accurately measure the moisture content in the wood, allowing you to determine when the wood slice is dry enough for use. Some moisture meters provide readings in percentage form, while others may use a scale of 0 to 100.
You can usually purchase a moisture meter from home improvement or woodworking specialty stores. To use the meter on the wood slice, simply insert the probe into the wood and read the results. You should follow the specific instructions provided with your device, as each one can be slightly different.
• Conducting the Spritz Test for Wood Slice Dryness
The spritz test is another method for checking the dryness of your wood slices. To perform this, lightly spritz a small amount of water onto the surface of the wood. If the water droplets seep into the wood quickly, it indicates that the wood is still moist.
However, if the water sits on top of the wood or takes a long time to be absorbed, it signals that the wood is effectively dry.
• Drying Wood Slices in an Oven
Although drying wood slices in an oven can take over 24 hours, it is an effective at-home method. Maintain a constant low oven temperature, preferably between 185 to 200F, to prevent the wood from cracking due to rapid moisture loss.
Arrange the wood slices on a baking sheet and place them in the oven. Turn the slices intermittently to ensure even drying. Oven drying may be a slow process, but the results can be highly satisfactory.
• Using a Microwave to Dry Wood Slices Quickly
Quick drying of wood slices can be performed in a microwave. Choose an intermediate power setting to prevent rapid moisture removal, which can cause the wood to crack.
Place the wood slice on a microwave-safe dish and microwave it for one minute, let it cool, then check the progress. Repeat until desired dryness has been achieved. Remember, the time it takes can vary as it is dependent on the microwave’s wattage and the slice’s thickness.
• Preventing Cracking During the Drying Process
Cracking or splitting can be a common issue with drying wood slices. This generally happens if the wood dries too quickly. To prevent this, you should aim to dry the wood slowly and evenly. During any of the aforementioned drying methods, introducing humidity can prove beneficial.
For instance, enclosing the slices in a cardboard box with moistened newspaper during the drying process can slow down the speed of drying and help prevent cracking.
• Relevance of 20% or Less Moisture Content in Wood Slices
A moisture content of 20% or less is often desired in woodworking. This is a good indicative value to ensure the wood won’t shrink or deform further during use. A moisture meter should be able to help determine if a wood slice has reached this level.
If the meter shows a reading below or equal to 20%, it means the wood is adequately dry for most uses. For more information on moisture content and its significance, The U.S. Department of Agriculture’s Forest Service provides an excellent, comprehensive guide.
What type of wood is best for air drying?
The type of wood best for air drying depends on your specific needs. However, oak, ash, and maple are popular choices for this method. Best of luck with your wood drying process!
Can you use a regular oven to dry wood slices?
Yes, you can use a conventional oven to dry wood slices, but be cautious about potential toxins and flavors leaching into your food if you use the same oven for both purposes.
Air drying wood is a simple and cost-effective method.
Thank you for highlighting the effectiveness of air drying wood. It is indeed a simple and cost-effective method that can be utilized with the proper techniques and patience.
I didn’t know about the spritz test to check wood dryness, thanks for sharing!
Thank you for your comment, Aubree! I’m glad you found the information about the spritz test helpful. If you have any more questions about drying wood, feel free to ask!
I never knew you could use a microwave for drying wood slices, interesting!
Thanks, Bernice! Using a microwave for drying wood slices is a quick and easy method for smaller quantities. Check out the video for a tutorial!
I learned a lot about different drying techniques from this article, thank you.
Thank you, Sherry! I’m glad you found the article helpful. Let me know if you have any other questions or need further information on wood drying techniques.
How can I seal the end grain of wood slices effectively to prevent cracking and splitting during the drying process?
Sealing the end grain with Anchor seal or melted wax will help prevent cracking in the drying process. Remember to dry slowly for best results.
Is there a risk of fire when drying wood in an oven?
Drying wood in an oven is a quick method, but there is a risk of fire due to the high heat. Best to monitor it closely and ensure it is properly ventilated.
Kiln drying is faster but requires specialized equipment.
Thank you for sharing your insights, Dwayne. Kiln drying indeed requires specialized equipment to speed up the process effectively. Your expertise is appreciated!
Using a fan indoors to dry wood is a great idea for speeding up the process.
Thank you for your feedback, Marvin! Using a fan to dry wood indoors can definitely help speed up the process. Your insight is appreciated!
The tips on preventing cracking during the drying process are very useful.
Thank you, Leo! I’m glad you found the tips helpful. Feel free to reach out if you have any more questions about wood drying techniques or other woodworking tips. Happy crafting!
Is denatured alcohol safe to use for drying wood?
Denatured alcohol can be used to accelerate the drying process of wood slices, but proper sealing and drying time is crucial to prevent cracking or splitting. Remember, it’s essential to handle denatured alcohol safely.
Great information on the importance of moisture content in wood slices.
Thank you, Erica! I’m glad you found the information helpful. Moisture content is indeed crucial in wood slices drying. If you have any more questions, feel free to ask.
I appreciate the detailed steps provided for drying wood slices.
Thank you for your appreciation, Luis! I’m glad you found the detailed steps useful for drying wood slices. Let me know if you have any other questions or if there’s anything else you’d like to learn about woodworking techniques!
This article provides great tips for drying wood slices in an oven, especially for those looking for a quick and effective method. The step-by-step guide is very helpful for beginners like me. Thank you!
Thank you for your positive feedback, Dave! I’m glad the tips were helpful for you. Happy woodworking!
The article covers a wide range of methods for drying wood, very informative.
Thank you, Ann! I’m glad you found the information on wood drying methods helpful. Let me know if you have any more questions or need further clarification.
Great tips on using denatured alcohol for drying wood slices!
Thank you, Lloyd! I’m glad you found the tips helpful. Denatured alcohol is indeed a great option for drying wood slices quickly and effectively. Enjoy your woodworking projects!
How do you know when the wood slices are dry enough?
Hi Alfredo, you’ll know when wood slices are dry enough when they have a moisture content of 20% or less. Using a moisture meter can help determine this accurately. Hope that helps!
The video tutorials are very helpful for visual learners.
Thank you, Andre! I’m glad you found the video tutorials helpful for visual learners. Feel free to check out more content on drying wood slices on the blog!
Will sealing the end grain really prevent cracking?
Sealing the end grain can help reduce cracking, but it’s not foolproof. It’s important to dry wood properly for best results. Hope this helps!
Can wood slices be dried outdoors?
Yes, wood slices can be dried outdoors through the air drying method. However, the process can be slow. If you need a quicker option, consider using a microwave or oven for faster results.
How long does it take to naturally air dry wood?
Air drying wood naturally can take weeks, months, or even years, depending on various factors like humidity and weather. For faster results, consider using a kitchen oven or different drying methods mentioned in the article.