A lawnmower is one of the machines that help you keep your lawn looking beautiful. Maybe it is the garden tool that you will use the most. But even when you maintain your lawnmower well, there is always the possibility that something breaks. You want to use your mower, but it fails to start. Even after several pulls to the cord, it just does not work. Or, in the case of a riding lawn mower, you try to start. You hear the starter motor, but the engine just doesn’t run. You might have various reasons popping in your mind. You check the battery and sparkplug and quickly see that both are fine. But on further investigation, you find that a damaged sparkplug wire might be causing the issue. To fix this, you do not have to buy a new one in most cases, as the old wire can still be used by splicing it.
How to splice a lawnmower spark plug wire, step by step:
- Step 1: Check the condition of the sparkplug wire
- Step 2: Remove the top cover of the lawnmower
- Step 3: Notice the type of coil and sparkplug wire
- Step 4: Repair the wire
- Step 5: Replace the boot if loose
- Step 6: Clean dirt and corrosion present
- Step 7: Check the continuity using a Digital Multimeter
- Step 8: Reinstall the components and start the engine

As suggested by the name, the sparkplug wire is the connection between the ignition coil and the sparkplug. If the wire is damaged, the engine will not get a spark and hence will not function. Before getting into the details of the reason for the required procedure, it is important to understand the working of the lawnmower’s ignition system.
Contents
- 1 Diagnosing a Spark Plug Wire Problem
- 2 How does the lawnmower ignition system work
- 3 Splicing a lawnmower spark plug wire, step by step:
- 3.1 Equipment required:
- 3.2 •Step 1: Check the condition of the sparkplug wire
- 3.3 •Step 2: Remove the top cover of the lawnmower
- 3.4 •Step 3: Notice the type of coil and sparkplug wire
- 3.5 •Step 4: Repair the wire
- 3.6 •Step 5: Replace the boot if loose
- 3.7 •Step 6: Clean any dirt and corrosion present on the different components
- 3.8 •Step 7: Check the continuity using a Digital Multimeter
- 3.9 •Step 8: Reinstall all component and check the start
- 4 Preventive Measures:
- 5 Related Questions
- 6 Final Remarks
- 7 Understanding Your Lawnmower’s Spark Plug Wire Connection
- 7.1 • The Effect of a Damaged Spark Plug Wire
- 7.2 • Tools You Need to Splice a Spark Plug Wire
- 7.3 • Inspecting Spark Plug Boot and Wire
- 7.4 • Checking for Wire Breakage
- 7.5 • Repairing a Broken Wire
- 7.6 • Correct Insulation of the Repaired Wire
- 7.7 • Dealing with a Loose Spark Plug Boot
- 7.8 • Keep Your Ignition System Clean
- 7.9 • Reinstallation and Testing
- 7.10 • Safety Measures During Repair
- 7.11 • Frequently Asked Questions (FAQs)
- 7.12 • Importance of Understanding Your Lawnmower Ignition System
- 7.13 • Personal Recommendation
- 8 Repairing a Broken Spark Plug Wire in Your Stihl Limbing Saw Using Junked Parts
- 8.1 • The Broken Spark Plug Wire Dilemma
- 8.2 • Sourcing for Needed Parts
- 8.3 • The Joining of Two Wires
- 8.4 • Insulation and Protection of Your Splice
- 8.5 • The Daunting Task of Putting the Saw Back Together
- 8.6 • Quality Assurance of The Repair Method
- 8.7 • Comments and Reviews: Hearing from Other’s Experiences
- 8.8 • Trademark Disclaimer and Intellectual Property
- 8.9 • Benefits of Spark Plug Wire Replacement
- 8.10 • Importance of Regular Spark Plug Wire Inspection
- 8.11 • The Splicing Process
- 8.12 • The Significance of the Sparkplug Wire
- 8.13 • Impact of a Damaged Sparkplug Wire
- 8.14 • Diagnosing Sparkplug Wire Problems
- 8.15 • Necessary Equipment for Splicing a Sparkplug Wire
- 8.16 • How to Splice A Lawnmower Sparkplug Wire
- 8.17 • Regular Maintenance and Repair
- 8.18 • Safety Precautions for Working with Lawnmower and Ignition System
- 8.19 • Setting the Air Gap
- 8.20 • Spark Plug Gap Setting
- 8.21 • Understanding a Spark-Ignition Engine
- 8.22 • Conclusion
Diagnosing a Spark Plug Wire Problem
Finding a spark plug cable problem can be tricky. When the sparkplug cable is fully broken, it is reasonably easy. The lawnmower will just stop working. The first step will be to check the spark plug itself. But when it is working fine, the spark plug cable will be the next logical part to check. But when the wire is just damaged, it is less obvious. It can cause a voltage drop. The sparkplug will not receive all the energy it needs. The spark will give a less powerful spark that can lead to the following effects:
- High fuel consumption: The less optimal spark can cause the lawnmower to use more gas than usual.
- The engine will not start: Even there is a spark. It is so weak that the lawnmower has great difficulty starting. Or it will not start at all.
- Erratic operation: The engine feels very heavy and tends to run very irregularly.
- Misfiring: This effect is not solidly observable, but all others are generally the aftereffect of this. Engine stroke timing suffers, and power losses are massive.
You would like to know more about the full operating cycle of a spark ignition combustion engine with a curious building. More awareness will also allow you to learn more of the methods you use to help detail, preserve, and restore. If you are still not as involved in technical information, you can skip to the next segment, where a step-by-step guide for splicing a lawnmower sparkplug wire.
How does the lawnmower ignition system work
The spark plug has a tip with no insulation on both heads. When the high voltage travels through the spark plug, the slight distance between the two main terminals causes the current to leap and create a spark. The high voltage is obtained from the ignition coil, which raises the 12V current of the battery. The spark plug is an integral feature of ignition engines. The sparkplug wire carries the high voltage across it and is heavily insulated.
Splicing a lawnmower spark plug wire, step by step:
Equipment required:
For splicing the lawnmower sparkplug wire, you will require:
- Socket wrench
- Screwdriver
- Insulation tape
- Digital Multimeter
- Feeler gauge
- Soldering iron (if you have one)
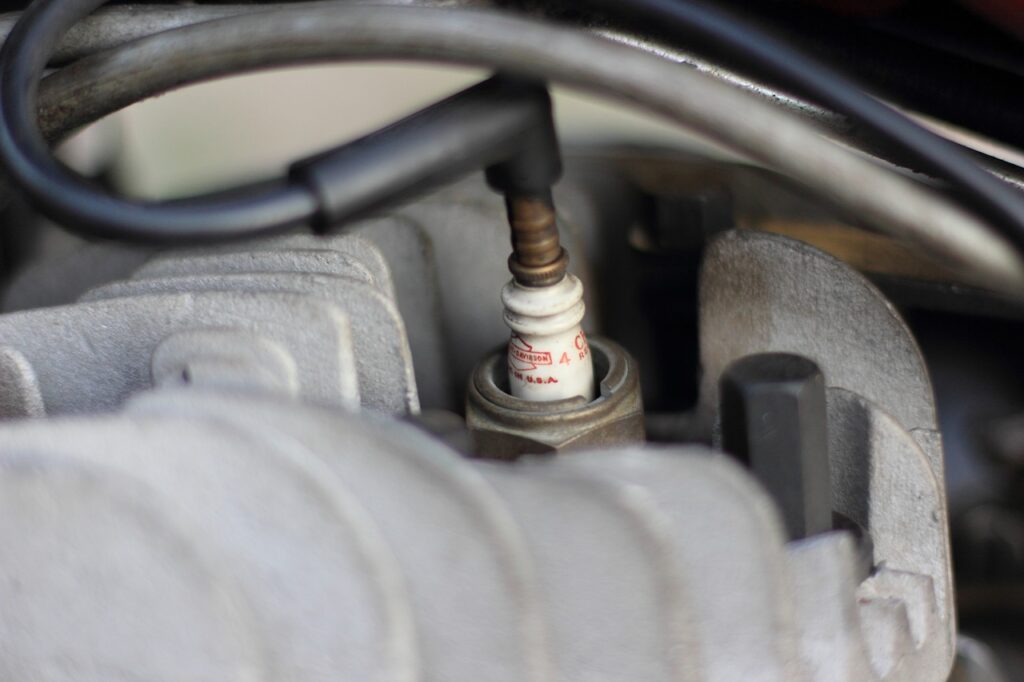
•Step 1: Check the condition of the sparkplug wire
- Checking the sparkplug boot: After locating the sparkplug, check whether the sparkplug is snuggly fit over the sparkplug. The boot is present on one end of the wire. If the fitting is not tight, the grip is faulty and needs repair.
- Visual observation: Check for damages to the wire’s insulation. Move the cable around and check for cracks. If you find cracks, this could be the location where the cable is broken. If you can not find any indications on the outside of the cable, and the check with the multimeter shows a broken wire. You will need to replace the whole cable.
- Resistance and continuity check: Using a digital multimeter (DMM) in the continuity setting or not having this the ohms setting. Check the resistance and compare it to the one provided by the manufacturer. Make sure you move the cable around so you will notice it if there is a broken wire inside. If you do not do this, the broken wire’s two ends may be touching each other during the check. If you use the continuity setting on the multimeter, a beep will mean that it is fine. If you move the cable around and notice that the beep is not continuous, there is a broken wire. If you use the multimeter resistance setting, the result should be low, close to 0 ohms. If the resistance is higher, the cable is broken. Take care that if you hold the probes in your hand during the test, you do not mix the body’s resistance as a good result.
•Step 2: Remove the top cover of the lawnmower
- Remove the cover/ hood: For a riding lawnmower, lift the hood. In the case of a push mower, remove the engine cover if it has one.
- Remove the start mechanism: Depending on the lawnmower, you have to remove the starting mechanism as well. If this is the case, use a socket wrench to do this.
- Lift the cover off: Pull the cover off, making sure that any fragile components are not damaged.
- Place the nut back in place: To secure the metallic spacers present on the studs, screw the nuts back on.
•Step 3: Notice the type of coil and sparkplug wire
The mounting of the coil and the sparkplug wire may vary from engine to engine. If the machine consists of a single-cylinder, the type of coil is different.
- Type 1: In the most single-cylinder engine, the sparkplug wire is attached permanently attached to the coil
- Type 2: In a multi-cylinder setup, the wire gets plugged in a distributor box due to more wire. And these are easy to access and remove.
•Step 4: Repair the wire
If you have found during the check of the cable an indication where the cable is broken, you can try to repair it. If you did not find any indication, there is no other option than to replace the cable.
- Remove the insulation: Cut off about 3 inches of the hard black insulation from the wire at the location you think the problem is. Fold back the braided insulation
- Cut the cable: The core should be visible now. Remove the white dielectric from both ends of the copper cable.
- Join the broken wire: Check again if you can find the place where the cable is broken. If you find it, add the two sides together. If you have a soldering iron, you could use this to join the two sides even better. If you do not have it, try to join the two sides as well as you can.
- Properly insulate: Apply a lot of electric tape on the spliced wire to ensure that the insulation is regained. Check the continuity again with the digital multimeter.
•Step 5: Replace the boot if loose
If the boot from the cable is loose, it needs to be replaced. Buy a new coil (for a single cylinder) or wire for (multi-cylinder). Replace the wire and properly gap the coil for a good operative condition of the lawnmower.
•Step 6: Clean any dirt and corrosion present on the different components
Use sandpaper and a metal wire brush to clean the flywheel, the different electrical connections, and all related parts. Make sure to remove all visible dust and rust. Especially the brown corroded flywheel should be cleaned. The magnets should be wiped off properly as well.
•Step 7: Check the continuity using a Digital Multimeter
- Use a Digital Multimeter to check the wire for continuity: Set the multimeter to continuity mode. Touch both ends of the wire with the probes from the multimeter. The meter will beep, indicating the wire is good to use. If your multimeter does not have a continuity setting, you can also use the resistive setting. Use the lowest setting and measure the resistance of the cable. It should be a low value, close to zero.
- Use the correct sparkplug gap: Use a feeler gauge of the nominal value suggested in the lawnmower’s manual. Push the feeler gauge of advised thickness between the gap. If the gap is greater, gently press the tip down. Suppose you can not find the needed gap in your user manual and can not find it anywhere else. Use .030″ as the gap distance. This is the most seen gap on lawnmowers.
•Step 8: Reinstall all component and check the start
Reinstall all the parts, stater mechanism, and lower the hood. Start the mower and check if you have solved the issue.
Preventive Measures:
- Safety: Depending on what you are doing, use safety gloves, goggles, and insulation boot
- Disconnect the battery: Do not forget to remove the battery’s ground connection (if the lawnmower has a battery).
- Hot engine: Keep spliced wire away from high temperature such as exhaust manifold
Related Questions
1. How to air gap the coil?
The air gap in the coil is done according to the distance provided by the manufacturer. Turn the flywheels magnet towards the coil and use a feeler gauge to check or set the required thickness.
2. What is the right spark plug gap for my lawnmower engine?
The exact gap depends on the spark plug and the lawnmower brand and type. For most lawnmowers, that gap will be .030″ or .020″ (less often). Check the lawnmower user manual for the actual gap number that should be present between the electrode tips. If you can not find it, set it to .030″ and try how it works. Use a feeler gauge to check the actual size.
3. What is a Spark-Ignition Engine
Most of the engines used in lawnmower use gas. If your lawnmower uses diesel, it does not have a sparkplug, as it uses compression to ignite the diesel.
The term spark-ignition internal combustion engine is used because of the spark it uses to start the combustion cycle.
- Spark means the jump of current from one electrode of the sparkplug to the other with air as a medium to travel
- Ignition means the start of the combustion process of the air-fuel mixture
- Internal means processes take place in an enclosed space
- Combustion means the burning of fuel that generates power to drive the rotary power
The engine converts the chemical energy of fuel into the mechanical strength of the crankshaft. The operating cycle is the Otto cycle, which has four processes going on.
- Intake of the air-fuel mixture
- Compression of the mixture
- A spark from the sparkplug
- Combustion of fuel
- Power stroke on piston head driving it down
- The exhaust of burnt gases
The piston moves linearly and transfers power as rotational energy via a connecting rod.
Final Remarks
Although small yet essential, the sparkplug wire needs repair and replacement for good running and lawnmower’s extended life. Replacement of sparkplug wire is necessary as a maintenance process and if the engine fails to start. This article has summarized the process for readers’ help.
Understanding Your Lawnmower’s Spark Plug Wire Connection
The role of the spark plug wire in your lawnmower cannot be downplayed. It connects the ignition coil to the spark plug, making it an instrumental part of the overall ignition system. When correctly attached, the wire allows the engine to produce a vital spark needed for efficient combustion.
• The Effect of a Damaged Spark Plug Wire
A damaged or compromised spark plug wire can bring about unwelcome disruptions. It often prevents your lawnmower’s engine from starting or hampers its performance by producing a weak spark. This makes your mowing tasks inefficient and frustrating.
• Tools You Need to Splice a Spark Plug Wire
Embarking on splicing a lawnmower spark plug wire calls for basic tools to make the task more manageable. You would need a socket wrench, screwdriver, insulation tape, digital multimeter, feeler gauge, and a soldering iron might come in handy as well.
• Inspecting Spark Plug Boot and Wire
Before splicing, however, it is crucial to check the prime condition of the spark plug boot and inspect the wire for any cracks or visible damage. This is to ensure they are in a good state, ready for a productive start.
• Checking for Wire Breakage
A digital multimeter comes in handy when testing the spark plug wire for continuity. This test will confirm whether the wire is broken or not, providing a solution-focused approach to your repair effort.
• Repairing a Broken Wire
A broken wire isn’t a call to replace your entire ignition system. With the right tools and skills, you can repair it efficiently. Simply remove the insulation at both ends of the wire and join them together by twisting or using a soldering iron if available.
• Correct Insulation of the Repaired Wire
Covering the repaired wire appropriately is crucial after a repair. Insulate it using electric tape and perform another continuity check to ensure it’s in proper working condition.
• Dealing with a Loose Spark Plug Boot
A loose spark plug boot needs timely attention. If it’s loose, consider replacing it with a new one to maintain the efficiency of your lawnmowers ignition system.
• Keep Your Ignition System Clean
As you repair, ensure you get rid of any dirt and corrosion from various ignition components. Thorough cleaning mitigates damage and enhances the performance of your lawnmower.
• Reinstallation and Testing
Once the splicing and repair process is complete, reinstall all components, including your spark plug. Now, start your lawnmower’s engine to ensure its running as expected, smooth and uninterrupted.
• Safety Measures During Repair
Safety can never be overstated when dealing with such tasks. Always wear safety gloves and goggles, and ensure you disconnect the battery before starting any work on your lawnmower’s ignition system.
• Frequently Asked Questions (FAQs)
Most often, questions about how to air gap the coil and the appropriate spark plug gap for lawnmower engines come up in this context. This article aims to answer such questions succinctly.
• Importance of Understanding Your Lawnmower Ignition System
Knowing the ins and outs of your lawnmower’s ignition system, including how to splice spark plug wires, goes a long way in maintaining and preserving your machine.
By acquiring such knowledge, you’re also well-equipped for any restoration tasks that may arise. The Engineers Edge is an excellent platform that offers a more in-depth understanding of your lawnmower’s ignition system.
• Personal Recommendation
As a seasoned operator, I am a firm believer in acquiring the right set of skills. I highly recommend learning how to splice a spark plug wire as an essential expertise in maintaining your lawnmower’s efficiency and prolonging its lifespan.
Repairing a Broken Spark Plug Wire in Your Stihl Limbing Saw Using Junked Parts
• The Broken Spark Plug Wire Dilemma
Many of us tool handlers are no strangers to the dismay that hits when an essential tool suffers damage. We often see these situations from a glass-half-empty vantage, but they can be prime moments to test our DIY mettle.
This article dives into such a situation involving a Stihl limbing saw with a rather daunting fault – the spark plug wire has broken off inside its boot. However, before you think of trashing your precious tool, there’s a practical and efficient solution that can add more years to its service.
• Sourcing for Needed Parts
Have an old, junked weed wacker engine lying around? It’s time to pull it out of retirement. Not to resurrect its working days but to donate a boot and a short length of wire. This will form the basis for our spark plug wire recovery mission.
• The Joining of Two Wires
After successfully reclaiming your short length of wire and boot from the junked engine, let’s move on to the next step. This involves merging your salvaged wire with the existing wire on your Stihl saw.
Do so by simply joining the two wires together and bolstering that union with a bit of soldering. This may require a bit of finesse, but it is an integral part of our operation.
• Insulation and Protection of Your Splice
Don’t rush to power on your saw just yet. The exposed splice from joining your two wires is not quite battle-ready to withstand harsh working environments. Consequently, strip off a bit of insulation from your recovered wire. You can then split it and neatly wrap it around this splice.
Additional protection comes in the form of two layers of heat shrink to cover the splice. Both actions will shield your new connection from potential damage and further extend its life.
• The Daunting Task of Putting the Saw Back Together
As much as the main repair exercise is mostly behind us, reassembling your saw may present new challenges. But labor is not in despair rather, it takes a systematic approach. Set so that every piece slides into its intended slot and every screwed finds its rightful place.
• Quality Assurance of The Repair Method
A lingering question might be in your mind: is this soldering and insulating process viable? Can it stand the test of serious limbing activity?
Well, you’re not alone. A common worry shared by most first-time DIYers, but don’t sweat it. Remember, sharing is caring; in that spirit, let us explore some experiences from the community.
• Comments and Reviews: Hearing from Other’s Experiences
For instance, a reader once repaired a 4hp Kohler engine for a roto-tiller using a precisely similar approach. The method held up admirably, so much so that replacement has never been an alluring option.
Likewise, another devoted DIYer went ahead and improvised by working around staple-induced wire punctures and applying multiple heat shrink layers to remarkable success!
Without going into celebration mode just yet, you might find more assurance by visiting a relevant forum or community like StackExchange, where similar experimentations have been carried out, documented, and discussed.
• Trademark Disclaimer and Intellectual Property
Finally, while this guide aims to extend the life of your Stihl saw, it is in no way associated with or endorsed by Stihl. Also, remember to respect intellectual property rights. Reproduction of any part of this website without written permission is strictly prohibited. Dive into the DIY world – happy repairing!
• Benefits of Spark Plug Wire Replacement
It’s common for vehicle owners to consider splicing their spark plug wires as a cheaper alternative to full replacement. However, multiple advantages accompany the decision to replace these crucial components outright.
The benefits of a complete spark plug wire replacement extend beyond the surface repair to the very heart of vehicle efficiency and reliability.
– Guaranteed Consistent and Reliable Spark
When you opt for spark plug wire replacement, you’re essentially restoring the original efficiency of your vehicle’s ignition system.
This ensures a consistent and reliable spark that not only facilitates smooth vehicle operation but also enhances fuel efficiency. When splicing, there’s always a risk that spark quality might be compromised, affecting the overall performance of your vehicle.
– Minimal Risk of Future Issues
Splicing spark plug wires adds inconsistency to your vehicle’s ignition system, potentially inviting further troubles down the road. By fully replacing the wire, you’re reducing the future risk of ignition-related issues, guaranteeing longer performance life and fewer unexpected trips to the mechanic workshop.
– Addressing Potential Underlying Problems
A faulty spark plug wire could indicate other underlying issues within the ignition system. By replacing rather than splicing the wire, you could potentially uncover and address these problems early before they evolve into larger, costlier repairs.
• Importance of Regular Spark Plug Wire Inspection
Maintaining the peak performance of your vehicle entails more than regular oil changes and tire rotations. A crucial yet often overlooked form of preventative maintenance involves regularly inspecting your spark plug wires.
Recognizing the signs of wear and tear on your spark plug wires could help you decide when a replacement is necessary. Regular checks can prevent unexpected ignition problems, save on fuel consumption, and ultimately extend the lifespan of your vehicle.
– Temporary Fixes versus Lasting Solutions
It might seem tempting to wrap a minor nick in the spark plug wire with tape as a quick fix. While this may serve as a short-term solution, it’s not advisable for long-term use or for addressing significant damage.
A taped-up wire might mask underlying problems that could eventually escalate to serious ignition issues.
• The Splicing Process
While not recommended for the above reasons, it’s crucial to understand how splicing a spark plug wire works. This procedure involves disassembling significant parts of your car’s engine, replacing the faulty wire, and putting it all back together.
The time taken to splice a spark plug wire typically doesn’t exceed an hour. However, this duration could vary based on a range of factors, including the mechanic’s skill level and potential distractions that might lengthen the process.
Although splicing appears to be a quicker fix, the long-term hassles, potential costs, and risks to the vehicle’s performance outweigh the benefits. As an experienced mechanic, I recommend a complete spark plug wire replacement over a temporary splice.
For more information on spark plug wires and their role in vehicle operations, please refer to this link from a reputable educational institution, Understanding Spark Plug Wires
• The Significance of the Sparkplug Wire
The functionality of a lawnmower is closely linked to the performance of the sparkplug wire.
This vital component serves as the conduit between the ignition coil and the sparkplug. In simplistic terms, the sparkplug wire’s primary role is to transmit electrical power from the coil to the sparkplug. This chain of events contributes to igniting the engine.
• Impact of a Damaged Sparkplug Wire
Unlike most lawnmower malfunctions, a damaged sparkplug wire can cause the entire engine to fail. The damage can range from minor tears to severe fraying.
Consequently, the lawnmower might be unresponsive, or it might fail to start. Therefore, regular maintenance and timely repair are crucial for avoiding such problems.
• Diagnosing Sparkplug Wire Problems
It’s true that diagnosing issues with your sparkplug wire can be challenging. However, there are a few signs you can look out for. These include visually inspecting the wire and checking the sparkplug boot.
Moreover, a resistance and continuity check can also be conducted using a Digital Multimeter. This can provide accurate results about the health of your sparkplug wire.
• Necessary Equipment for Splicing a Sparkplug Wire
To take on the task of splicing a lawnmower sparkplug wire without professional help, you’ll need specific equipment.
This toolkit typically consists of a socket wrench, screwdriver, insulation tape, Digital Multimeter, a feeler gauge, and a soldering iron, if available. Having these tools at hand can simplify the process.
• How to Splice A Lawnmower Sparkplug Wire
- Check the condition of the wire. If it’s damaged beyond repair, consider replacing it.
- Remove the top cover of the lawnmower to gain access to the wire and coil.
- Identify the type of coil and wire having the correct replacements helps in swift replacements or repairs.
- Repair the wire using the appropriate tools if you perceive that it is salvageable.
- Replace the boot if it seems loose. A loose boot can cause connectivity issues.
- Clean away any dust, grime, or corrosion on the components.
- Use the Digital Multimeter to check continuity. This test will tell you if the electrical charge is flowing through the wire unhindered.
- Finish the process by reinstalling all the components.
While not everyone is comfortable performing this task, personal experience has shown that this step-by-step guide can be an effective way to handle the process.
• Regular Maintenance and Repair
Regular monitoring and maintenance of the sparkplug wire contribute significantly to maintaining a finely tuned and efficient lawnmower. Also, make sure to replace the sparkplug wire as and when required to ensure longevity.
• Safety Precautions for Working with Lawnmower and Ignition System
While working on a lawnmower, it’s essential to take certain precautions. Disconnect all power sources before working on the ignition system to prevent any accidental shocks. Also, wear appropriate personal protective equipment to keep yourself safe.
• Setting the Air Gap
Para crucial aspect of the coil setup in a lawnmower is the air gap. It should always adhere to the manufacturer’s specifications. This ensures efficient ignition and prolongs the lifespan of the sparkplug wire.
• Spark Plug Gap Setting
The magnitude of the spark plug gap depends on the lawnmower brand, type, and the specific spark plug-in use. Always check and adjust the gap according to the lawnmower user manual. I recommend using a wire or feeler gauge for the most accurate measurement.
• Understanding a Spark-Ignition Engine
One should understand the basics of a spark-ignition engine while working on a lawnmower. This type of engine uses a spark from the spark plug to ignite the air-fuel mixture. This combustion generates the power to run the lawnmower.
Its operating cycle includes intake, compression, spark ignition, combustion, powerstroke, and exhaust. Familiarity with this cycle makes troubleshooting much more manageable.
• Conclusion
Taking proper care of the sparkplug wire is essential to the overall health and longevity of your lawnmower. Remember, effective maintenance and an understanding of how these components work can save you time and money on professional repairs.
To explore and deepen your understanding of lawnmower maintenance, I recommend reviewing the resources offered by the University of Missouri Extension, a non-commercial source dedicated to sharing knowledge in different areas, including lawnmower care and maintenance.
Stay safe, keep learning, and happy mowing!
Good to know about the different types of coils and spark plug wires, very informative.
Thank you, Jose! I’m glad you found the information on coils and spark plug wires helpful. Feel free to reach out if you have any more questions or need further assistance.
I never realized how complicated the ignition system of a lawnmower could be, makes me appreciate it more.
Thank you for your comment, Thomas! It’s great to see your appreciation for the complexity of lawnmower ignition systems. If you ever need to repair a spark plug wire, feel free to refer back to the blog post for a step-by-step guide.
This is helpful, I had no idea how important the sparkplug wire is!
Thank you, Vickie! I’m glad you found the information helpful. The sparkplug wire is indeed crucial for your lawnmower’s operation. Let me know if you have any more questions.
How often should I inspect my lawnmower’s sparkplug wire?
Hi Mia, I recommend inspecting your lawnmower’s sparkplug wire annually to prevent any issues. Regular maintenance ensures optimal performance. Hope this helps!
Excellent step-by-step guide, very detailed and easy to follow.
Thank you, Harper! I’m glad you found the guide helpful and easy to follow. Your feedback is much appreciated!
Is it common for sparkplug wires to get damaged quickly?
“Damaged spark plug wires can cause starting issues or poor performance in lawnmowers. Regular maintenance is key. Follow the step-by-step guide for splicing the wire to ensure optimal function. Hope this helps!”
Can a damaged sparkplug wire cause damage to other parts of the lawnmower?
Dear Amanda Sullivan, yes, a damaged sparkplug wire can cause damage to other parts of the lawnmower, affecting its performance and efficiency. Regular maintenance is key.
The videos provided in the article were very helpful, visual aids are always a plus.
Thank you, Roberta! I’m glad you found the videos helpful. Visual aids can indeed make a big difference in understanding complex processes like splicing a lawnmower spark plug wire.
What is the average lifespan of a lawnmower sparkplug wire?
“On average, a lawnmower sparkplug wire can last several years with proper maintenance. Follow these steps to extend its lifespan and keep your lawnmower running smoothly. Hope this helps!”
I never knew how important regular maintenance of the sparkplug wire is, thank you for the information.
Thank you for your feedback, Jon! Regular maintenance of the sparkplug wire is indeed important for the proper functioning of your lawnmower. Let me know if you have any other questions or need further assistance.
The explanation of how a spark-ignition engine works was very insightful.
Thank you, Virgil Henry! I’m glad you found the explanation insightful. Let me know if you have any more questions about lawnmower maintenance or repairs.
Do you have any tips for preventing damage to the sparkplug wire?
Hi Chester, check out my step-by-step guide on splicing a lawnmower spark plug wire for tips on preventing damage and maintaining your lawnmower. Hope it helps!
This article is a great resource for lawnmower owners new to maintenance and repairs.
Thank you, Andrew Wallace! I’m glad you found the article helpful for lawnmower maintenance and repairs. Your feedback is much appreciated.
Can you recommend the best type of insulation tape to use for this?
It is recommended to use high-quality electrical insulation tape for splicing a lawnmower spark plug wire. This will ensure a secure and long-lasting repair.
I never realized a damaged sparkplug wire could lead to so many issues.
Thank you for sharing your insight on the impact of a damaged sparkplug wire. It’s a crucial component that can lead to various issues if not addressed promptly. Your awareness is commendable.
What should I do if I find corrosion on the components?
Please follow the step-by-step guide to repair the spark plug wire on your lawnmower. It’s a simple process that can save you time and money. Good luck with the repair!
Are there any signs or symptoms that indicate a problem with the sparkplug wire?
Thank you for your question, Felicia. Signs of a spark plug wire problem can include high fuel consumption, difficulty starting, irregular engine operation, and misfiring. Regular maintenance can help prevent issues.
I learned a lot about the importance of the sparkplug wire in the lawnmower’s ignition system.
Thank you for sharing your experience with the sparkplug wire in a lawnmower’s ignition system. It’s great to hear that you learned something new!
I appreciate the safety precautions mentioned in the article, safety first!
“Thank you, Duane! Safety is always a top priority when working with any machinery, including lawnmowers.”
I feel more confident now about maintaining my lawnmower, thank you for the detailed guide.
I’m glad the guide helped you, Dana. Remember to regularly inspect and maintain your lawnmower to keep it running smoothly. Happy mowing!