Lawnmowers may be gas-powered or electric. If your gas mower has an electric starter, it needs a battery to power the starter motor. Larger riding lawnmowers contain extra features like headlights and even taillights. All these are battery-operated. Maintaining the battery is needed to have a good working mower. A multimeter is a simple tool that can test the battery’s potential by connecting its two terminals. You can easily get your hand on one from a nearby hardware store or from an online retailer. This article will explain the procedure to test the mower’s battery by using a multimeter. If the lawnmower batteries are well-maintained, they can prolong their lifespan.
How to test a lawnmower battery with a multimeter, use this step by step method:
- Step 1: Locate the battery on your lawnmower.
- Step 2: Use the correct multimeter setting
- Step 3: Connect the multimeter to the battery.
- Step 4: Check and interpret the multimeter reading
- Step 5: Measure again with a load attached

A multimeter is a hand-held meter used to test the voltage, amperage, and Resistance across two terminals. You can perfectly use it to check the battery’s condition annually. It will tell you if it is dead and needs to be recharged. The average shelf life of a lawnmower or garden battery is 2-3 years, depending on the type and amount of times you recharged it. If you face starting or stalling issues, it can well be that there is something wrong with the lawnmower starting or battery charging system. A good starting point to find the problem is by testing your mower battery to see whether it is in a healthy condition or not. This article will explain how to use a digital multimeter to test a battery.
Contents
- 1 General Step-by-step guide:
- 2 Additional tips:
- 3 Frequently asked questions:
- 3.1 1. How often should you replace the lawnmower battery?
- 3.2 2. My charger does not charge my battery
- 3.3 3. Why should you trickle charge a battery?
- 3.4 4. Do I need to disconnect the battery before charging
- 3.5 5. How do I know if my lawnmower battery is bad?
- 3.6 6. What will happen if I invert the terminals of my multimeter?
- 4 Final remarks:
General Step-by-step guide:
Using the device itself is quite simple, but you should know the basic method of how to use it.
● Step 1: Locate the battery on your lawnmower.
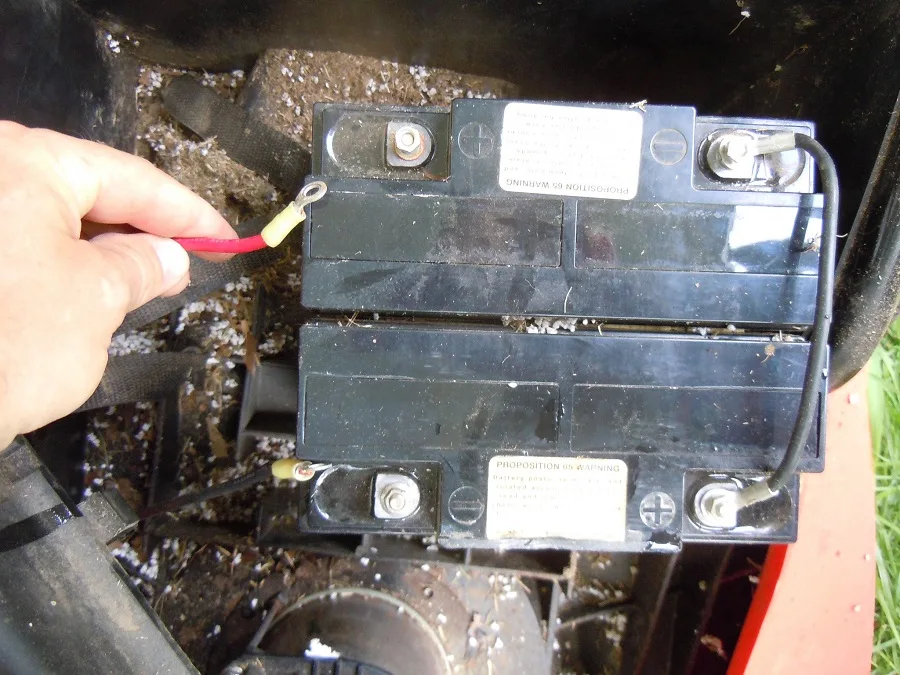
The very first step is to locate the battery of your lawnmower. Probably you know the location already. You can find it under the seat or in the hood close to the engine for most riding mowers. Push mowers will have a small battery present along the mower’s deck. The battery size varies. The battery may be a liquid lead cell type or dry type, but for testing, that does not matter.
Before we continue, you have to make sure that the mower is off and that all electrical attachments are off. So the lights should be off, the ignition key should be off. If you are not sure if this is the case, you can always disconnect the battery.
Tip: Ensure that your battery is sufficiently charged when you test it by the digital multimeter. Because if it has not been charged properly or has been sitting for a long time, it will give an inaccurate reading.
● Step 2: Use the correct multimeter setting
Digital multimeters have a lot of setting you can use to measure different things. In general, you can divide them into three groups:
- AC Voltage
- DC Voltage
- A (Ampere)
- Resistance
Your specific multimeter may have even more types of settings, but that would go into too much detail for this blog post. The setting for AC Voltage is used to measure alternating current. That is what you use in your home. The setting for DC Voltage is used to measure Direct Current, the voltage you get from a battery. DC is used in your lawnmower, your car, and in almost all electronic devices to power it. If it runs from the mains, there will be some electronic inside that converts the AC mains supply to a DC voltage to power the device.
The Ampere setting is to measure the current. Some devices can only measure the DC current, and some can also measure the AC current. The last main type is Resistance. This is used to measure the Resistance of something. In your lawnmower case, you can use this to check if a cable is ok or if it is broken.
If we focus on the DC Voltage, there are two types of Digital Multimeters. One type of multimeter has only one setting for DV Voltage. The other has many different settings for it. If you have different settings for it, you can see that they are meant for a certain DC voltage range. For example, 0 to 200V, 0 to 20V, and depending on the device, many different ones.
In the case of your lawnmower, you know that the voltage should be around 12 Volt. Use the setting that can handle this voltage a best as possible. In the case of the example, it would be the 0 to 20 Volt setting. Always make sure that the maximum voltage is larger than the voltage you expect to measure. If you do not know the voltage you are going to measure, start with the biggest setting and move downwards until you found the best one.
If your multimeter has only one DC Voltage setting, your multimeter has a built-in feature that will find the best internal setting. It will automatically start with a high setting and then go down until it finds the best one. This goes so fast that you almost do not notice this.
● Step 3: Connect the multimeter to the battery.
Now that the multimeter is ready, you will have to connect it. Depending on the battery size, Most lawnmowers use a 12 Volt battery, but some use a 6 Volt one. For the measurement, this does not matter, but in case you want to purchase a replacement battery, this is extremely important. Attach the two probes in the multimeter. Take care that you use the correct ports on your multimeter. You have to use a specific port for the red probe, which differs between using the DC, AC, A, and resistance mode. How many ports your specific multimeter can differ. Some combine them, so you will see fewer ports. For your lawnmower, we will use the DC functionality on the multimeter to ensure that the red wire is plugged into the port. The black probe can be attached to the common port, which is often shared for multiple settings.
After connecting the wires with the multimeter, the next step is to check the terminals’ locations on the battery. Hold the free ends of the multimeter probes in your hand. You can have probes with a needlepoint or ones that have a crocodile end. The last ones are handy as you can clamp them on the battery terminals. The needle ones need to be held against the battery terminals.
Attach or help the two probes against the battery. The best way is to attach the red probe to the + sign on the battery and the black probe against the battery terminal. If you mix those two, it is not a big problem. You will only see that the voltage in the display will have a – sign in front of it.
Tip: If you are not clear about the battery’s positive and negative terminals, look for the representations mentioned on the battery terminals as (+) or (-) representing the positive and negative terminals, respectively. If you cannot see the signs, your battery might be covered with dirt or debris. Clean the battery with a dry piece of cloth or rag to reveal the terminal signs. In some batteries, the terminals are colored to indicate the charge affinity. Red stands for positive, and black or brown indicates negative.
● Step 4: Check and interpret the multimeter reading
When you connect the probes to the battery terminals, you will see a reading on a multimeter. This will tell the voltage of the battery and indicates the battery’s health.
If you measure a voltage around 12.6 Volt, it means that the battery is looking healthy. If you measure a higher voltage than 13 Volt, it is strange. It could mean that the battery is being charged, it is a different battery type, or there is something wrong with it. If you do not measure anything, or close to 0, the battery is dead. If you see a reading from 6 – 9 Volt, it means that the battery needs charging. A low voltage can mean that the battery condition is poor, but that is impossible to say at this time. The first step is to charge the battery. If you measure a low voltage after you have charged the battery, it means that it is in poor condition and needs to be replaced.
The first type has some build-in mechanism that checks the level
Now that you have your battery out, place it on a table. If there are terminal caps, remove them. If they need cleaning, wipe them off with a piece of cloth without contacting the terminals with each other. Take out the multimeter. It will have a rotating knob. Turn it around to set it on DC point. It means direct current as mower batteries are DC. 2 connecting wires come with the multimeter. Connect them, each matching the color code or the symbol on the multimeter. The red one is for the positive terminal. The black one is for the negative terminal.
● Step 5: Measure again with a load attached
If the multimeter reading was close to 12.6 Volts, it means that the battery was charged and looks fine. But we have only checked it with no load. It is still possible that the reading is fine, but the battery is not in good shape. This is why we are going to test it again while it is being used.
The easiest way is to turn on the lights of the lawnmower. If your lawnmower does not have lights or another electrical attachment that you can use, you can use it to start the engine. If you can start the engine with no problems, the battery should be fine. If you notice that it has problems and is dead quickly, it means that the battery needs to be replaced.
If you have turned the lights or another attachment on, measure the voltage again. If you see a slightly lower voltage, it is fine. This is normal, as the battery is being used. If you see that the voltage is really lower, it means that the battery can not deliver enough power. In that case, you will need to replace it. You will probably see that the lights will have a reduced brightness, and starting the engine will be more difficult.
Additional tips:
Ensure all the safety precautions when dealing with such types of works to avoid personal or property damage.
- Damaged battery: If your battery has been damaged, such as cracks in battery casing, swollen or bulging battery, or broken battery terminals posts, you should always replace it.
- Charging: Most of the lawnmowers are equipped with a rechargeable battery, so keep it charging for an additional hour and retest if your DMM reveals a reading of less than the battery’s voltage. Replace it on a priority basis.
- Water level: You should check the water level in the liquid Lead batteries. Your battery should be filled to the optimum level. If the water level is low, that may cause damage to the cells.
- Short circuit: Never form a connection between the battery’s terminals with a metallic tool. This will short the terminals, and the battery will die.
Frequently asked questions:
1. How often should you replace the lawnmower battery?
The service life of your mower battery is normally two to three years. But a well-maintained battery will serve up to four years. If you notice some abnormalities in your mower’s battery like cracks, leaks, and broken post terminals, then your battery may have reached the end of its useful lifespan. It is preferable to replace it as it will no longer work properly.
2. My charger does not charge my battery
If the battery is dead, it does not have any energy. Most modern chargers will not charge as they need a minimal amount of energy in the battery to know what type it is. To make the battery charge again, you need to precharge it. This can be done with an older simple charger, or you can use another battery to charge it a little bit. See step 2 for more information on this.
3. Why should you trickle charge a battery?
Trickle charging a battery is a process where you keep the battery fully charged. When you store a battery, it will lose some of its charge over time. A modern charger with a trickle charge function will measure this and keep the battery charged and in an optimal state.
4. Do I need to disconnect the battery before charging
No. There is no need to disconnect the battery before charging. You can connect the charger and leave the battery cables connected. If the battery is really dead, would we advise you to disconnect it and charge it separately.
5. How do I know if my lawnmower battery is bad?
If, after starting your lawnmower, you feel the clicking and the beating sound by your engine. The most probable cause is the weak or dead battery. Inspect it further if your find irregularities like cracks and leaks on the battery. It will have gone bad. Also, test its voltage capacity with a multimeter to be sure about your finding. An engine that takes time to start is a good indication of a poor battery.
6. What will happen if I invert the terminals of my multimeter?
Even if you invert the terminals on the battery, it won’t make a difference. You will still get a numerical reading but with a negative sign. The sign shows the opposite direction of potential difference. The number will be the same. If you want to find the amperage, inverting the terminals will give you a zero value as the current can’t flow in the opposite direction.
Final remarks:
Checking your lawnmower battery with a digital multimeter is a good method to know your battery’s health. A multimeter is a cheap and readily available device to perform the task. By following the instructions from the above article, you will be able to do the job at home with ease. Take necessary precautions as mentioned for a safe job.
I appreciate the detailed steps provided in the article. It makes the process easy to understand.
Thank you for your feedback, Harry. I’m glad you found the steps easy to understand. Let me know if you have any questions about testing lawnmower batteries in the future.
The FAQ section is very helpful for answering common questions about lawnmower batteries.
Thank you, Brad! I’m glad you found the FAQ section helpful for lawnmower battery questions. Let me know if there’s anything else you’d like to see covered!
Is it safe to leave the battery attached to the lawnmower while testing with the multimeter?
Yes, it is safe to leave the battery attached to the lawnmower while testing with a multimeter. Just ensure all electrical attachments on the mower are off before testing. Happy testing!
Can a multimeter be used for other battery types as well?
Yes, a multimeter can be used for different battery types, including lawnmower batteries. Follow the steps outlined in the article to test your lawnmower battery’s condition.
Can I use a multimeter to test other components of the lawnmower?
Yes, a multimeter can be used to test other components of the lawnmower. It is a simple and effective method to check the battery’s condition and overall health.
How long should I wait after charging the battery to test it again with the multimeter?
After charging the battery, you should test it immediately with a multimeter. This will give you an accurate reading of the battery’s health. Waiting too long may cause the battery to lose some power.
What should I do if the multimeter reading is not within the expected range?
Hi Juanita, if your multimeter reading is not within the expected range, it may indicate an issue with your lawnmower battery. Check the connection and condition of the battery before considering a replacement. Keep me posted on your progress!
Very helpful guide. I will definitely try this method with my lawnmower battery.
Glad you found the guide helpful, Derrick! Testing your lawnmower battery with a multimeter is a great way to ensure it’s in good condition. Good luck with your lawnmower maintenance!
Very informative. I didn’t know you could use a multimeter for this purpose.
Thank you, Johnni! I’m glad you found the information informative. Multimeters are versatile tools that can be very helpful in various scenarios. Feel free to reach out if you have any more questions.
I like how the article includes additional safety precautions to follow while working with the battery.
Thank you, Sheila! I’m glad you found the additional safety precautions helpful. Let me know if you have any more questions about testing lawnmower batteries.
How do I know if my multimeter is set up correctly for testing the battery?
Hi Terry, make sure to set your multimeter to the DC voltage setting and connect it to the battery terminals. A reading around 12.6 Volts indicates a healthy battery. Follow these steps for accurate testing.
Great tips on what to do if the battery is damaged or needs replacement.
Thank you, Norman Ray! Glad you found the tips helpful. Checking your lawnmower battery regularly with a multimeter is a great way to ensure it stays in good condition. Keep up the good work!
I never knew testing a lawnmower battery could be this simple. Thank you for the clear instructions.
I’m glad you found the instructions helpful, Bob! Let me know if you have any more questions about testing lawnmower batteries. Happy mowing!
Does the voltage measurement change for different types of lawnmowers?
Different lawnmowers may have different voltage measurements, depending on whether they are gas-powered or electric. Use a multimeter to check the voltage of your mower’s battery for accurate results.
Thank you for explaining the importance of maintaining the lawnmower battery.
Thank you for your feedback on the importance of maintaining the lawnmower battery. I’m glad you found the information useful. Let me know if you have any other questions.
This article is a lifesaver! I was struggling with my lawnmower battery, and now I know what to do.
I’m glad to hear that the article was helpful for you! Keeping your lawnmower battery in good condition is essential for a well-functioning mower. Thank you for reading!
Does temperature affect the multimeter readings when testing the battery?
Yes, temperature can affect multimeter readings when testing the battery. It is recommended to conduct the test at room temperature for accurate results.
Great explanation on how to use a multimeter with a lawnmower battery!
Thank you, Terrence! I’m glad you found the explanation helpful. Let me know if you have any more questions.
Thank you for breaking down each step clearly. It’s much appreciated for someone like me who is new to this.
Thank you for your feedback, Jar! I’m glad the steps were clear for you as a beginner. If you have any more questions, feel free to ask. Happy mowing!
I didn’t realize you could use a multimeter to check the battery’s health. Very interesting read!
Thank you, Tracy! Using a multimeter to test the battery’s health is a simple way to ensure your lawnmower runs smoothly. I’m glad you found the information interesting.